Print
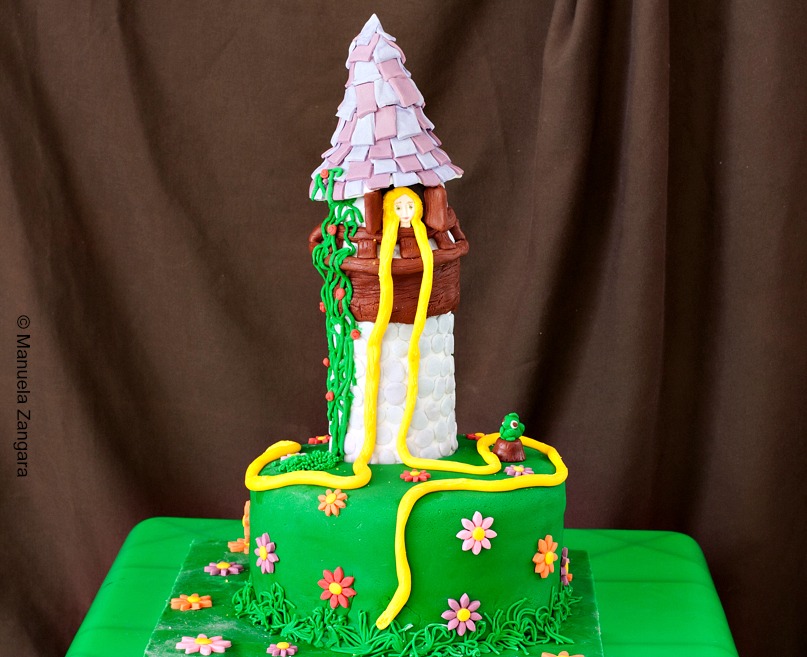
Rapunzel Cake
A tutorial on how to make a Rapunzel Cake with fondant for your kid's birthday party!
Cook Time 1 hour
Total Time 1 hour
Servings 12 -15
Ingredients
- 2 Yogurt Cakes baked in 1x23 cm – 9 inches and 2x10 cm – 4 inches round pans
- Coloured Fondant
- Edible glue
- Gel colours
- Icing for crumb coating
- Icing Sugar/corn starch
- Plastic Tube to make the tower
- Cardboard to make the cone
- Small round plastic container for the “house”
Instructions
-
Start by baking the cake. I made 2 yogurt cakes and froze them.
-
Then colour all the fondant you are going to need. Dip a toothpick in the gel colour and then rub it onto the piece of fondant you want to colour. Then knead until uniformily combined. Alternatively, you can purchase coloured fondant and just use what you need.
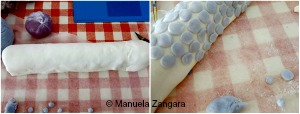
Tower
-
I started by making the tower. I used a plastic tube as the base and then I covered it with a sheet of white fondant. Then I made some small balls with grey fondant, I flattened them with my finger and I stuck them to the tower with edible glue. Then I left the piece to dry.
-
To make the house, I used a small round take-away container and I I covered it with a sheet of white fondant. Then I left it to dry.
-
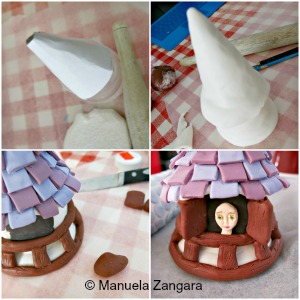
To make the roof, I made a cone with cardboard and I covered it with a sheet of white fondant. Then I left it to dry.
-
I then attached all the pieces with edible glue. When stuck, I continued to decorate them.
-
I made the wood pieces with brown fondant and stuck them to the tower.
-
I made some “tiles” using 2 different colours of fondant and attached them to the roof with edible glue.
-
I used a thin piece of black fondant to make the window and then I made the shutters with brown fondant. Then I left it to dry.
-
Now you can make Rapunzel’s head by rolling a small ball. Pinch the nose out, and form the eye sockets, forehead, and cheekbones. Then, shape the chin and the mouth. Handle it with care so you don’t deform the head and stick it to the window. Do not make the hair now!! Let it dry and then “paint” the face with food colours.
Flowers and Pascal
-
Make the flowers using a cookie cutter and keep aside.
-
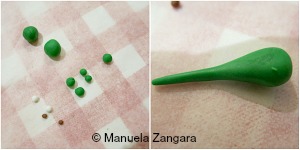
Make Pascal by rolling green, white and black balls of fondant of different sizes. To make the body, make one of the biggest balls into a tear drop shape, then roll out one end until it gets really long and roll it on itself to make the tail.
-
Make the head, attach the eyes and attach the head to the body.
-
Make the hands and feet using the smaller green balls and attach them to the body.
-
To make the spine, roll out the last small ball into a thin serpent. Attach it to the body and make indents using a knife. Let it dry out. I then attached Pascal to a piece of brown fondant shaped like a tree log.
Assembling
-
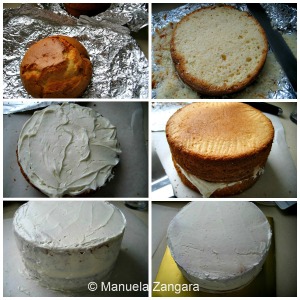
The day before the party I assembled the cake. I made some icing for the crumb coating (you can use your favourite icing recipe, just make sure that it is a little less dense as it needs to be smooth and you should be able to apply it easily). I took the 2 yogurt cakes out of the freezer and levelled them while still frozen with a sharp serrated knife.
-
I took a cake board, put some icing in the centre and put one cake on it Then I put a layer of icing on it and topped it with the other cake. Make sure to choose the smoothest and flattest of the cake surfaces for the cake top (it is very likely going to be the bottom of one of the cakes), this will make it easier to ice and decorate the cake. Then I crumb coated it with icing. Start from the top, then do the sides. Use a cake spatula to make sure the surface of the cake is as smooth as possible. Then put it in the fridge to harden. (You can also crumb coat it first and then transfer it to the cake board). This coating will make the fondant top look smooth and it will ensure that no crumbs will be visible through it.
-
When the icing has dried, make a hole with a sharp knife the same size as the tower. Make sure the hole is not bigger than the tower, or the tower will not stand properly.
-
Then roll out the green fondant and cover the cake with it. Remember to make a hole for the tower! Smooth it with a fondant smoother and cut out the excess.
-
Now carefully position the tower in the hole.
-
Then apply all the decorations on the cake securing them with some fresh fondant and/or edible glue/toothpicks.
-
I also made Rapanzul’s hair rolling out long strips of yellow fondant.
-
I made some “grass” using a clean garlic press and a vine rolling out thin strips of green fondant.
-
And there you have your Rapunzel Cake!