Print
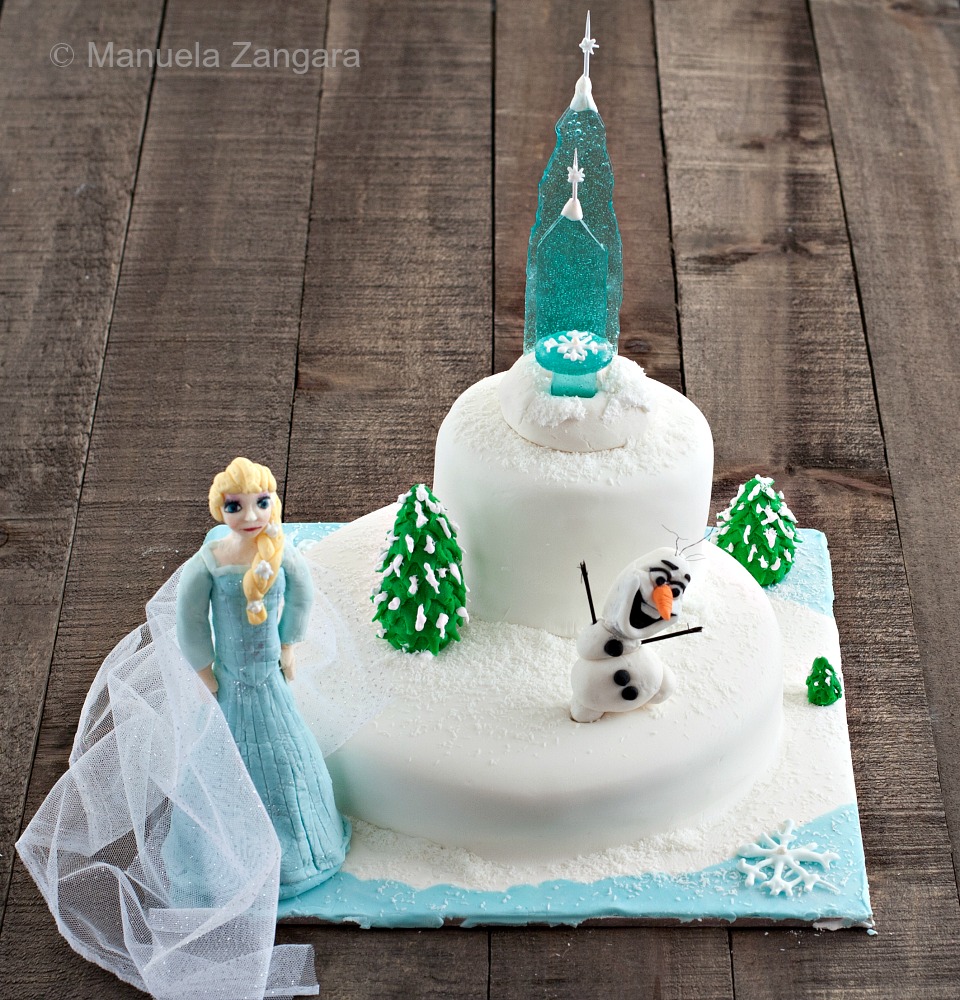
Frozen Cake
A tutorial on how to make a Frozen Cake for your kid's birthday party!
Ingredients
Cake, Elsa, Olaf and Trees
- 1 ½ Yogurt Cakes baked in 1x23 cm – 9 inches and 2x10 cm – 4 inches round pans
- Coloured Fondant
- Edible glue
- Gel colours
- Fabric for the cape
- Icing for crumb coating
- Icing Sugar/corn starch
- Coconut powder
Castle
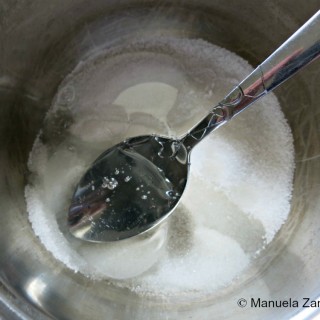
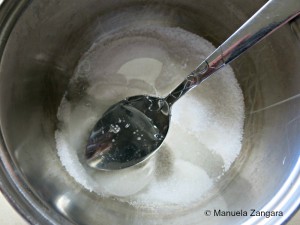
- 1/3 cup sugar
- 2 tbsp glucose syrup
- 1 tbsp water
- Blue food colouring
- Royal Icing
Instructions
-
Start by baking the cake. I made 3 yogurt cakes and froze them.
-
Then colour all the fondant you are going to need. Dip a toothpick in the gel colour and then rub it onto the piece of fondant you want to colour. Then knead until uniformly combined. Alternatively, you can purchase coloured fondant and just use what you need.
Elsa
-
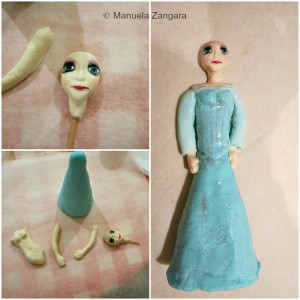
I started by making Elsa. I made her head by rolling a small ball. Pinch the nose out, and form the eye sockets, forehead, and cheekbones. Then, shape the chin and the mouth. Handle it with care so you don’t deform the head! To make the torso, roll a proportionate amount of fondant into a teardrop shape. Flatten out the small end to form the waist. The thicker part will be the shoulders. To make the arms, roll 2 same sized balls. Then roll each ball into arms with one end thinner than the other. Bend the arms into whatever pose you like and then shape the wrist and hand. To make Elsa’s gown, use some blue fondant for the skirt. Then insert a wooden stick into the top of the skirt and insert the torso on it to create the body. Roll a thin piece of blue fondant to create the top and attach it to the torso using water or edible glue. Using an exacto knife, cut small lines vertically and across the top and gown. Using a brush add some sparkles to the gown.
-
Use some toothpicks and water or edible glue to stick all the other pieces together. You can draw her lips and eyes with some edible ink pens (I painted them with a brush and gel colours diluted with Vodka).
-
When Elsa is dry and solidified, make her hair. Simply get some light yellow fondant and make a plait. Stick it to the back of her head with edible glue. Roll smaller pieces of the same fondant to make the rest of the hair. Be sure to make her one ear as the other is covered with her hair! Decorate the plait with some Royal Icing stars/snowflakes.
-
Using some edible glue, attach a piece of fabric to her back to make the cape. Then let Elsa dry completely!
Olaf
-
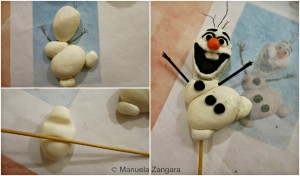
Roll different sized balls of white fondant. To get the shape/proportions correct, just use a picture of Olaf! Attach the balls to each other with a toothpick.
-
Shape the head/mouth/nose area with your fingers and a bamboo skewer. Make sure to recess the area of the mouth, leaving adequate white fondant on the sides. Add some black inside the mouth (in the recessed area) and the white tooth.
-
To make the eyes, roll a little white ball, then add a smaller black ball on the top. You can use a little bit of black for the border of the eyes and eyebrows.
-
Roll 3 black balls to make the buttons and attach them to the body with some water or edible glue.
-
To make the nose, use some orange fondant to make a “carrot”.
-
To make the hands, I used 2 toothpicks and I coloured them black. I also cut open the edges to make the “hands”.
-
For the hair, I used some black twine that I found in the craft shop… it’s the same one used to make bracelets.

Trees
-
Roll some green fondant into a teardrop shape.
-
Using small scissors, make some cuts along the sides to make them look like branches and leaves.
-
Pipe some Royal Icing on the top to make it look like snow.
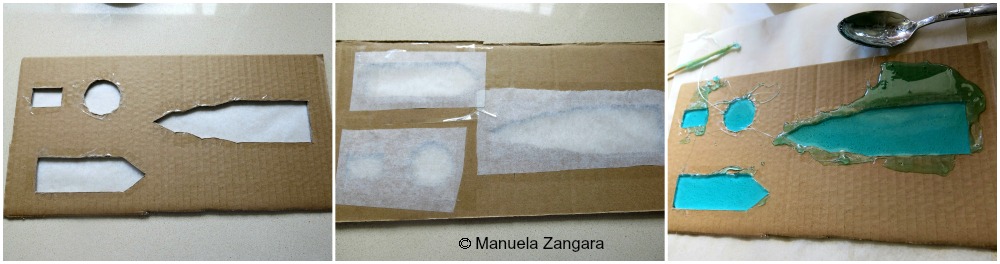
Castle
-
This was my husband’s idea. He made a mould for the 4 pieces. He then lined them with tape and baking paper and got them ready for the sugar to be poured.
-
-
Keep cooking the mixture until it reaches 150°C – 300°F (hard crack stage). Then put the fire off and quickly mix in the liquid blue colour (I used 1 or 2 drops). Still working fast, pour the sugar mixture onto the moulds, trying to level them.
-
Let them dry completely before trying to unmould them. To unmould them, cut the mould with scissors… be delicate or the sugar pieces may break!
-
I had some syrup left and made some lollipops with it.
-
When the castle pieces are dry, add 2 toothpicks (I coloured them white) at the top of the front and back pieces. To attach them, simply use some edible glue and white fondant. If you want, you can stick 2 Royal Icing snowflakes on them too.
Assembling
-
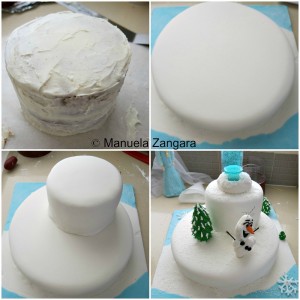
The day before the party I assembled the cake. I made some icing for the crumb coating (you can use your favourite icing recipe, just make sure that it is a little less dense as it needs to be smooth and you should be able to apply it easily). I took the 3 yogurt cakes out of the freezer and leveled them while still frozen with a sharp serrated knife.
-
I took a cake board, put some icing in the centre and put the biggest cake on it (smooth side up). Then I crumb coated it with icing. Start from the top, then do the sides. Use a cake spatula to make sure the surface of the cake is as smooth as possible. Then put it in the fridge to harden. (You can also crumb coat it first and then transfer it to the cake board).
-
Then I put a layer of icing on one of the small cakes and topped it with the other small cake. Make sure to choose the smoothest and flattest of the cake surfaces for the cake top (it is very likely going to be the bottom of one of the cakes), this will make it easier to ice and decorate the cake. Then I crumb coated it. When the cake is all covered in icing, put it in the fridge to harden. This coating will make the fondant top look smooth and it will ensure that no crumbs will be visible through it.
-
When the icing has dried, roll out the white fondant and cover the smaller cake with it. Keep it aside. Now roll out some more white fondant and cover the bigger cake and board with it. I also added some light blue at the bottom to give it a little touch of colour and make it look like ice. Smooth it with a fondant smoother and cut out the excess.
-
Now position the smaller cake on top of the bigger cake. You can use a bamboo skewer to make sure it doesn’t move.
-
I then applied all the decorations on the cake securing them with some fresh fondant and/or edible glue/toothpicks.
-
I finished the cake off with some coconut powder to simulate fresh snow.