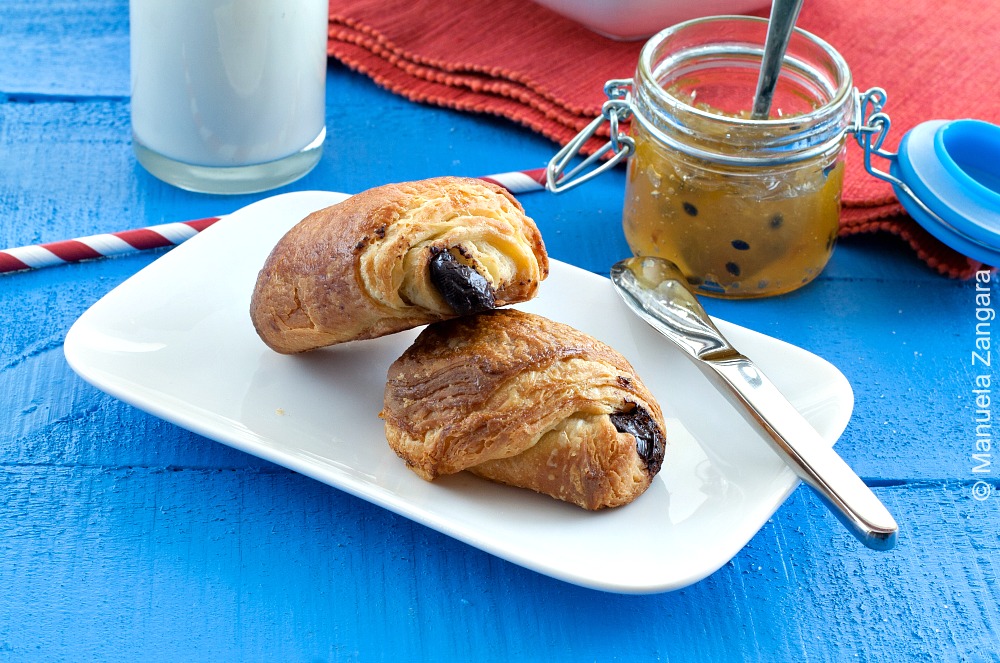
Pain au Chocolat
The recipe for the perfect French Pain au Chocolat: flaky, buttery, soft yet crunchy on the outside!
Ingredients
- For the dough
- 750 gms – 3 cups all purpose flour
- 14 gms – 2 packets yeast
- 110 gms + 2 tsp sugar
- 70 gms – 5 tbsp milk
- 18 gms – ¾ tbsp salt
- 53 gms – 3 ¾ tbsp butter at room temperature
- 23 gms – 1 ½ tbsp milk powder
- 300 gms – 1 ¼ cup water
- For the beurrage
- 490 gms – 4 1/3 sticks butter divided in two (at room temperature)
- For the egg wash
- 2 eggs
- 1 egg yolk
- 1 pinch of salt
Filling
- Dark chocolate sticks
Instructions
-
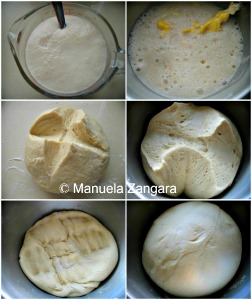
Sift the flour in the bowl of an electric mixer fitted with a hook attachment. Add the salt, 110 gms sugar, milk powder, milk and the 53 gms – 3 ¾ tbsp of soft butter.
-
Dissolve the yeast in half of the water (make sure it is lukewarm) and the 2 tsp of sugar and keep it aside to activate. When frothy, add it to the rest of the ingredients in the bowl.
-
Knead the dough only until all the ingredients are just combined (do not overwork it as you do not want to develop the gluten in the flour). Add the remaining water as required to obtain a smooth dough.
-
When ready, make it into a ball and put it in a bowl, cover the bowl with cling wrap and let the dough rise for 1 to 1 ½ hours, or until the dough doubles in size.
-
Punch down the dough, pushing down on it with your fist to give it its initial size. Cover with cling wrap again and store it in the fridge for 1 hour to 1 hour and 15 minutes.
-
Punch it down once more to its initial size.
-
At this point you can either continue with the recipe or store the dough in the refrigerator for the next day. In either case, first chill the dough in the freezer for 30 minutes.
-
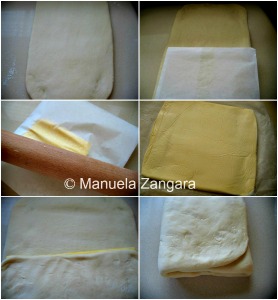
When you're ready to continue with the recipe, take the dough out of the fridge and roll it into a long rectangle. Cover it in cling wrap and put it back in the fridge while you prepare your butter for the beurrage.
-
To make things easier, take 2 pieces of baking paper and measure them against the rolled out dough. You want to make 2 paper rectangles, each that measures 2/3 of the rolled out dough. Make a “packet” out of it so you can roll your butter inside it, without it escaping from all sides. (The packet is made by folding each paper in half. Then for about 1 inch/2.5cm on the 3 open edges, fold them inward starting with the 2 sides.)
-
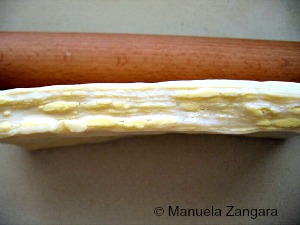
Now divide your butter in 2 equal pieces and put them into the 2 open paper packets. Close the paper packets and roll it from the outside until it fills the packets completely. – The original recipe calls for butter from the fridge but I actually used the butter at room temperature and it worked just as well. Once the packets are evenly rolled, put them back in the fridge to firm up again. Make sure that both your rolled butter and rolled dough are very cold before proceeding or you will end up with butter everywhere and your pains au chocolat will not come out.
-
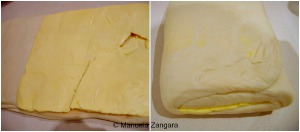
When your butter has firmed up again remove the paper from only one of them, take your cold dough out of the fridge and position the rectangle of butter on the lower two thirds of the rectangle. Now give it a simple turn (which means folding the bottom third up – butter on butter – and then folding the top third of the dough down, over itself). When looking at the dough now, you should see 3 layers. The steps are shown in the pictures.
-
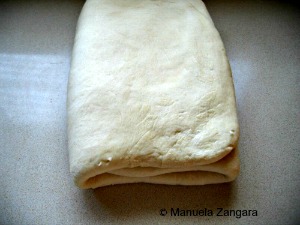
Roll out the dough into a long rectangle again and repeat the same simple 3 fold turn, but without adding any more butter.
-
Now cover the folded dough in cling wrap and put it in the freezer for 30 minutes, then in the fridge for 1 hour.
-
Now roll out the dough again into a long rectangle approximately the same size as before, and repeat the same simple 3 fold turns, the first one with the remaining butter and the next one without.
-
-
Make sure you flour your work surface regularly so that the dough doesn't stick. And use a brush to remove the flour when you fold the dough.
-
Now you should have made 4 single turns in all, one with added butter, one without, a rest period, then one turn with the second packet of butter and another with no added butter.
-
The dough is now ready, but I suggest you leave it in the fridge overnight to rest so it will be much easier for you to shape your pains au chocolat (and the butter will firm up again and it won’t leak everywhere. Don’t be hasty, you don’t want to ruin all your hard work!).
-
The next day, roll the dough into a 2.5 mm – 0.1 inch thick sheet (if the dough starts to become warm, put it back in the fridge to cool down). At this point, I divided it into 3 parts and started working on 1 of them while keeping the rest (covered) in the fridge.
-
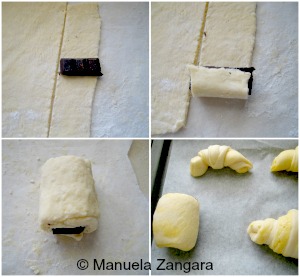
Cut rectangles 20 cm – 8 inches long and 10 cm – 4 inches wide. Put a chocolate stick (10 cm – 4 inches long) at the bottom of each rectangle and roll them from the base. Place them, seal side down, on a baking sheet covered with baking paper, leaving 5 cm – 2 inches of space between them.
-
Let them rise for 1 ½ to 2 hours at room temperature. Make sure to loosely cover them with cling wrap so the surface doesn’t dry out.
-
Repeat for the rest of the dough.
-
Once the pains au chocolat have risen, brush them with the egg wash and bake them for 20 minutes in an oven which has been preheated to 220°C – 430°F and lowered to 190°C – 375°F immediately after putting the pains au chocolat in.
-
The pains au chocolat may seem too dark to you but it's important to bake them for that long or they will not be as soft and airy as you want them
-
Let them cool for at least 10 minutes before eating them!
Recipe Notes
As making pain au chocolat is quite time consuming, I suggest you make the above full dose. You can freeze them right after shaping them (before they rise), by wrapping them individually in cling wrap and then putting them in a ziploc bag. When you want to eat them, take them out the night before and let them come back to room temperature and then rise and bake as per the instructions above.
You can also bake all of them the day you make them and then, after they cool down, freeze them. When you want to eat them, simply take them out of the freezer and put them in a pre-heated oven at 190°C – 375°F for 5 minutes.