Print
Frozen Cake Recipe
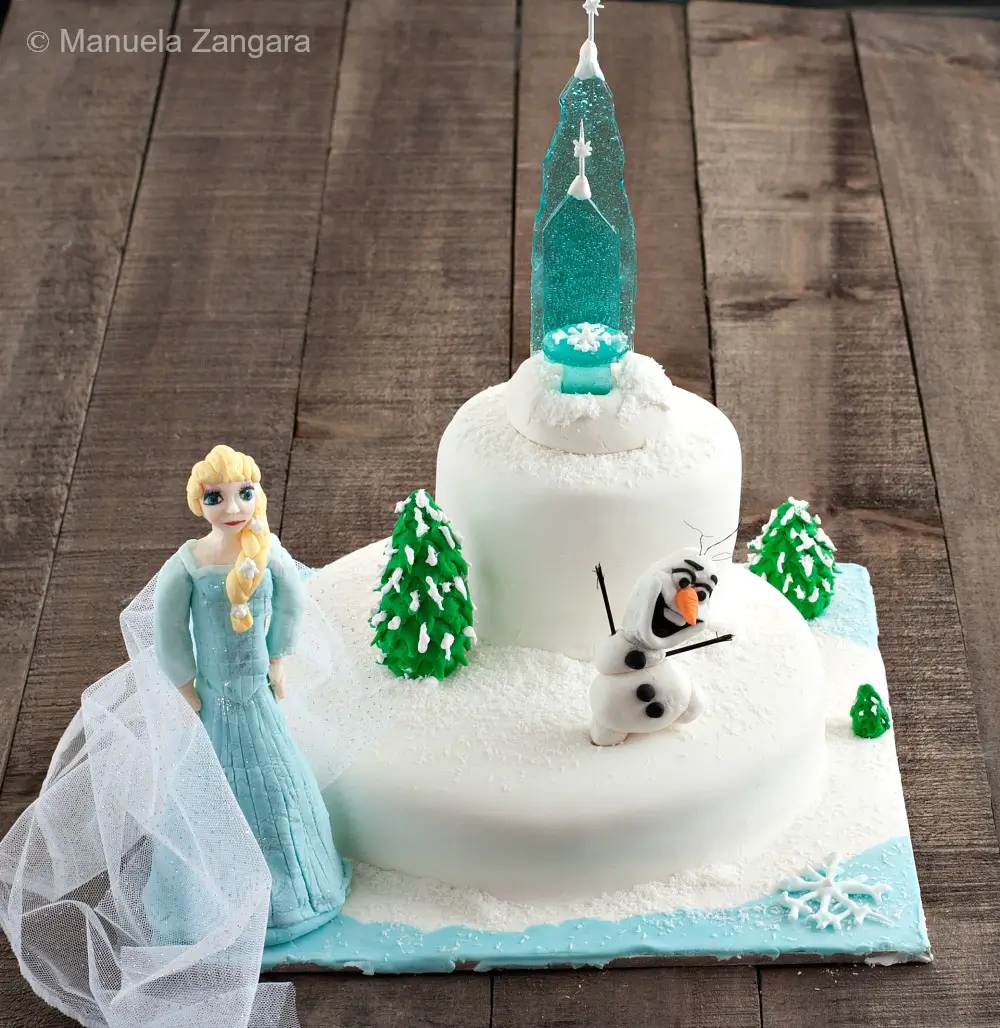
Soft yoghurt layers covered in pale blue fondant create a Frozen Cake with a simple winter style, ideal for parties where children want a dessert inspired by their favourite characters and icy colours.
Ingredients
Cake, Elsa, Olaf and Trees
- 1 ½ yoghurt cakes – baked in 1 × 23 cm – 9 inch and 2 × 10 cm – 4 inch round pans
- coloured fondant
- edible glue
- gel colours
- fabric – for the cape
- icing for crumb coating
- icing sugar or corn starch – for dusting and rolling fondant
- coconut powder
Castle
- ⅓ cup sugar
- 2 tbsp glucose syrup
- 1 tbsp water
- blue food colouring
- Royal Icing
Instructions
-
Bake your cakes ahead of time. I made 3 yoghurt cakes and froze them for easy assembly.
-
Colour all the fondant you plan to use. Dip a toothpick into the gel colour, rub it onto the fondant, and knead until the colour is evenly combined. Pre-coloured fondant can also be used in the amount needed.
Elsa
-
Shape Elsa’s head by rolling a small ball of fondant, forming the nose, eye sockets, forehead, and cheekbones, then shaping the chin and mouth carefully so the head does not deform.
-
Roll a teardrop shape for the torso, flatten the narrow end to create the waist, and leave the wider end for the shoulders.
-
Roll 2 equal balls of fondant and shape them into arms with one thinner end. Bend each arm into position and form the wrists and hands.
-
Roll blue fondant for the skirt to form the bottom of the gown. Insert a wooden stick into the top of the skirt and attach the torso with water or edible glue. Roll a thin piece of blue fondant for the top part of the gown, attach it to the torso, and add vertical and horizontal scoring with an exacto knife.
-
Secure the parts with toothpicks and water or edible glue. Paint the lips and eyes using edible ink pens or a fine brush dipped in gel colours mixed with vodka (the lips and eyes can be painted using a brush dipped in gel colours mixed with vodka).
-
Once dry, make the hair with light yellow fondant. Roll a plait and smaller pieces for the rest of the hair. Form one ear, as the other will be covered. Add Royal Icing stars or snowflakes to decorate the plait.
-
Attach a fabric piece to the back using edible glue to create the cape. Allow Elsa to dry completely.
Olaf
-
Roll different sizes of white fondant balls for Olaf’s body, using a reference picture for proportions, and secure them with a toothpick.
-
Shape the head, mouth, and nose area using fingers and a bamboo skewer. Recess the mouth slightly (inside the indented area), leaving enough fondant at the sides. Add black fondant inside the mouth and place the white tooth.
-
Make the eyes by shaping a white fondant ball and topping it with a smaller black fondant ball. Add black borders and eyebrows.
-
Roll 3 black fondant balls for the buttons and attach them with water or edible glue.
-
Shape the nose from orange fondant into a small “carrot.”
-
Use 2 toothpicks coloured black (the toothpicks can be tinted white), trimming the ends to form fingers.
-
Add the hair using black twine (the same type used for making bracelets).
Trees
-
Roll green fondant into a teardrop shape.
-
Snip along the sides with small scissors to form branches and leaves.
-
Pipe Royal Icing on top to resemble snow.
Castle
-
Prepare 4 moulds for the castle pieces by lining them with tape and baking paper.
-
Combine sugar, water, and glucose syrup in a pot and bring to a boil.
-
Cook until the syrup reaches 150°C – 302°F (hard crack stage), turn off the heat, mix in 1–2 drops of blue colouring, and pour the syrup into the moulds, spreading it evenly.
-
Allow the pieces to dry completely before unmoulding. Cut the moulds open gently with scissors (as the sugar pieces can break easily).
-
Use any leftover syrup to make lollipops.
-
When dry, insert 2 toothpicks (the toothpicks can be tinted white) at the top of the front and back panels. Attach the panels with edible glue and white fondant. Add Royal Icing snowflakes if desired.
Assembling
-
The day before the party, prepare the icing for the crumb coat (you can use any favourite icing recipe, keep it slightly looser so it spreads smoothly and is easy to apply). Remove the frozen yoghurt cakes from the freezer and level them with a serrated knife.
-
Spread icing in the centre of a cake board and place the biggest cake on it (with the smooth side facing up). Crumb coat the top and sides, smooth the surface, and chill until firm (the crumb coat can be applied before transferring the cake to the board).
-
Spread icing between the 2 smaller cakes and stack them, choosing the smoothest sides for the top (this surface will likely become the bottom of one of the cakes). Crumb coat the stacked cakes and chill until set.
-
Roll out white fondant and cover the smaller cake. Set it aside. Roll out more fondant to cover the bigger cake and the board, adding light blue fondant at the bottom for an ice effect. Smooth and trim the excess.
-
Position the smaller cake on top of the bigger one. If needed, insert a bamboo skewer for stability.
-
Attach all decorations using fresh fondant, edible glue, or toothpicks.
-
Finish with coconut powder sprinkled around to resemble snow.