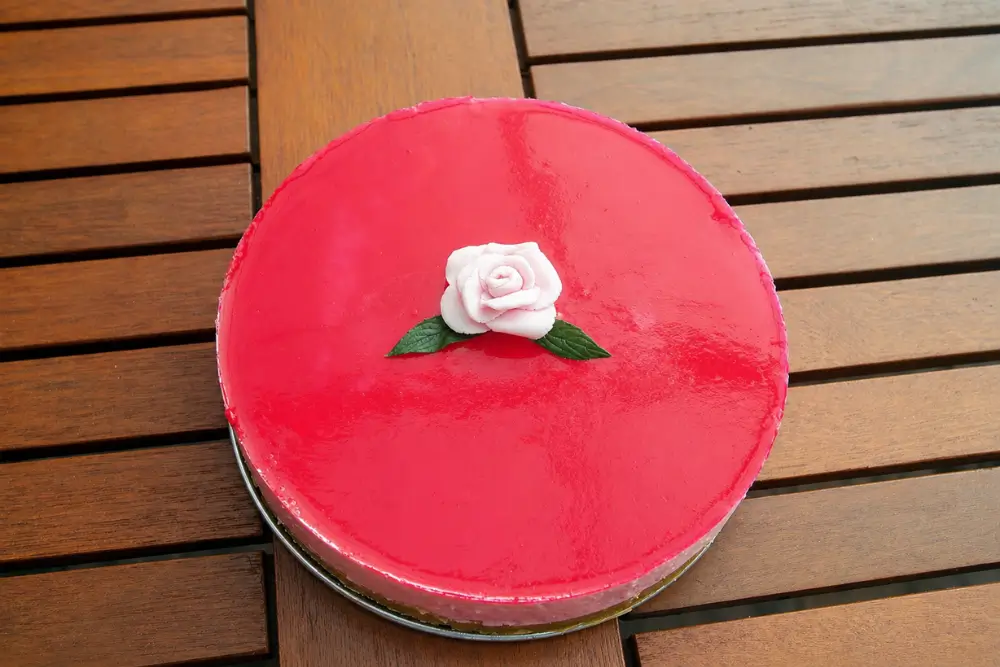
Creamy no-bake Rose Cheesecake with delicate rose syrup and a crisp biscuit crust makes a stunning centrepiece dessert. Light floral sweetness and silky layers give each slice an elegant finish.

I had some cream cheese in the fridge, but didn’t feel like making a fruit cheesecake. While looking through the pantry, I spotted a bottle of rose syrup we’d bought from the Indian grocery store.
We all love this syrup and usually drink it mixed with cold water, though I also use it in sweets from time to time. Seeing it there gave me the idea for this Rose Cheesecake.
I know cheesecake isn’t an Indian sweet, and rose with cream cheese may sound unusual at first, but the flavours work so well together.
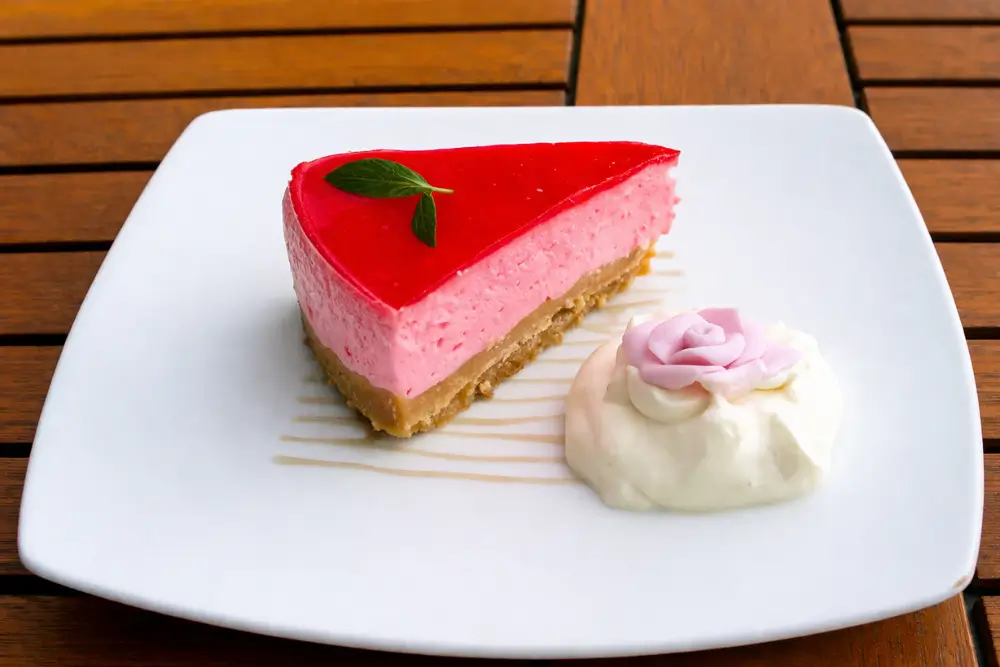
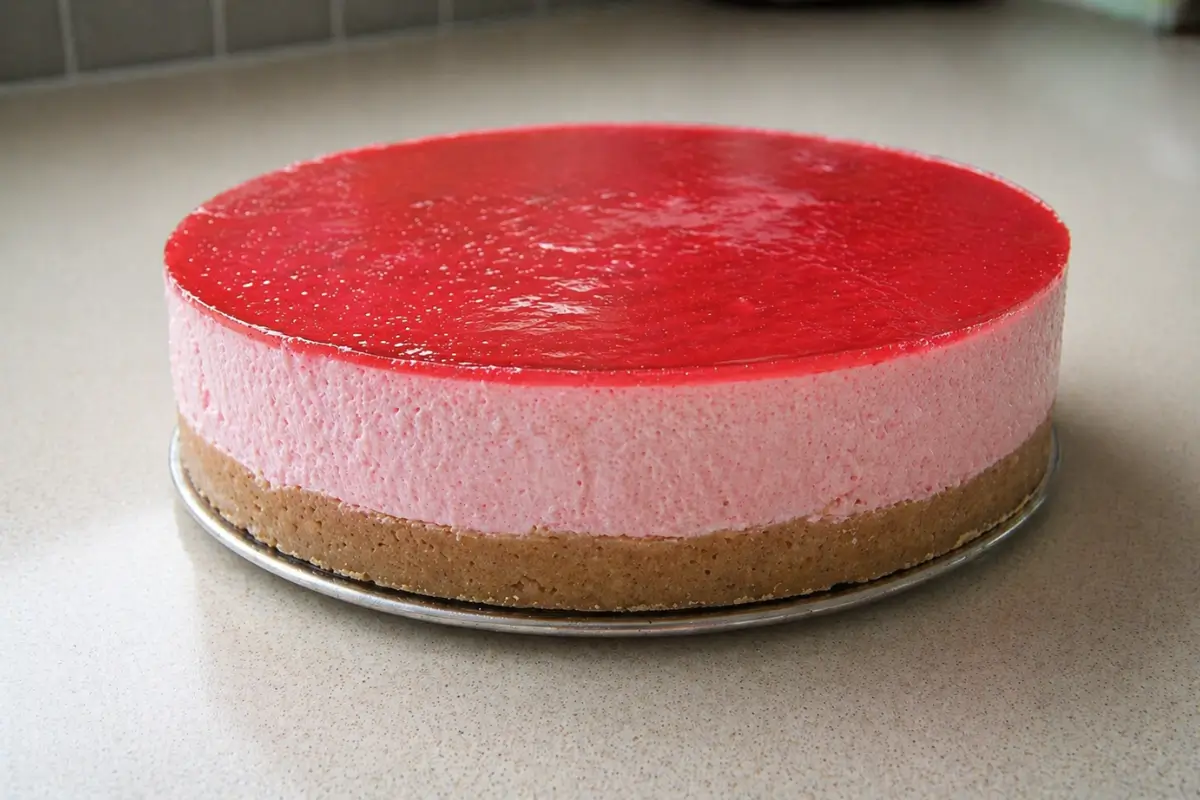
The floral syrup blends perfectly with the smooth filling, buttery biscuit base, and glossy rose topping. It’s creamy, delicate, and slightly different from the usual cheesecake flavours.
I created this recipe completely from scratch and was so happy with how it turned out that I knew I had to share it on the blog. It’s the kind of cheesecake that always gets people curious after the first slice.
Reasons to Make Homemade Rose Cheesecake
- No oven or water bath required, which makes the cheesecake much simpler and less messy to prepare.
- Smaller cheesecake size works well for birthdays, Mother’s Day, Sunday lunch, or smaller family gatherings.
- Smooth filling and glossy topping give every slice a neat finish without needing extra garnishes.
Key Ingredients for Rose Cheesecake
Rose Syrup
Rose syrup gives the cheesecake its delicate floral flavour and pale pink colour. It also creates the glossy topping, which sets gently over the chilled filling. Some rose syrups are stronger and sweeter than others, making it worth tasting yours first before adding extra.
Cream Cheese
Gives the filling its smooth, creamy texture and slight tanginess to balance the sweetness of the rose syrup. Full-fat cream cheese works best because it sets more firmly and blends more evenly once softened to room temperature.
Biscuit Crumbs
Biscuit crumbs add buttery crunch and contrast nicely with the soft filling. Scotch Fingers give a richer flavour, though digestive biscuits or graham crackers can also be used for a slightly lighter texture.
Whipped Cream
Lightly whipped cream gives the cheesecake a softer, creamier texture and keeps the filling from feeling too heavy. Thickened cream or whipping cream both work well for this recipe.
Find the complete list with measurements in the recipe card below.
How to Make Rose Cheesecake
Prepare the Base
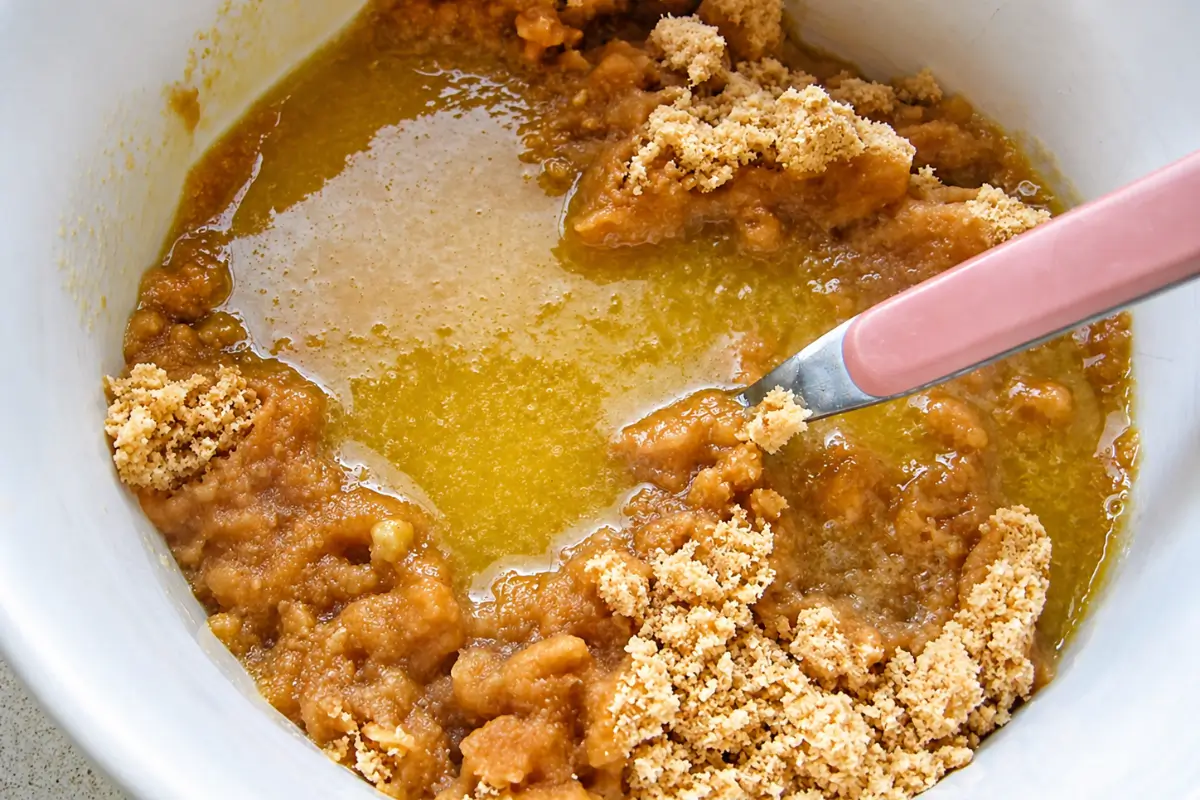
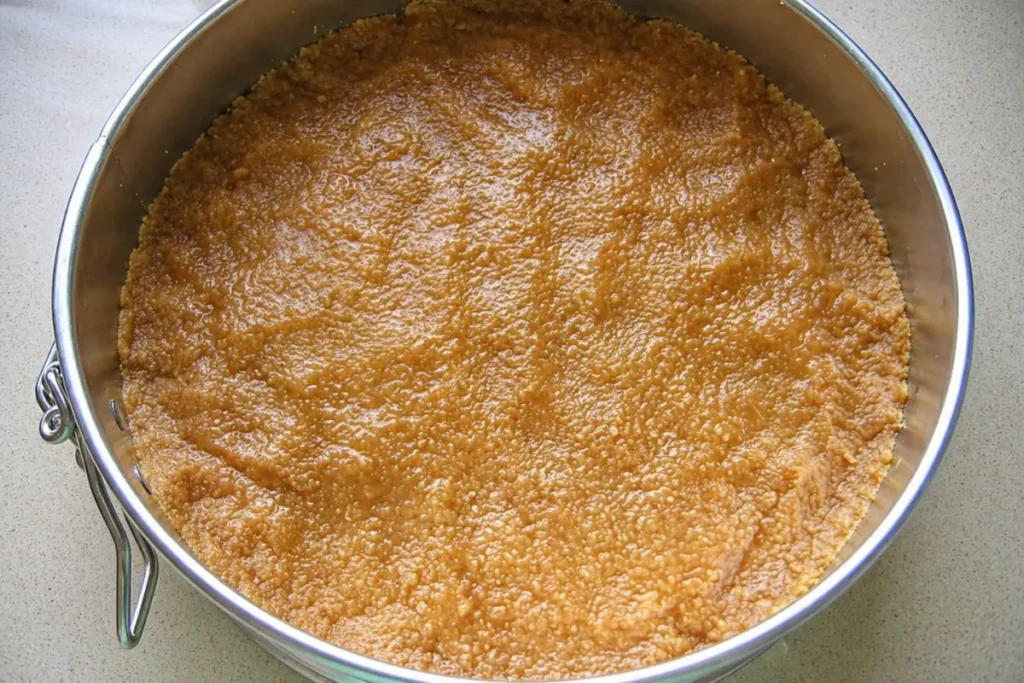
Step 1: Mix the biscuit crumbs and melted butter together in a bowl until evenly combined.
Note: The quantity indicated will make a thick base. If you prefer a thinner base, make ¾ of this dose using 1 cup biscuit crumbs and 60 g – 2 oz. melted butter.
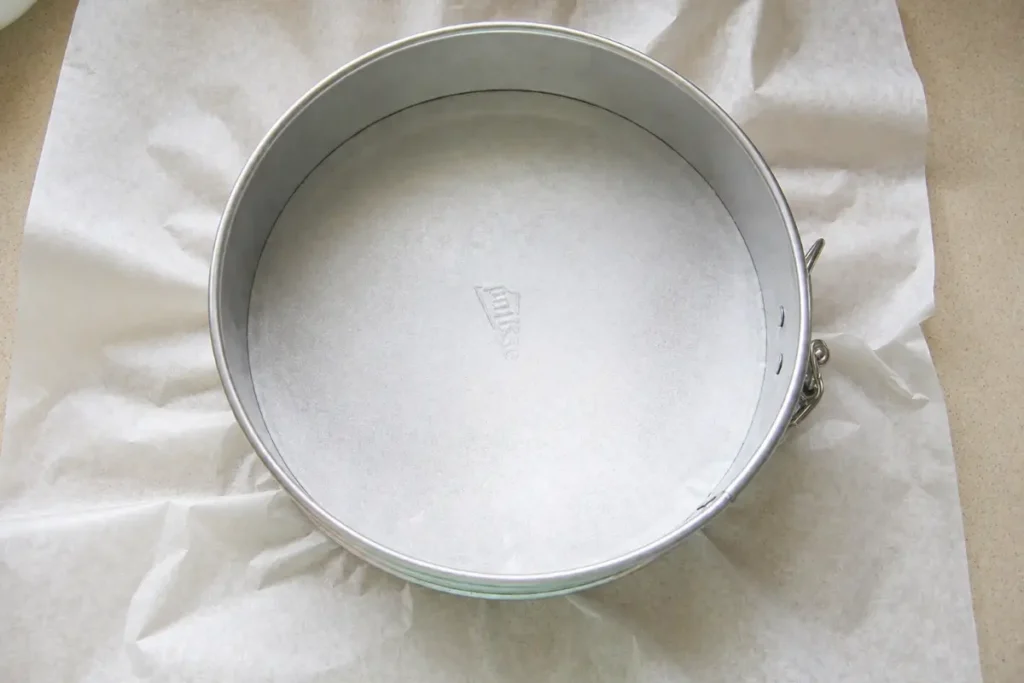
Step 2: Line the bottom of a springform pan with baking paper by unclipping the pan, placing the paper over the base, and re-clipping it. Trim away the excess paper.
Step 3: Press the biscuit mixture evenly into the pan and refrigerate it while you prepare the filling.
Make the Rose Cheesecake
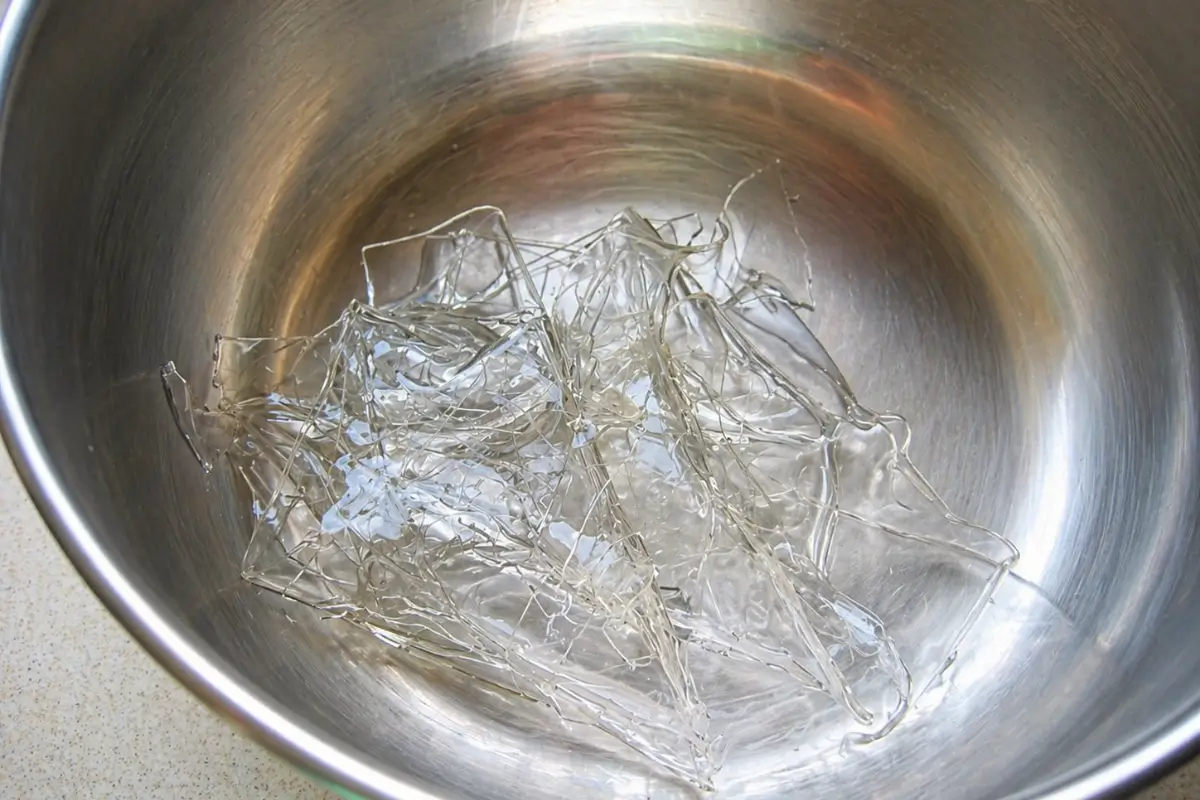
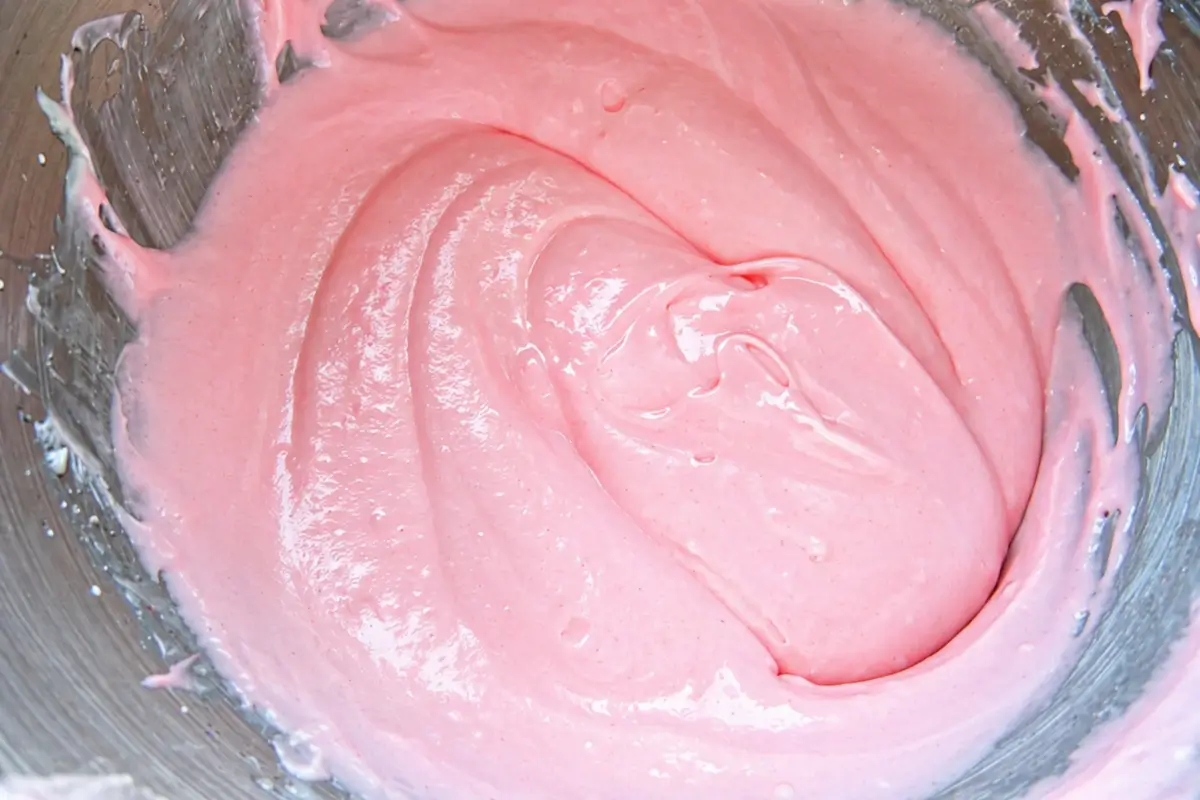
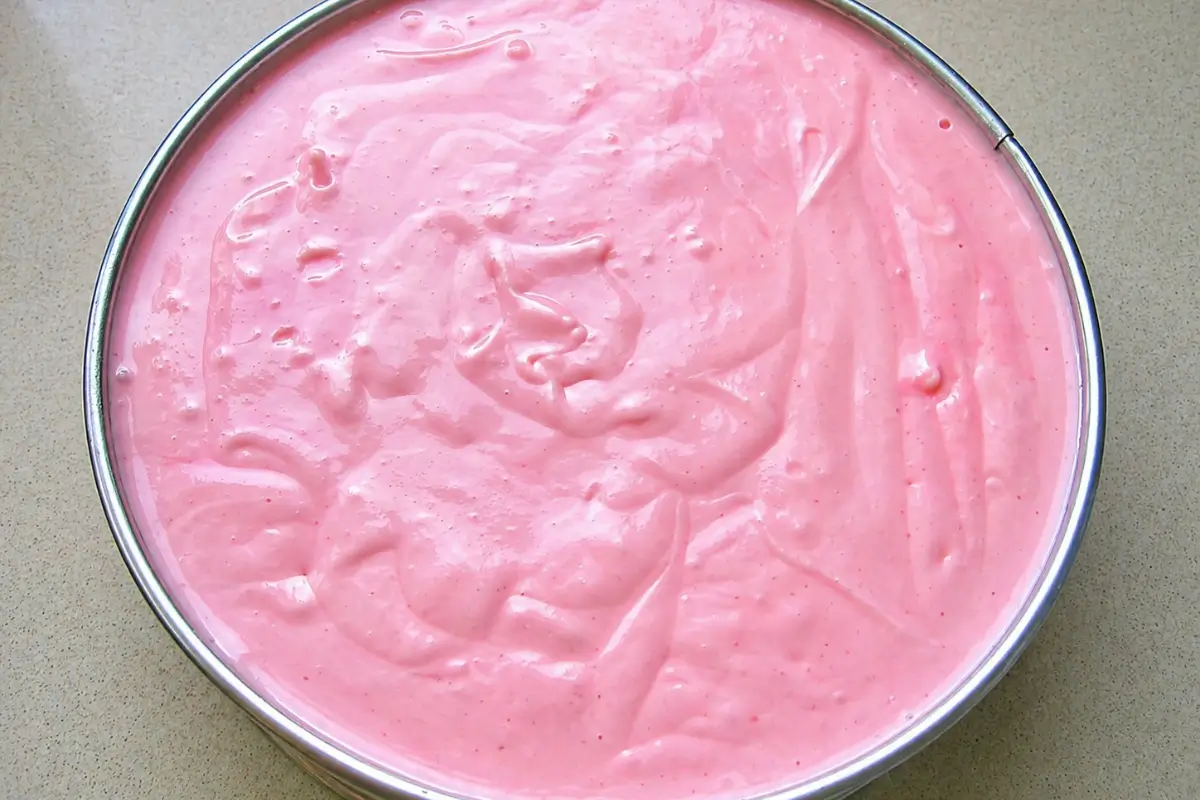
Step 1: In the meantime, beat the cream cheese and sugar together using an electric mixer until smooth. Add 4 tbsp rose syrup and 2 sheets gelatine dissolved in water, following the instructions on the gelatine packet.
Step 2: Gently fold the lightly whipped cream into the cream cheese mixture until fully incorporated.
Step 3: Pour the rose cheesecake mixture over the prepared base. Smooth the surface by gently shaking the pan and lightly tapping it on the bench top. Refrigerate for 1 hour.
Prepare the Rose Topping
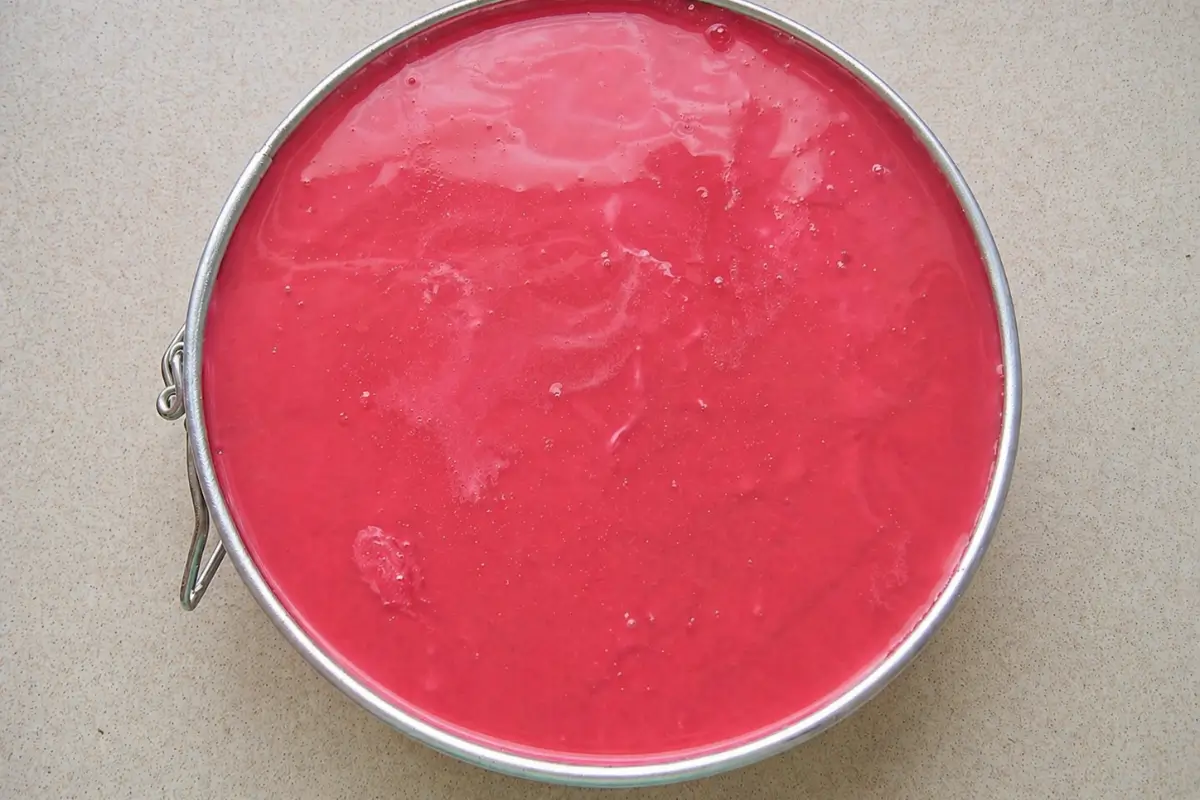
Step 1: Dissolve the remaining gelatine in 6 tbsp hot rose syrup, following the instructions on the gelatine packet and substituting the water with rose syrup.
Step 2: Pour the rose gelatine over the chilled cheesecake and spread it evenly by gently tilting the pan. Refrigerate for at least 2 more hours, preferably overnight.
Step 3: Before serving, run a hot, wet towel around the outside of the springform pan to help release the cheesecake, then gently loosen the edges using a straight cake spatula or knife before removing the sides of the pan.
Decorate and Serve
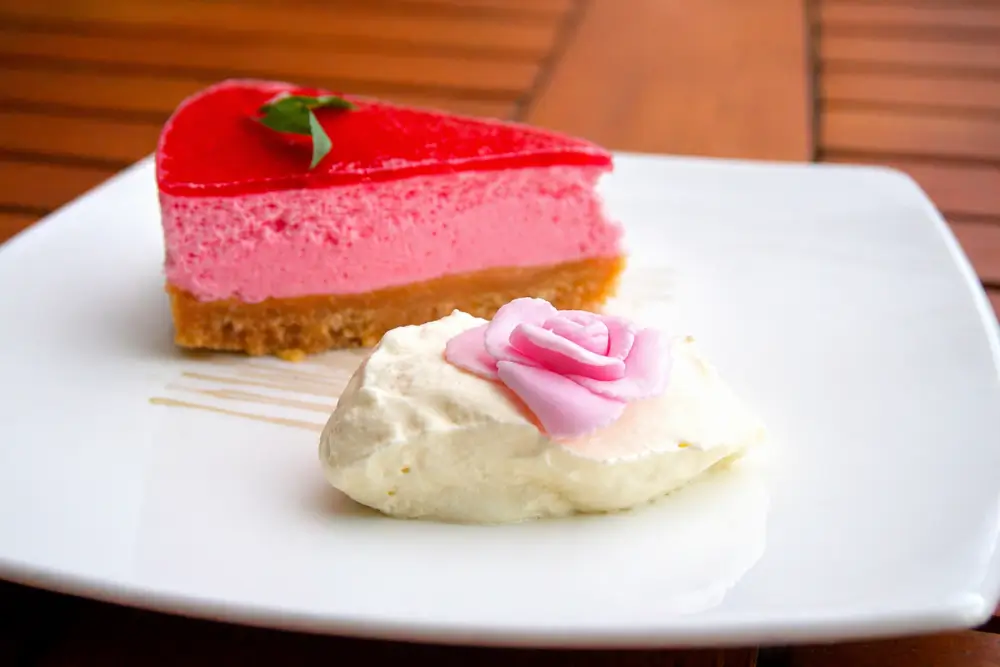
Step 1: Make a fondant rose and add a few mint leaves. You can find step-by-step instructions in my How to Make a Fondant Rose tutorial.
Step 2: Serve the cheesecake as is or with some whipped cream on the side.
Frequently Asked Questions
Yes, but the cheesecake will be much softer and won’t slice as neatly once chilled. Overnight chilling helps it firm up slightly more.
Milder rose syrups usually give the most balanced flavour. Rooh Afza works particularly well because it has a softer floral taste and balanced sweetness. If you can’t find rose syrup, you can use rosewater instead, though you may need to adjust the quantity and add a little extra colouring for a similar finish.
Yes, powdered gelatine works well if fully dissolved before adding it to the filling or topping. Both types set the cheesecake properly.
Use a sharp knife dipped in warm water and wipe it clean between each slice. Cutting slowly with gentle pressure also helps keep the rose topping smooth and neat.
Extra Help from the Kitchen
Choose a Mild Rose Syrup – Taste the syrup before using it, especially with a new brand. Rooh Afza works particularly well because it gives a softer floral flavour and balanced sweetness.
Don’t Pour the Rose Topping onto a Soft Filling – Chill the cheesecake until the surface feels lightly firm before adding the topping. If the filling hasn’t chilled enough, the rose layer can sink into the cheesecake instead of forming a clear top layer.
Let the Rose Topping Cool Slightly Before Pouring – Warm topping can soften the cheesecake surface and leave uneven patches. Slightly cooled syrup spreads more smoothly across the top.
Slice with Gentle Pressure – Pressing too firmly can crack the rose topping layer. Use a sharp knife and cut slowly for cleaner slices.
Decorate Close to Serving Time – Add mint leaves and fondant decorations shortly before serving because moisture from the topping can soften decorations after several hours in the fridge.
Variations and Twists
Rose and Pistachio Cheesecake – Add chopped pistachios over the topping or mix a small handful into the biscuit crumbs for extra crunch and a slightly nutty flavour.
Rosewater Cheesecake – Replace part of the rose syrup with rosewater for a lighter, floral flavour and less sweetness. A few fresh raspberries on top work particularly well with this combination.
Mini Rose Cheesecakes – Divide the biscuit base and filling between cupcake liners or small jars instead of using a springform tin. This works well for parties, afternoon tea, or individual desserts.
Add White Chocolate – Fold melted white chocolate into the filling for a richer texture and slightly sweeter flavour. Since white chocolate firms as it cools, you can slightly reduce the gelatine for a softer, creamier texture.
Top with Fresh Berries – Add sliced strawberries, raspberries, or blackberries over the rose topping before serving for extra freshness and colour contrast.
Storage and Shelf Life
Store Rose Cheesecake covered in the refrigerator for up to 3 days. Keep it in an airtight container or cover the pan tightly to prevent the cheesecake absorbing fridge odours.
You can also freeze individual slices or the whole cheesecake for up to 1 month.
Defrost it slowly in the fridge overnight before serving. This cheesecake is best served straight from the fridge for the cleanest slices and smoothest texture.
More Delicious Cheesecake Recipes You’ll Love
- Nutella Cheesecake with Nutella Ganache
- Chai Cheesecake with Pumpkin Butterscotch Sauce
- Lemon Cheesecake Bars
- Vanilla and Yoghurt Cheesecake with Raspberry Sauce
- Strawberry and Lemon Cheesecake in a Glass
Rose Cheesecake Recipe
Equipment
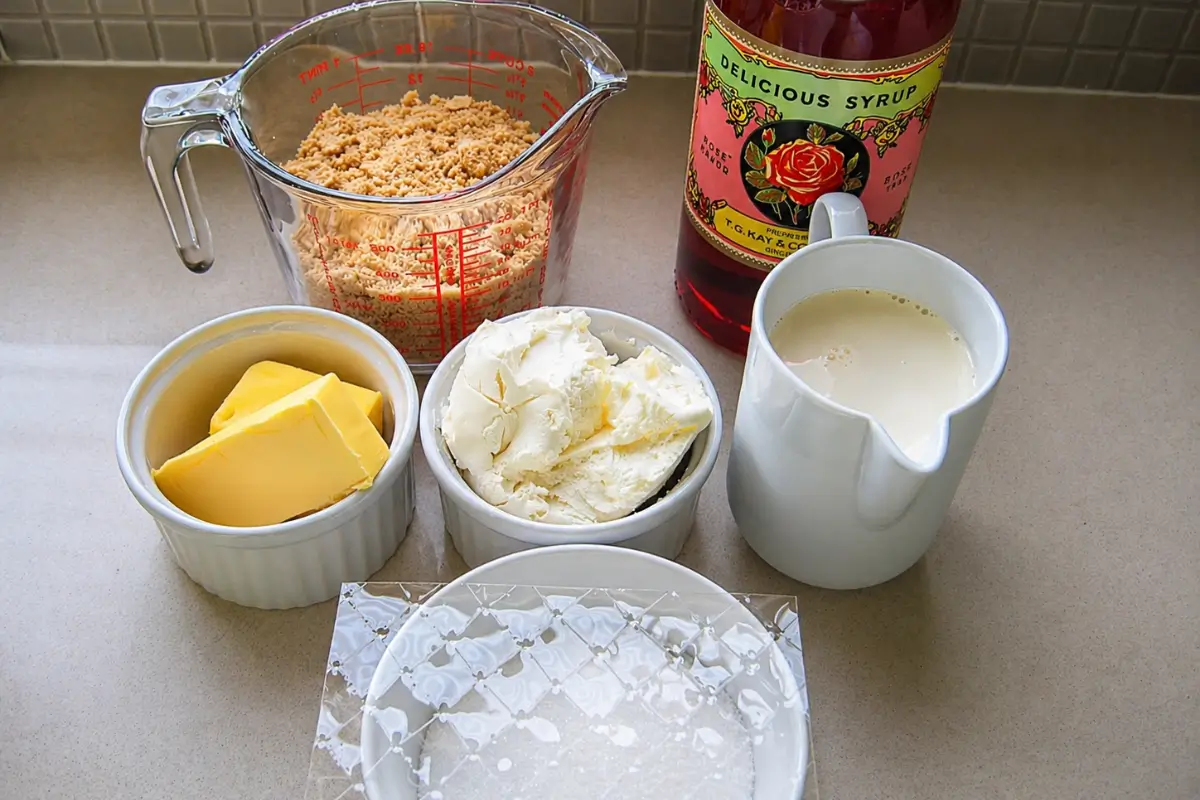
Ingredients
Base
- 1 ¼ cups biscuit crumbs – Scotch Fingers work well
- 80 g butter – melted
Filling
- 250 g cream cheese – at room temperature
- 125 ml – ½ cup lightly whipped cream
- ½ cup sugar
- 4 tbsp rose syrup
- 2 sheets – 4 g gelatine – colla di pesce, dissolved according to packet instructions, or 2 tsp powdered gelatine dissolved in 2 tbsp boiling water
Rose Topping
- 6 tbsp rose syrup
- 1 sheet – 2 g gelatine – colla di pesce, dissolved according to packet instructions, or 1 tsp powdered gelatine dissolved in the hot rose syrup
Instructions
Prepare the Base
- Mix the biscuit crumbs and melted butter together in a bowl until evenly combined.Note: The quantity indicated will make a thick base. If you prefer a thinner base, make ¾ of this dose using 1 cup biscuit crumbs and 60 g – 2 oz. melted butter.
- Line the bottom of a springform pan with baking paper by unclipping the pan, placing the paper over the base, and re-clipping it. Trim away the excess paper.
- Press the biscuit mixture evenly into the pan and refrigerate it while you prepare the filling.
Make the Rose Cheesecake
- In the meantime, beat the cream cheese and sugar together using an electric mixer until smooth. Add 4 tbsp rose syrup and 2 sheets gelatine dissolved in water, following the instructions on the gelatine packet.
- Gently fold the lightly whipped cream into the cream cheese mixture until fully incorporated.
- Pour the rose cheesecake mixture over the prepared base. Smooth the surface by gently shaking the pan and lightly tapping it on the bench top. Refrigerate for 1 hour.
Prepare the Rose Topping
- Dissolve the remaining gelatine in 6 tbsp hot rose syrup, following the instructions on the gelatine packet and substituting the water with rose syrup.
- Pour the rose gelatine over the chilled cheesecake and spread it evenly by gently tilting the pan. Refrigerate for at least 2 more hours, preferably overnight.
- Before serving, run a hot, wet towel around the outside of the springform pan to help release the cheesecake, then gently loosen the edges using a straight cake spatula or knife before removing the sides of the pan.
Decorate and Serve
- Make a fondant rose and add a few mint leaves. You can find step-by-step instructions in my How to Make a Fondant Rose tutorial.
- Serve the cheesecake as is or with some whipped cream on the side.
This post may contain affiliate links. If you make a purchase through these links, I may earn a small commission at no extra cost to you.


Looks gorgeous and simple!
Wonderful…..
It is a wonderful receipe! Last chritmas I bought everything I needed to make a fondant and I was looking for several receipes and made my first try, but I recognise every explanation I found was not too clear and easy as that one you give for the rose fondant.
Thanks for such a “flowery” receipe!
What a stunning cheesecake…the combination of rose and cream cheese actually sounds really good. I hope you had a lovely Mother’s Day.
Wow… Manu… this is beautiful. period. I don’t bake, but your step-by-step pictures always encourage me to just give it a try… really good to have those pictures especially if you are not baker. By reading words, I just don’t know what I’m doing is okay (even common sense, as I don’t have common sense in baking). Great beautiful post. I love it!
That’s absolutely beautiful. I love the unlikely combination. Really innovative and interesting. Great post!
Oh, Manu, this is beautiful! (I … like your daughter, LOVE pink!) 😀 And like you, I love cheesecake. I can just imagine how fragrant this is! 😀
That is really pretty. I haven’t had anything with rose flavor for a long time. I used to love sugar coated rose petals as a child.
Absolutely amazing!!
Wow that looks beautiful! I especially love the last photo. I’ve never used rose syrup before but it looks delicious! I am passing along several awards to you that you can find here: http://theculturaldish.blogspot.com/2011/05/easy-lemon-drop-cookies.html
Happy Mother’s Day!
Manu, you just amaze me! What a stunning cheesecake…and those roses are gorgeous! Lovely!
Manu, what a gorgeous cake. There is something ultra luxurious about using flowers in food and my mouth is watering at the thoughts of the lovely rose flavoured cheese filling. I love the vibrant colour of the gel topping against the more delicate pink of the filling – wow!
Stunning Mum’s Day cake! Very clever use of rose syrup 🙂 I imagine its just brilliant! Thanks for sharing
What a pretty looking cheesecake! I just can’t get enough of the beautiful creamy pink colour :)!
Wow, yummy looking cheese cake just in time for Mother’s day! since my oven give off uneven heat I won’t be baking any time soon! This is my kind of dessert! Please send three cheese cakes my way, hahaha. . . . . seriously!
WOW! Absolutely stunning and what a great flavor combo!
Oh my goodness Manu, this is just perfection..how creative and amazing looking, and also delicious!
I wish you the best Mother’s Day!!! Enjoy!
Your step-by-step approach seems so comforting. this cheese cake is beautiful! i like u decorated it with a rose. Definitely a must try! looks so appealing!
Manu, this is sheer perfection. I adore rose and the floral flavours going creamy like this in a cheesecake seem so appropriate for Mothers’ Day. The fondant rose just finishes it off beautifully. Have a wonderful weekend!
MMM… I really love this cake, and I almost can smell rose scent. My mother won’t appreciate, instead.. she doesn’t love desserts very much! 🙂
your cheese cake is simply beautiful! i love how you decorated it with a simple pink rose!
i didn’t know of rose syrup but i will look for that next time i am shopping…it looks much better than regular corn syrup…
I really love rose flavour but have never used it yet! Looks and sounds amazing 🙂