Italians can be quite “obsessive” about their pasta! And I am no less… For the best results, it is imperative that you cook it the right way. Eating overcooked pasta is a terrible experience and one that I often endured when eating abroad. In fact, it is the main reason why I avoid eating at Italian restaurants outside Italy. No matter how yummy and inviting your sauce is, if you get the cooking of your pasta wrong, there is no way to “save” your dish. So… let’s see how to cook “pasta al dente”, the Italian way!
To cook long pasta (like spaghetti or linguine), take a tall vessel (and for short pasta like penne, gomiti etc. use a normal vessel) and fill it up to 3 quarters with water. Note that the vessels need to be big enough to hold a lot of water so that the pasta can cook properly. Put it on the fire and add a handful of sea salt. When the water is boiling add the pasta noting the exact time. Add a teaspoon of olive oil to the water so that the pasta doesn’t stick and stir it well and often while cooking. Cook for as long as the package says to get “pasta al dente”. I usually take a piece of pasta and check its consistency about a minute before it should finish cooking, but if you are using Italian pasta, then the instructions are usually right. Pasta has to remain firm and not hard, and it is definitely NOT meant to be soft. If it is, then you have overcooked it and it will get sticky and won’t taste as good. Another sign that shows you have overcooked your pasta is if it starts breaking.
When the pasta is cooked, drain it using a colander and serve it HOT with the sauce and cheese (when required) on top. Eat it immediately… pasta is meant to be eaten hot to warm… cold pasta does not taste as good (unless you are having a cold pasta salad)!!!
Busiati (or busiate) is a traditional shape of homemade pasta from the area of Trapani, in western Sicily. It is similar to many other shapes that you find in southern Italy, like maccheroni al ferro, fusilli, strozzapreti etc. The main thing all these shapes have in common is the way they are made. To give these pastas their shape you need either a “ferro”, which could easily be a knitting needle or, in this case a “buso” which is a wooden stick from a plant that grows in abundance in the area of Trapani. If you do not have this wooden stick, a knitting needle of 0.5 cm – 0.2 inches in diameter will work just fine.

I learnt how to make this pasta during my summer holidays in a little town called San Vito Lo Capo. There was a very nice old lady who kindly (and patiently) taught me how to make them.
The first thing to do is to make the dough. You should calculate 80 to 100 gms (2.8 to 3.5 oz.) of continental flour per person and add enough lukewarm water to it to obtain a tough but pliable dough after kneading it for a few minutes. Add the water little by little, as it is easier to add it than to fix “soggy” dough.


When you have the dough ready, make it into a ball, cover it with a clean tea towel and let it rest for 10-15 minutes.
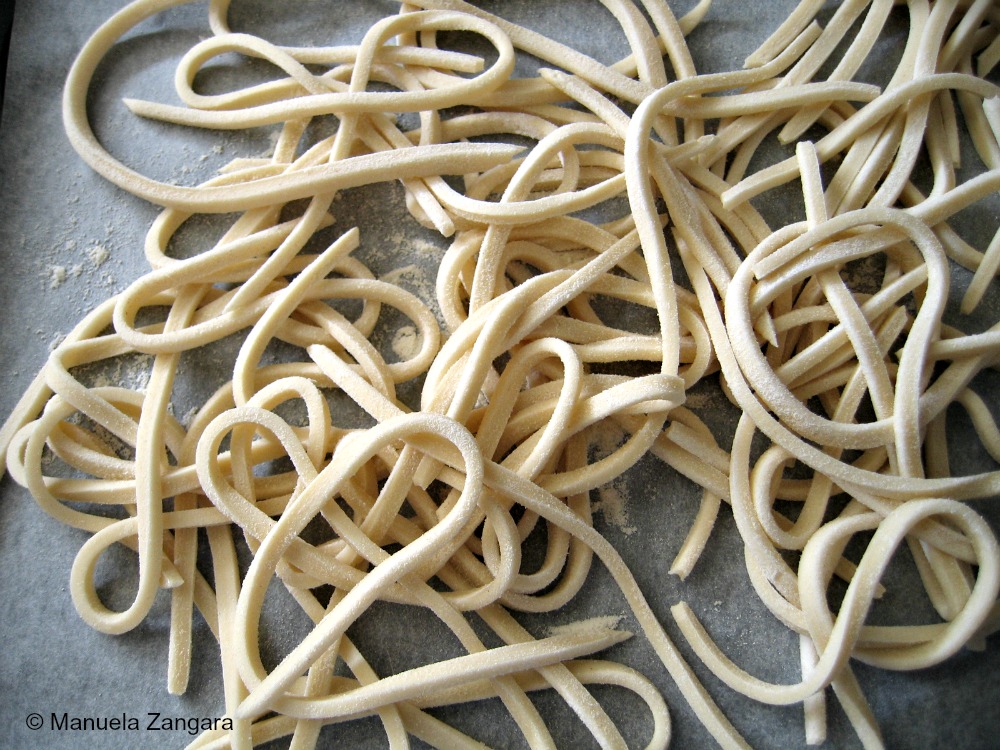
Now you are ready to transform the dough into pasta. Take small pieces of dough and roll them using your fingertips into ropes about 1 cm (1/2 inch) thick. Cut these ropes into segments approximately 10-12 cm long (3.9 to 4.7 inches).

Now, take your buso, place it on the right end of the rope and push it slightly so it sticks to it.

Now roll it at an angle with your hands, until the dough gets fully wrapped around the buso.


Then roll it some more gently with your hand on the bench top so that the pasta gets longer and thinner.

Then slide it out of the buso with your hand. Here you have your busiato.

Make sure to use some flour on the rope of dough before you start rolling it so it does not stick to the buso. Put it aside on a lightly floured tray and repeat these steps until your dough is over.

It sounds harder than what it is, so here is a video that shows you how to make busiati:
Busiati are traditionally served with “pasta cull’agghia” or with a simple tomato sauce.

Strascinati are a shape of pasta typical of the southern regions of Italy, above all Puglia and Basilicata. Their name means “pulled” because of the way they get their shape. They are a kind of orecchiette (Wiki), but they are not flipped inside out after being pulled with the knife.

The first thing to do is to make the dough. You should calculate 80 to 100 gms (2.8 to 3.5 oz.) of continental flour per person and add enough lukewarm water to it to obtain a tough but pliable dough after kneading it for a few minutes. Add the water little by little, as it is easier to add it than to fix “soggy” dough. When you have the dough ready, make it into a ball, cover it with a clean tea towel and let it rest for 10-15 minutes.
. 
Now you are ready to transform the dough into pasta. You will need a wooden surface to do this, so that you can give strascinati their traditional “wrinkled” surface. Take small pieces of dough and roll them using your fingertips into ropes about 1.5 cm (3/4 inch) thick.

Cut these ropes into 1.5 cm (3/4 inch) pieces.

Now take a knife with a rounded tip and put the end of the knife diagonally along the edge of the dough cube. Press down and pull the knife towards you. Detach the strascinato with your fingers and put it aside on a lightly floured tray. Repeat these steps until your dough is over.


Here are a couple of videos of how to shape strascinati:
They can be served with meat or vegetable sauces. I like them very much with a simple tomato sauce, like in my recipe Strascinati tricolore.

Orecchiette (Wiki) are a shape of pasta typical of the southern regions of Italy, above all Puglia and Basilicata. Orecchiette means “little ears” because they are shaped like little ears.
The first thing to do is to make the dough. You should calculate 80 to 100 gms (2.8 to 3.5 oz.) of flour (durum wheat) per person and add enough lukewarm water to the flour to obtain a tough but pliable dough after kneading it for a few minutes. Add the water little by little, as it is easier to add it than to fix “soggy” dough.

When you have the dough ready, make it into a ball, cover it with a clean tea towel and let it rest for 10-15 minutes. Now you are ready to transform the dough into pasta. You will need a wooden surface to do this, so that you can give orecchiette their traditional “wrinkled” surface. Take small pieces of dough and roll them using your fingertips into ropes about 1.5 cm (3/4 inch) thick. Cut these ropes into 1.5 cm (3/4 inch) pieces.


Now take a round shaped knife and put the end of the knife diagonally along the edge of the dough cube. Press down and pull the knife towards you. Now you have what is known as strascinati.


To turn them into orecchiette, detach them and pull the dough down and around your index finger to flip itside out.


Repeat these steps until your dough is over.

Here is a video on how to shape orecchiette:
They can be served with meat or vegetable sauces. I like them very much with a spicy vegetable sauce, like in my recipe orecchiette con verdura ripassata.

Cavatelli (Wiki) are a shape of pasta typical of the southern regions of Italy, above all Campania, Molise, Puglia and Basilicata. They are very easy to make, as you only require your fingers for them (no pasta machine is needed), and can vary in length.
The first thing to do is to make the dough. You should calculate 80 to 100 gms (2.8 to 3.5 oz.) of flour (durum wheat) per person and add enough lukewarm water to the flour to obtain a tough but pliable dough after kneading it for a few minutes. Add the water little by little, as it is easier to add it than to fix “soggy” dough. When you have the dough ready, make it into a ball, cover it with a clean tea towel and let it rest for 10-15 minutes.

Now you are ready to transform the dough into pasta. Take small pieces of dough and roll them using your fingertips into ropes about 1.5 cm (3/4 inch) thick.

Cut these ropes into 2.5 cm (1 inch) pieces. Now put your index and middle fingers together and press them down on each piece of dough. Roll it towards you with a quick movement. Here you have your cavatello!

Repeat these steps until your dough is over. Here is a video on how to shape cavatelli:

They can be served with meat or vegetable sauces. I like them very much with a spicy pork sauce, like in my recipe Cavatelli con ragù di maiale.
How to make Malloreddus – Gnocchetti Sardi

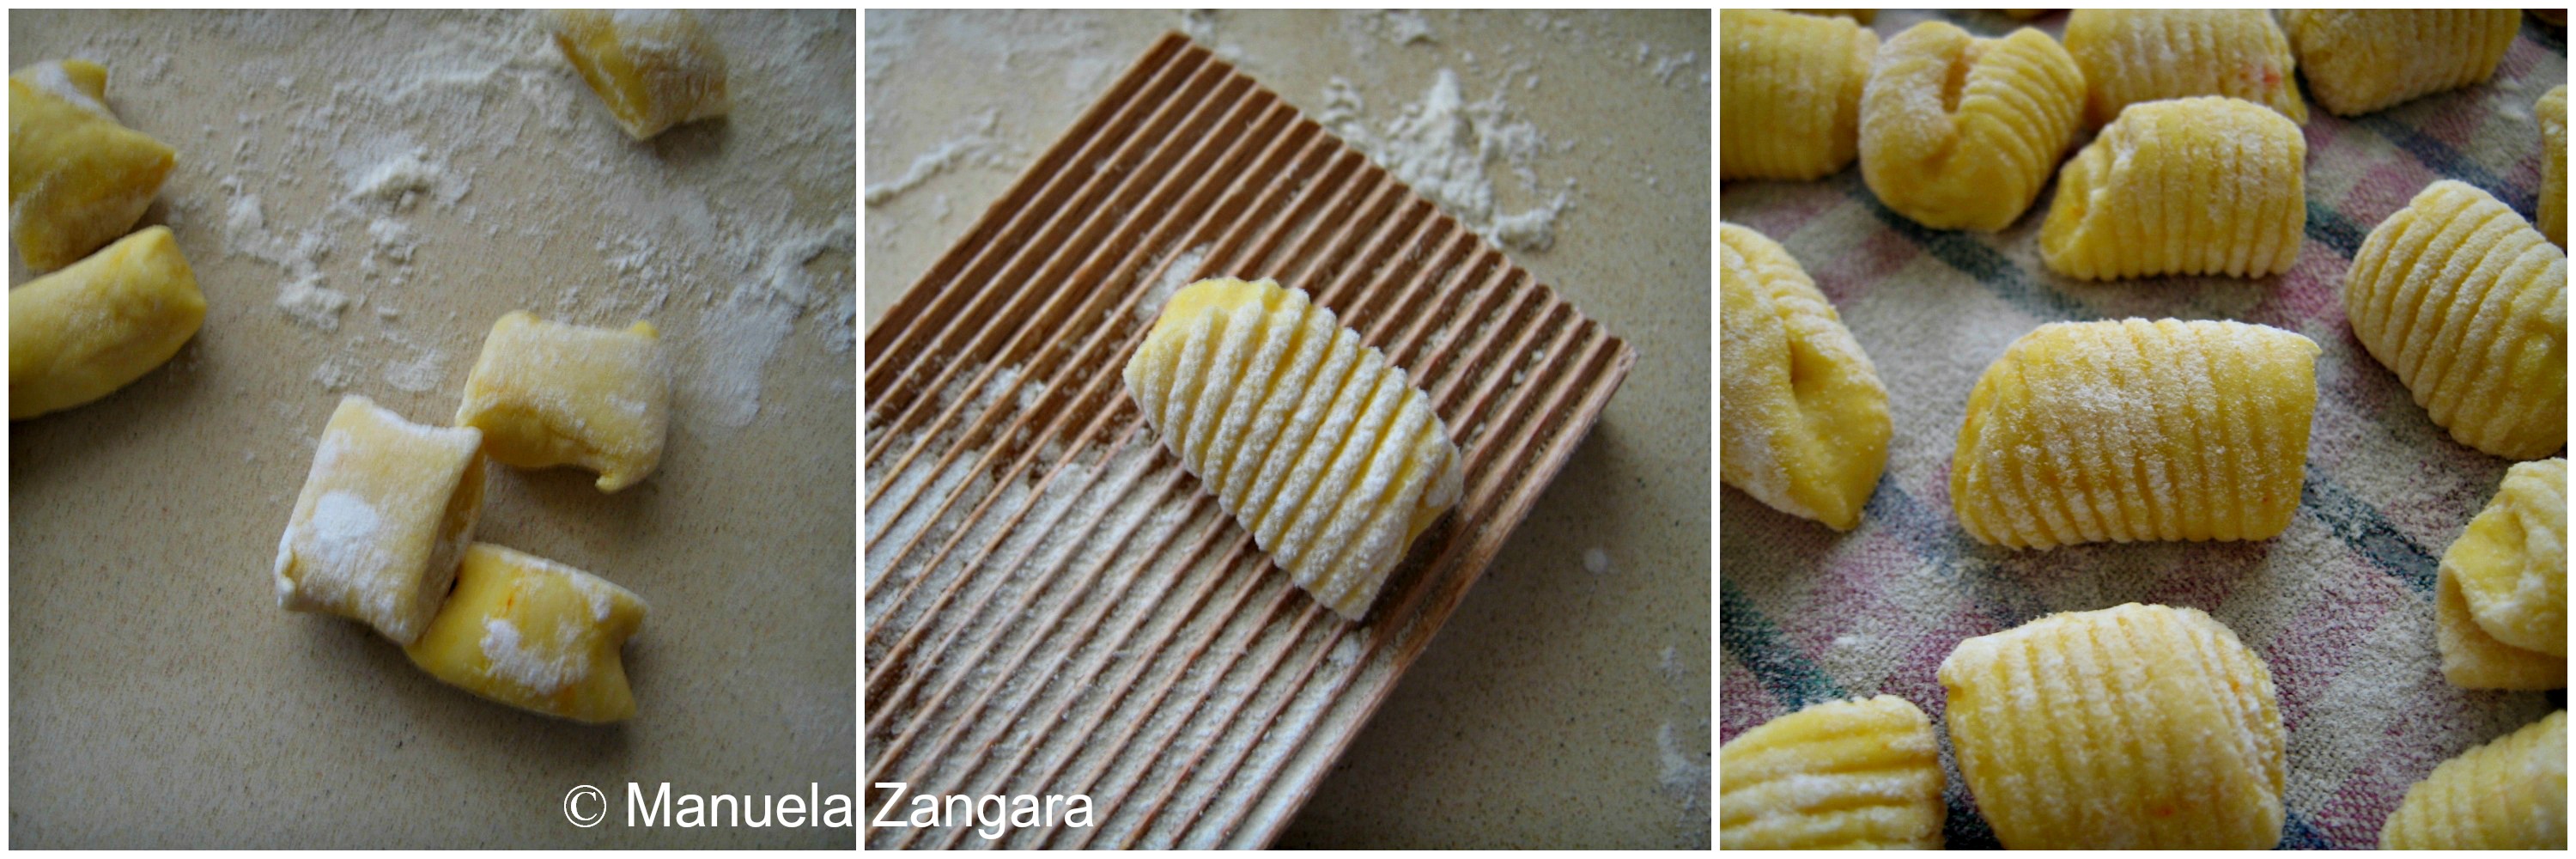
Malloreddus are a shape of pasta typical of the Italian region of Sardegna (Sardinia). The term malloreddu literally means “baby calf” in the local language dialect. I know it may seem like a strange name for pasta, but the reason is that in the agricultural world, calves have always been seen as a sign of abundance, especially if they were well fed and on the “chubby side”. And the shape of this pasta is rounded, just like a chubby calf. These are very easy to make, especially if you have already made gnocchi, as they are shaped in the same way (in fact they are also knowns as gnocchetti sardi – Sardinian little gnocchi). The only difference is in the dough, which is made with durum wheat. The first thing to do is to make the dough.
You should calculate 80 to 100 gms (2.8 to 3.5 oz.) of flour (durum wheat) per person and add enough lukewarm water to the flour to obtain a tough but pliable dough after kneading it for a few minutes. Add the water little by little, as it is easier to add it than to fix “soggy” dough. When you have the dough ready, make it into a ball, cover it with a clean tea towel and let it rest for 10-15 minutes.

Now you are ready to transform the dough into pasta. Divide the dough in 8 to 10 balls. Roll each ball of dough using your fingertips into ropes about 2 cm (3/4 inch) thick (1). Then cut the ropes of dough into 2.5 cm (1 inch) pieces (2) and shape them like gnocchi, by rolling them on the ribs of a fork (or using the specific tool) with your thumb (3-4-5). Place the ready malloreddus on a floured tray (6).


Cook following the steps on “How to cook pasta al dente”. Only in this case you will not have a pre set cooking time. This will vary on the thickness of your malloreddus (it should take approximately 5 minutes). So, the best solution is to taste it! Remember, it does have to remain firm.
They can be served with meat or vegetable sauces. My favourite is Malloreddus alla Campidanese, which is the most traditional way to enjoy them!

Trofie are a shape of pasta typical of the region of Liguria in the North of Italy. They are very easy to make, as you only require your palms for them (no pasta machine is needed) and 2 basic moves. They are my absolute favourite pasta to make and eat. The most traditional way to enjoy this shape of pasta is with pesto or with a sauce made with walnuts, both traditionally made in Liguria.
The first thing to do is to make the dough. You should calculate 80 to 100 gms (2.8 to 3.5 oz.) of flour (durum wheat) per person and add enough lukewarm water to the flour to obtain a tough but pliable dough after kneading it for a few minutes. Add the water little by little, as it is easier to add it than to fix “soggy” dough. When you have the dough ready, make it into a ball, cover it with a clean tea towel and let it rest for 10-15 minutes.

Now you are ready to transform the dough into pasta. Take small pieces of dough (1.5 cm – 0.6 inches)and roll them using your palm into small ropes about 3.5 cm (1.4 inches) long. Make sure the ends of the ropes are thinner than the middle part. Now, put your palm perpendicular to the left end of the rope of pasta and pull it towards you while applying a light pressure. This motion will roll the pasta, giving it the shape of “trofie”.

Repeat these steps until your dough is over.

Here are a couple of videos on how to shape trofie:
The most classic ways to serve them are with pesto or with walnut sauce.
How to make Troccoli alla Chitarra
Troccoli (also knows as Spaghetti alla Chitarra or Tonnarelli) are a kind of pasta typical of the Centre and South of Italy. They have a square cross section about 2-3 mm thick and a porous texture that allows pasta sauce to adhere well.
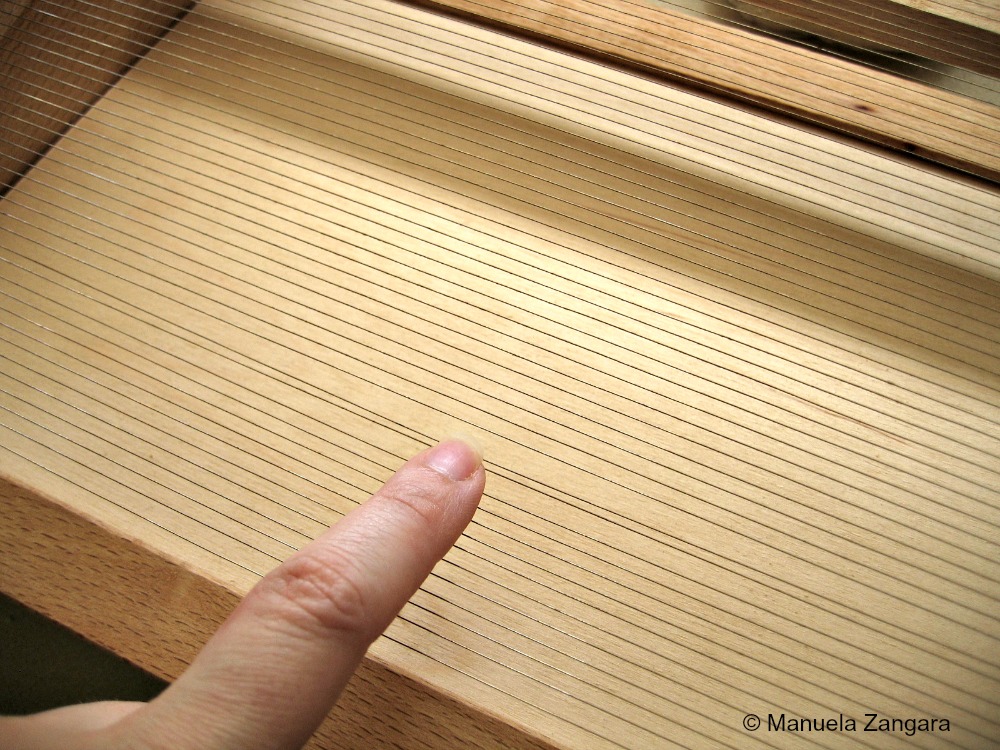
They are made using a specific tool called chitarra (guitar), a frame with a series of parallel wires crossing it.
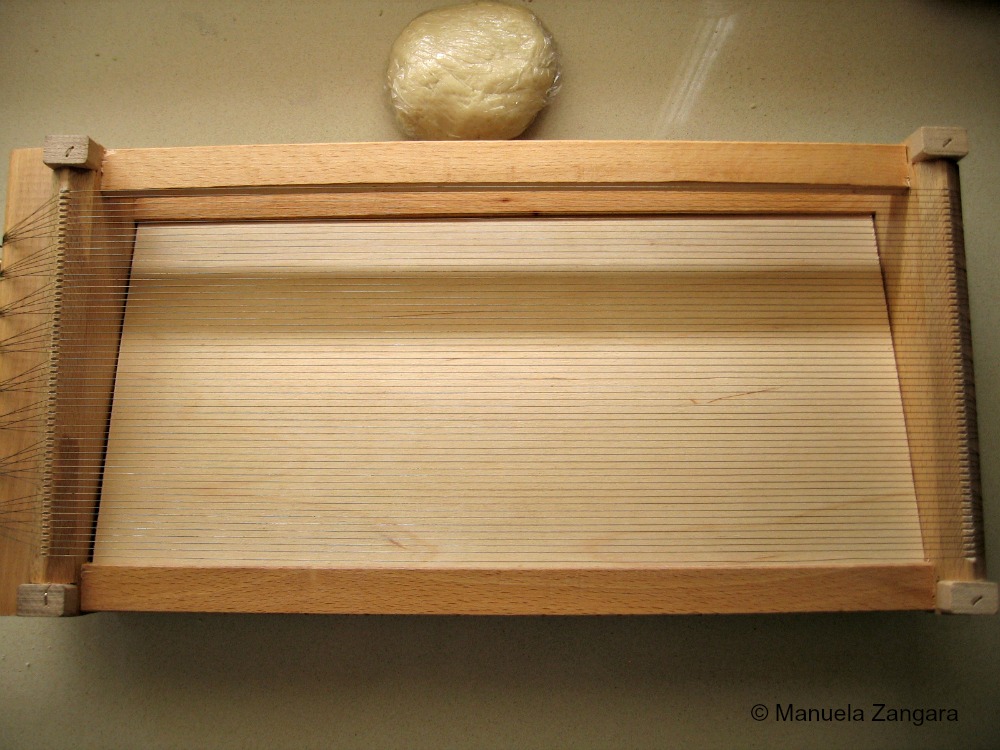
The first thing to do is to make the dough. You should calculate 80 to 100 gms (2.8 to 3.5 oz.) of flour (durum wheat) per person and add enough lukewarm water to the flour to obtain a tough but pliable dough after kneading it for a few minutes. Add the water little by little, as it is easier to add it than to fix “soggy” dough. When you have the dough ready, make it into a ball, cover it with a clean tea towel and let it rest for 10-15 minutes.
Now you are ready to transform the dough into pasta. Roll the dough into a 2-3 mm – 0.1 inch thick rectangle.
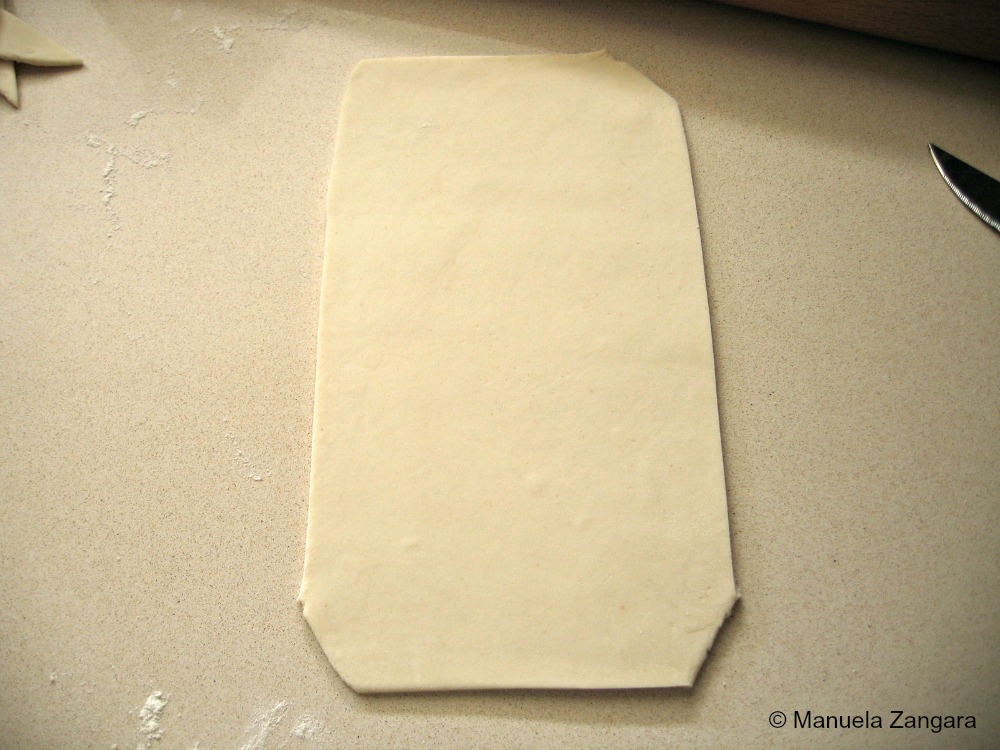
Place it on the “chitarra” and pushed through with the rolling pin, so that the strings of the guitar cut it into strips.
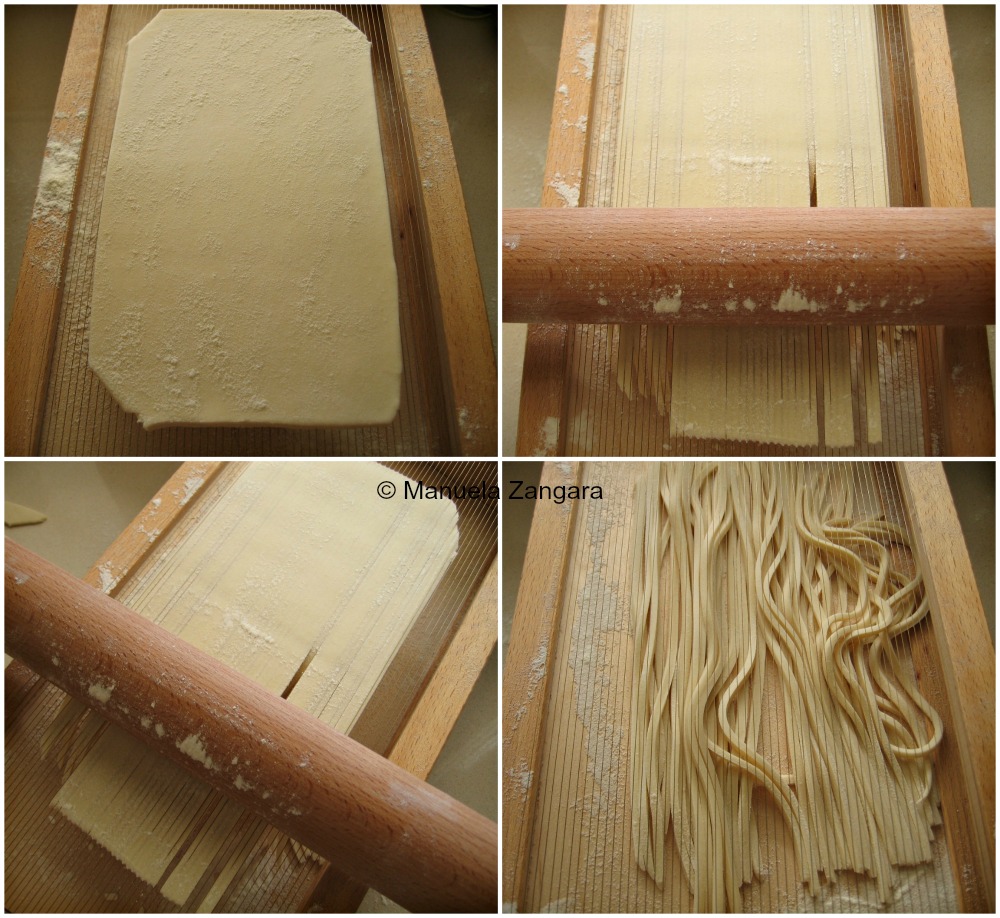
Repeat these steps until your dough is over.
The most classic ways to serve them are with meat sauces like this or this.
How to make egg pasta dough
Making egg pasta is very easy. You only require eggs and flour (Italian 00 or all purpose flour) in a 1:1 proportion (1 egg per 100 gms – 3.5 oz. of flour).

Ingredients (for 4 persons) 300 gms – 10.5 oz. plain flour 3 eggs

Put the flour and eggs in a food processor and mix.

When the dough looks like crumbs, pour it onto the bench top sprinkled with a little flour.

Knead well by hand until you obtain a smooth dough.

Make it into a ball, wrap it in cling wrap and let it rest for 10-15 minutes.
Now you are ready to make your egg pasta.


Now you are ready to make your egg pasta.
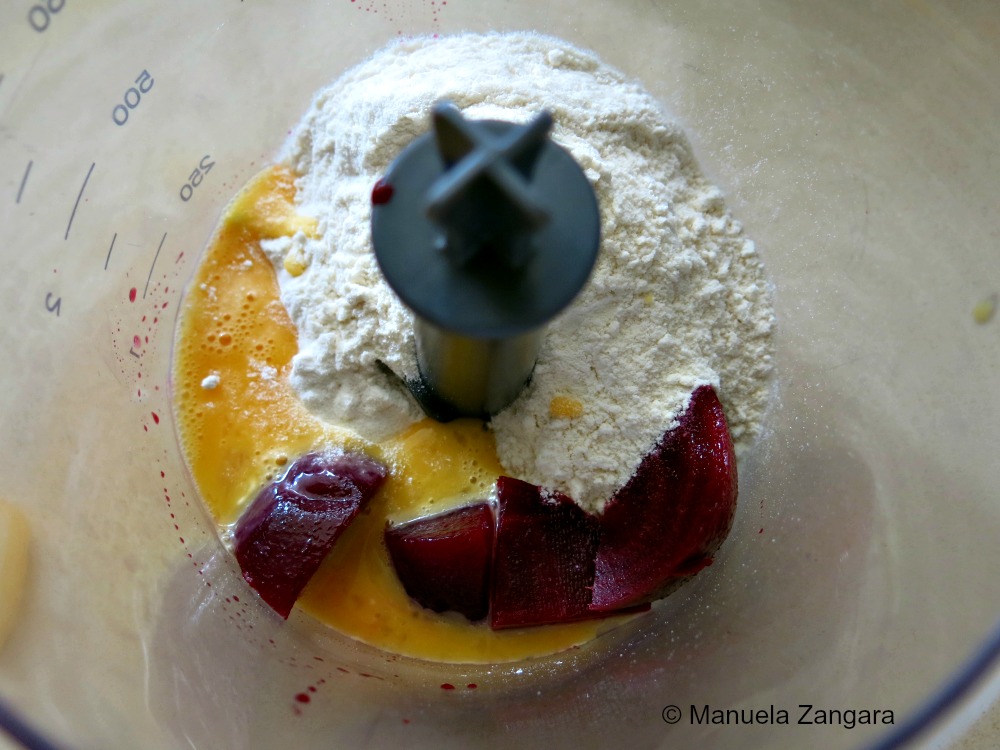
How to make Beetroot Egg Pasta Dough
Ingredients: (for 4 persons)
200 gms – 1 ½ cup flour (or more as required)
1 egg
75 gms – 2 ½ oz. cooked beetroot, roughly chopped
Put the flour, the chopped cooked beetroot and egg in a food processor and mix.
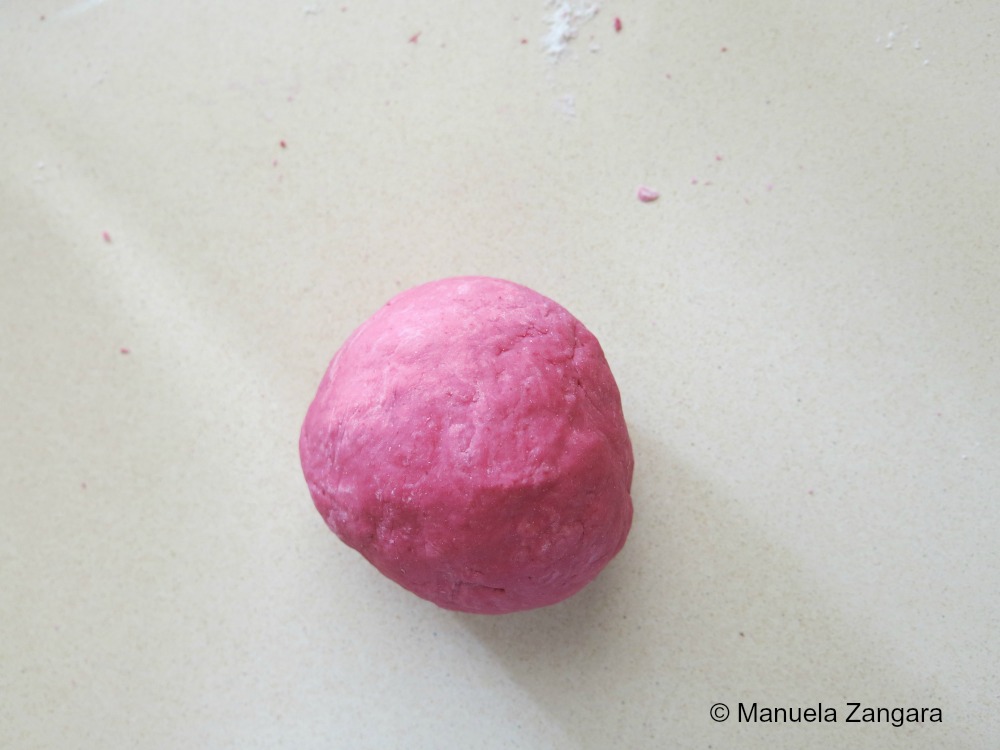
When the dough looks like crumbs, pour it onto the bench top sprinkled with a little flour. Knead well by hand until you obtain a smooth dough (add flour if required, until the dough isn’t sticky anymore).
Make it into a ball, wrap it in cling wrap and let it rest for 10-15 minutes.
Now you are ready to make your pasta.

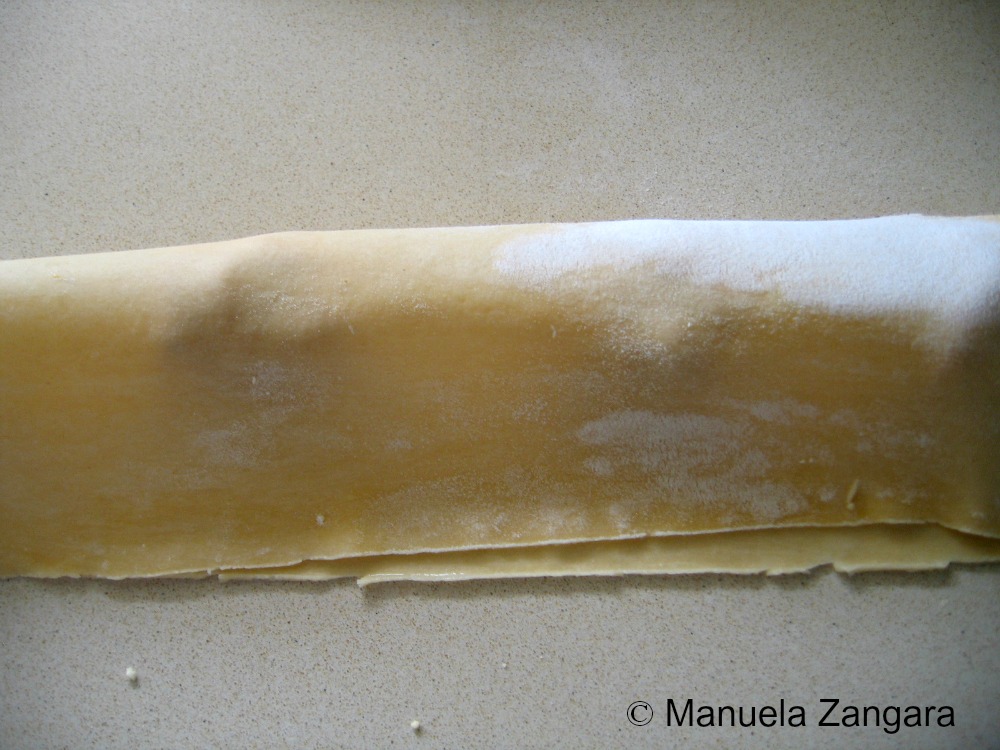
Cut out a piece of egg pasta dough (How to make egg pasta dough) and flatten it into a rectangular shape with your hands.


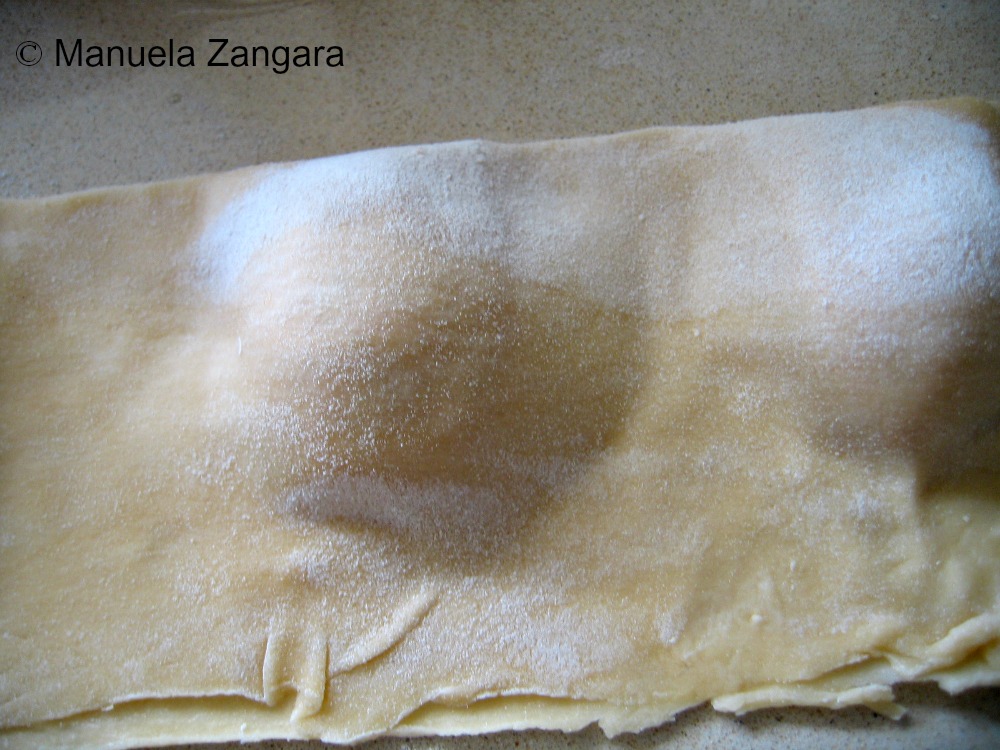
Put a little flour on it and begin passing it though the pasta machine. Turn the dial to the widest setting (#1) and, starting with one of the shorter sides of the rectangle, feed it through the rollers.

Now fold one side of the piece of dough into the middle, then fold the other side over that to form 3 layers.

Starting with one of the narrower sides of the folded dough, feed the pasta through the machine, again at the widest setting. Repeat the folding and rolling technique on the widest setting for at least a couple of times.

Now you can start rolling it thinner, by turning the dial to the next narrowest setting (# 2). Roll the pasta through the machine without folding the dough between settings. Keep reducing the settings until #7. If the sheet of pasta gets too long, you can cut it in half with a knife.

Cut out your lasagne sheets.


I love these with my nonna’s Bolognese or with Tuna and Ricotta!

Follow the procedure of How to make egg pasta dough to make the dough and the procedure of How to make lasagne sheets to roll out the pasta sheets. Make sure to roll them until setting #8 as the pasta has to be really thin.

Now put the filling with a tablespoon on one half of the sheet of pasta. Make sure to leave some space in between them, like in the pictures.

Fold the other half of the sheet onto the filling and press well all around. Make sure there are no air bubbles inside, or the pasta will open while cooking and the filling will come out. To seal the pasta use a little bit of water.


Cut around in a semicircular shape and remove the excess dough.

Keep the mezzelune on a tray dusted with flour and let them dry for a few hours before cooking.
Follow the procedure of How to make egg pasta dough to make the dough and the procedure of How to make Mezzelune (I used a 7 cm – 2 ¾ inch round cutter). Make sure to roll the pasta sheets until setting #8 as the pasta has to be really thin.
Now put the Mezzaluna standing on the round side and press it down with your index finger, like in the picture. Pinch the sides and gently push them towards the centre to make your Casoncelli.

Keep the casoncelli on a tray dusted with flour and let them dry for a few hours before cooking.
How to make Ravioli or Tortelli
Follow the procedure of How to make egg pasta dough to make the dough and the procedure of How to make lasagne sheets to roll out the pasta sheets. Make sure to roll them until setting #8 as the pasta has to be really thin.
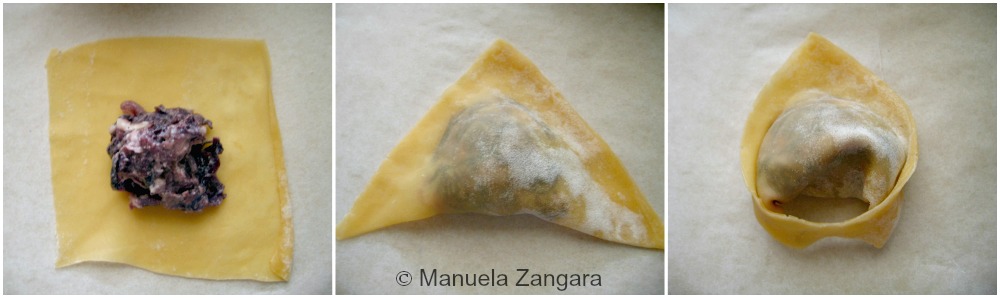
Now put the filling with a tablespoon on one half of the sheet of pasta. Make sure to leave some space in between them, like in the pictures.

Fold the other half of the sheet onto the filling and press well all around.
Make sure there are no air bubbles inside, or the pasta will open while cooking and the filling will come out. To seal the pasta use a little bit of water.
Cut around the filling in a squarish shape and remove the excess dough.
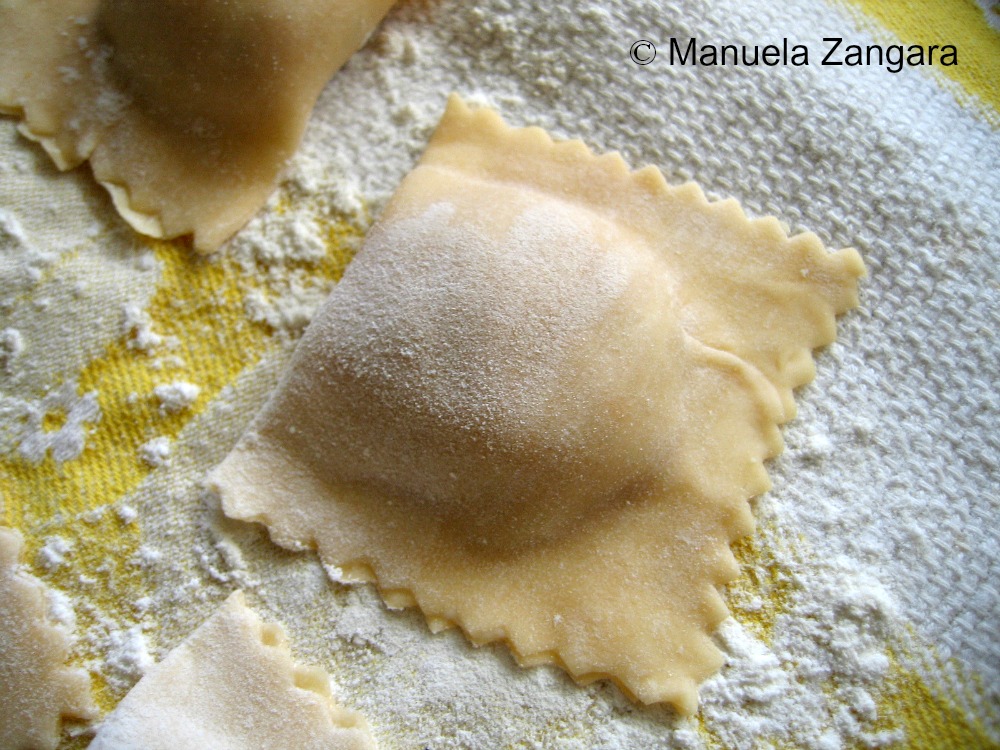

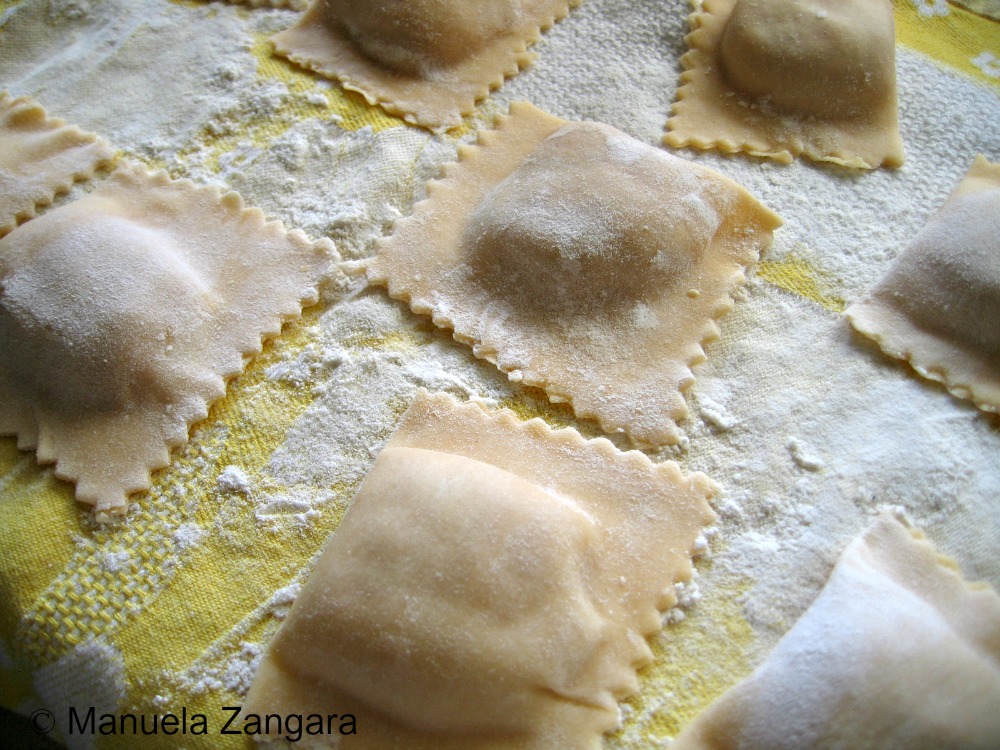
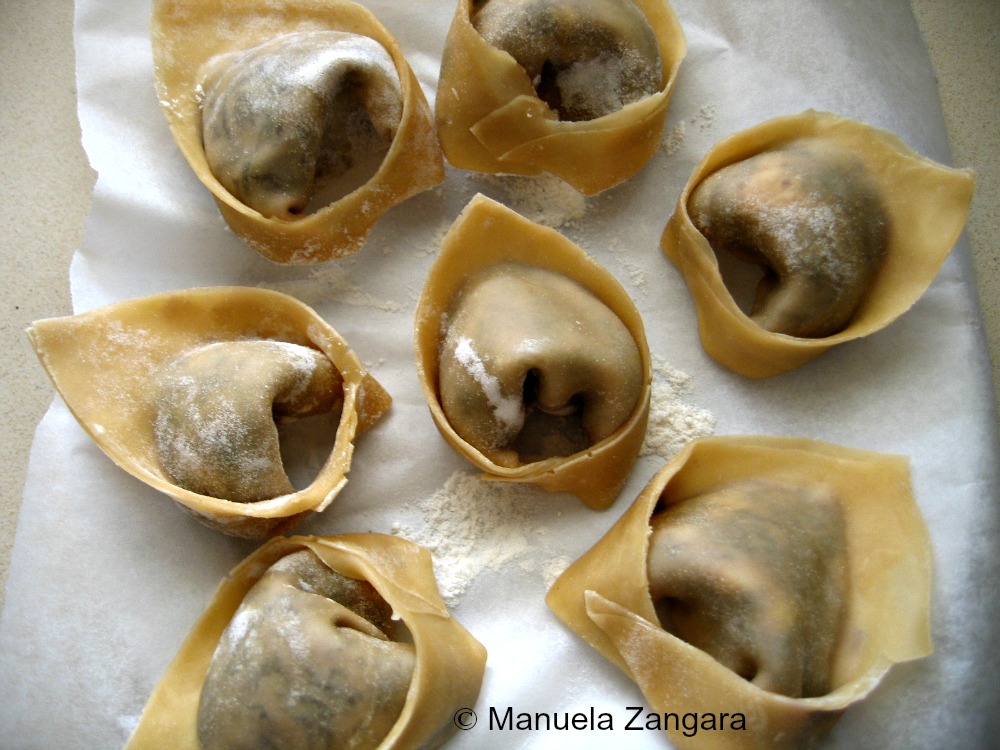
Keep the Ravioli on a tray dusted with flour and let them dry for a few hours before cooking.

NOTE: make sure to roll out only a little piece of dough at a time as the pasta dries up very fast and that will make shaping tortellini really hard. I suggest you keep the dough covered with cling wrap at all times (even the ready-to-fill squares) unless you are working with it.
Some recipes suggest a ratio of 12 eggs per 1 kg – 2.2 pounds of flour for tortellini dough (the dough would definitely be more elastic), but I usually make much less which makes the proportion impossible to keep, so I stick to 1 egg per 100 gms – 3.5 oz. of flour and it works fine if you keep the dough moist/covered.

Follow the procedure of How to make egg pasta to make the dough and the procedure of How to make lasagne sheets to roll out the pasta sheets. Make sure to roll them until setting #8 as the pasta has to be really thin.

Cut out 4 cm – 1.6 inches squares (if you are going to serve them in a soup) or 6 cm – 2.4 inches squares (if you are going to serve them with a pasta sauce). I used this dough cutter as I liked the patterns, but you can also use a normal knife.

Now put a little filling (for the classic filling for Bologna see here) on each square of pasta, lightly wet the corners with a little water and close it in half to make a triangle.

Bring the two opposite corners together by wrapping them around your index finger and press them together to seal them (the remaining corner will flip up a little too giving the tortellino its characteristic shape, which is known as “Venus’ belly” in Italy!).

I couldn’t make a video this time, but I found this one which is very clear: Come fare i tortellini. Here are the 2 different sizes of tortellini:

Do this for all the squares, then roll out some more pasta dough and continue.

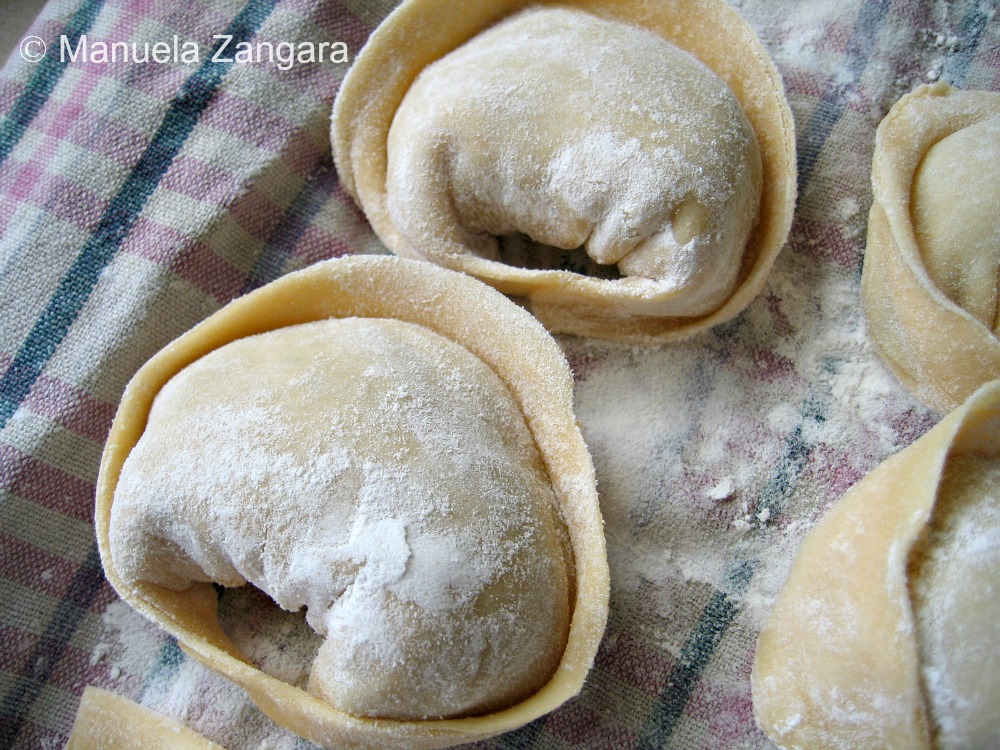
Keep the tortellini on a tray dusted with flour and let them dry for a few hours before cooking.

Follow the procedure of How to make egg pasta to make the dough and the procedure of How to make lasagne sheets to roll out the pasta sheets. Make sure to roll them until setting #8 as the pasta has to be really thin.
Cut out 10 cm – 4 inch squares.
Now put some filling on each square of pasta, lightly wet the corners with a little water and close it in half to make a triangle shape.
Bring the two opposite corners together at the bottom, by wrapping them around your index finger and press them together to seal them.
Keep the Tortelloni on a tray dusted with flour and let them dry for a few hours before cooking.
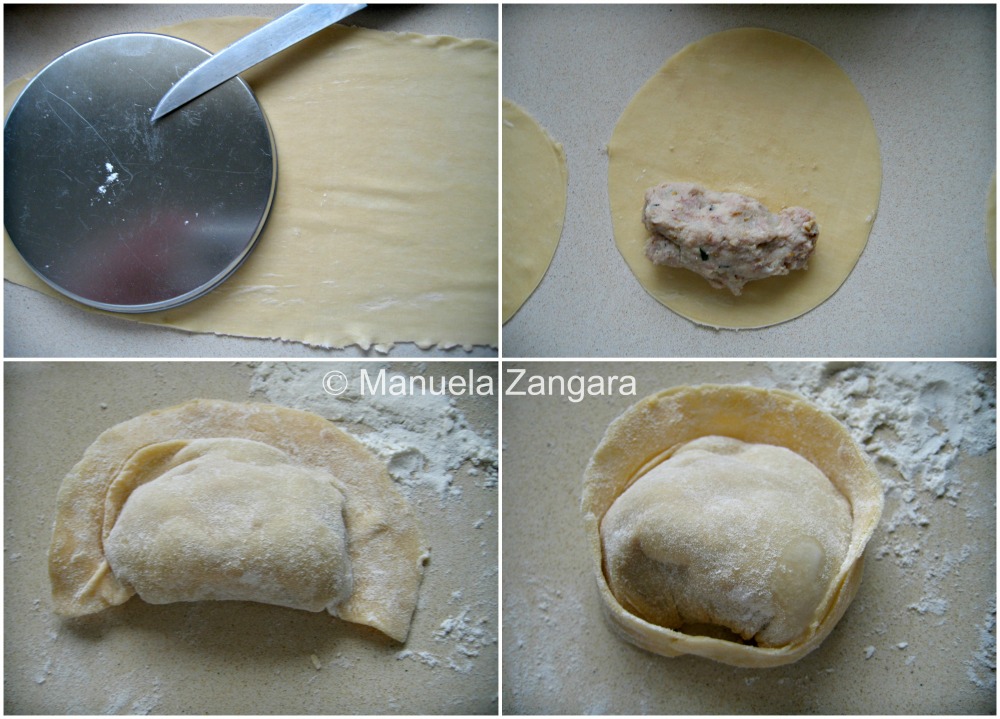
Follow the procedure of How to make egg pasta to make the dough and the procedure of How to make lasagne sheets to roll out the pasta sheets. Make sure to roll them until setting #8 as the pasta has to be really thin.
Cut out 12.5 cm – 5 inch circles of dough.
Now put some filling on each round of pasta, lightly wet the corners with a little water and close it in half to make a half moon shape.
Bring the two opposite corners together at the bottom, by wrapping them around your index finger and press them together to seal them.
Keep the Cappellacci on a tray dusted with flour and let them dry for a few hours before cooking.

NOTE: make sure to roll out only a little piece of dough at a time as the pasta dries up very fast and that will make shaping fagottini really hard. I suggest you keep the dough covered with cling wrap at all times unless you are working with it. Follow the procedure of How to make egg pasta to make the dough and the procedure of How to make lasagne sheets to roll out the pasta sheets. Make sure to roll them until setting #8 as the pasta has to be really thin.

Cut out 4 cm squares and brush them with some lightly beaten egg.


Now put a little filling on each square of pasta and close it by folding and joining the sides together towards the center, making a little parcel. Press well.

Do this for all the squares, then roll out some more pasta dough and continue. Keep the fagottini on a tray dusted with flour and let them dry for a few hours before cooking.

Check out my Parmigiano Reggiano Fagottini for a recipe.

Follow the procedure of How to make egg pasta to make the dough and the procedure of How to make lasagne sheets to roll out the pasta sheets. Make sure to roll them until setting #8 as the pasta has to be really thin. Cut out 4 cm – 1.6 inches squares (if you are going to serve them in a soup) or 6 cm – 2.4 inches squares (if you are going to serve them with a pasta sauce). I used this dough cutter as I liked the patterns, but you can also use a normal knife. Now put a little filling (for my potato and mint filling see here) on each square of pasta, lightly wet the corners with a little water and close it in half to make a triangle.

Do this for all the squares, then roll out some more pasta dough and continue. Keep the triangolini on a tray dusted with flour and let them dry for a few hours before cooking.
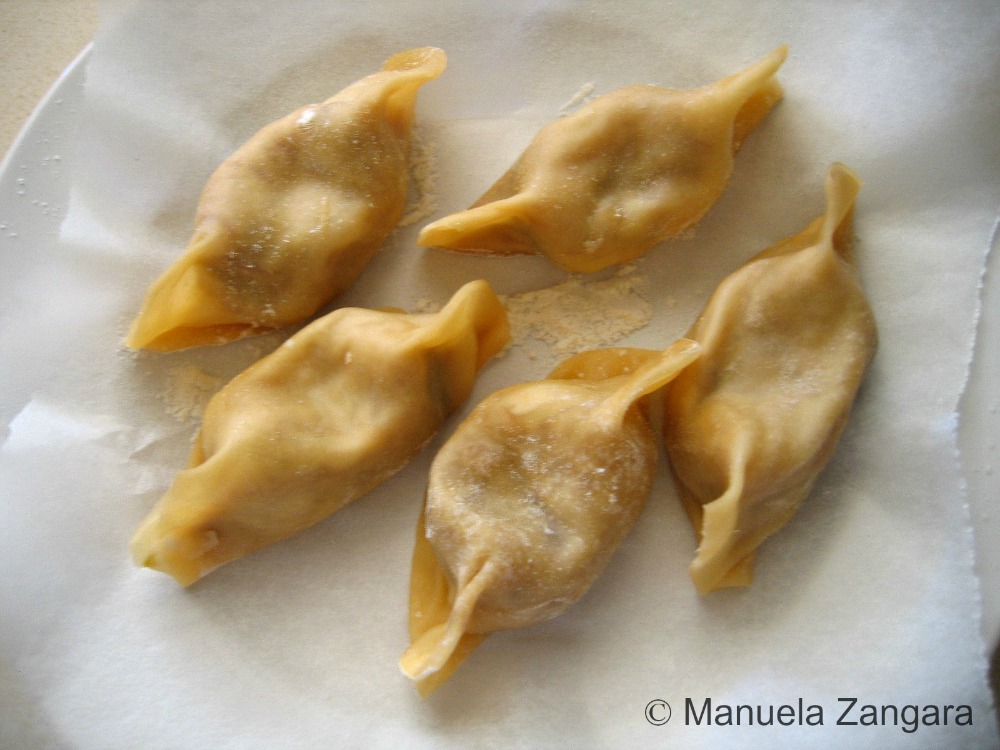
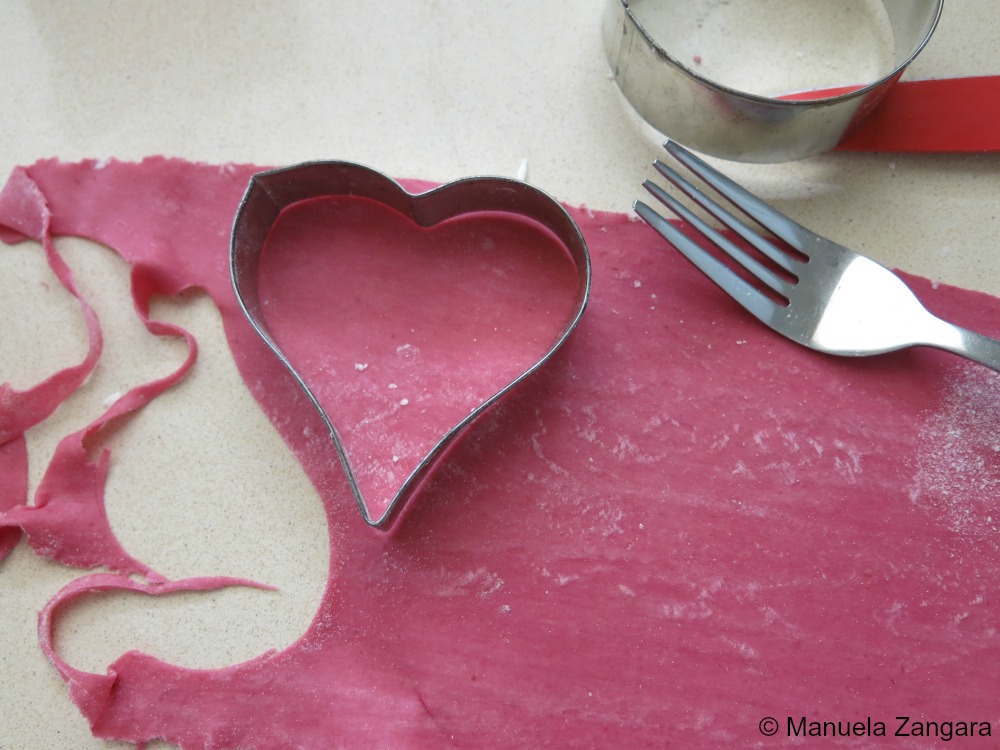
Follow the procedure of How to make Beetroot egg pasta dough to make the dough and the procedure of How to make lasagne sheets to roll out the pasta sheets. Make sure to roll them until setting #8 as the pasta has to be really thin.
Now take a heart shaped cookie cutter and cut out pasta hearts.
Put the filling with a tablespoon on one half of the pasta hearts.
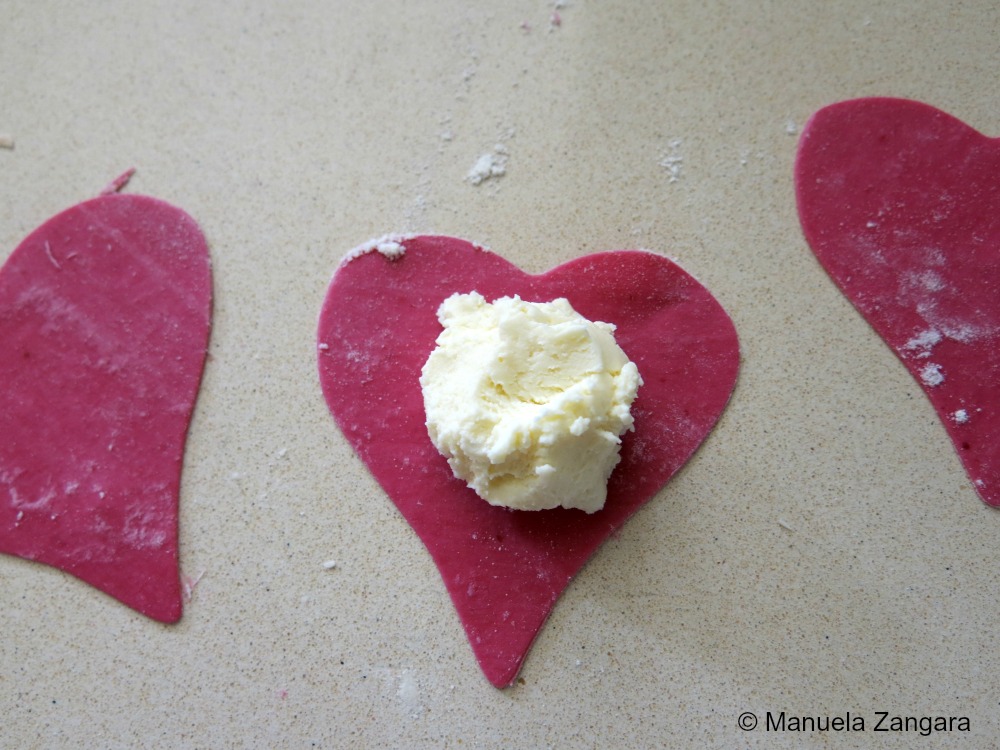
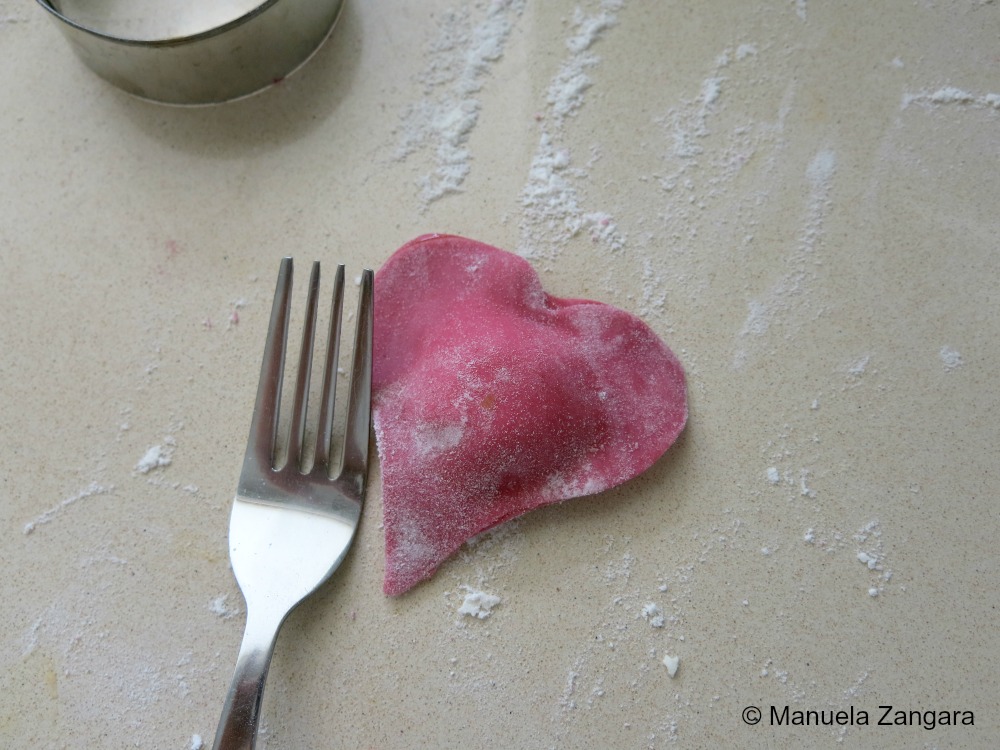
Then rub a little bit of water on the sides (this will seal the pasta) and top with another pasta heart to enclose the filling. Press well all around using a fork. Make sure there are no air bubbles inside, or the pasta will open while cooking and the filling will come out.
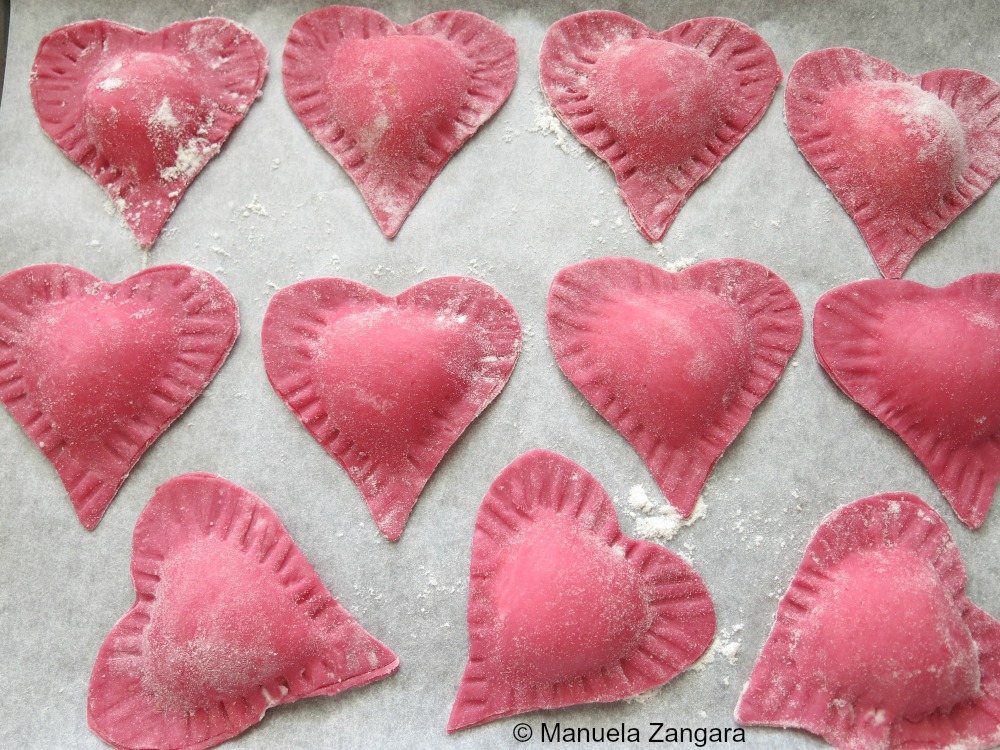
Keep the pasta hearts on a tray dusted with flour and let them dry for a few hours before cooking.
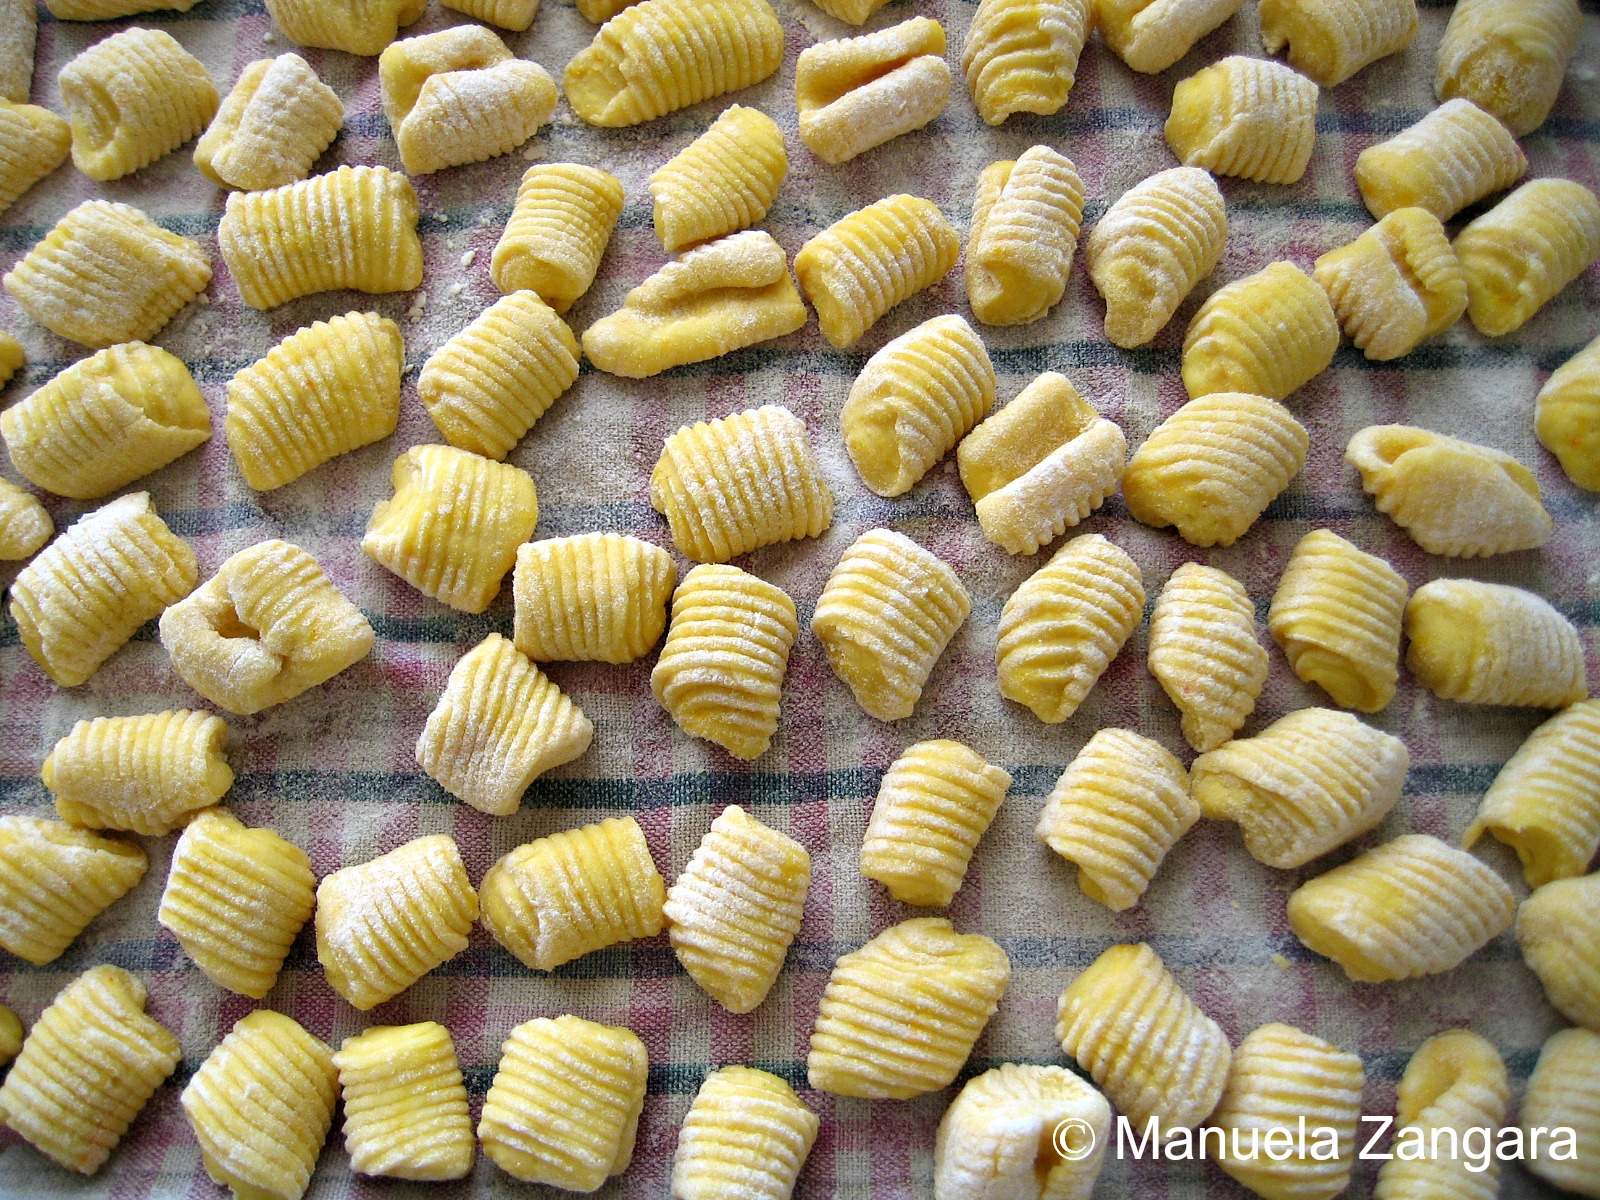
I know I have already mentioned this is one of my previous posts, but I feel the need to repeat myself. I used to dislike all kinds of gnocchi. They were among the very few items I would not eat, ever. I think it all started in kindergarten (yes, I am not kidding you), where they would serve potato gnocchi EVERY Thursday. In fact, in Italy potato gnocchi are very often eaten on Thursday… so much so that there is even a saying that goes “Giovedi, gnocchi”, which means “On Thursdays, we eat gnocchi”. Don’t ask me why though… I have no idea. Anyhow, I am digressing… where were we? Oh yes, kindergarten. If you ever try and cook gnocchi for 100 people and serve them in a cantine you will know why I would not eat them. By the time they arrived on my plate, they would be like glue. Sticky and gummy and… yucky. Sorry, about that, but even the thought of it now makes my skin crawl! After 3 years of “eating” that every Thursday… well, gnocchi were understandably scratched off my “craving list” for the following 30 years! I know, I could have tried them at a good restaurant, or I could have made them… but the thought of it, just didn’t appeal to me. Then a couple of years ago, I went for lunch at a friend’s place and she had made ricotta gnocchi. She had no idea of my dislike for everything gnocchi and I did not want to be rude… so I had a small serving of it. Well, let me only tell you that I had a second serving. It was love at first bite. I loved the consistency (smooth, silky and soft) and the taste. I was sold… my 30 year old dislike for gnocchi was overcome in a matter of seconds. Needless to say, I am now trying to catch up! After sharing my recipe for ricotta gnocchi, today I want to show you how to make the most classic of gnocchi: potato gnocchi. Enjoy!

Ingredients (for 4 people):
1 kg – 2.2 lbs potatoes
1 egg
¾ tsp salt
250 gms – 1 cup flour (to add little by little, you may require more or less depending on the potatoes you are using)

Halve the potatoes and cook them in salted boiling water until tender.

Put the flour on the benchtop. Then put the warm boiled potatoes in a potato masher (1) (there is no need to peel them as the skin will remain inside the masher) and squeeze them onto the flour. Add the salt and mix well (2). Then add the egg (3) and keep kneading until you get a smooth dough (4). You may have to add a little more flour. The dough will be ready when it won’t stick to the surface anymore, but it is still soft and pliable.

Divide the dough in 8 to 10 balls. Roll each ball of dough using your fingertips into ropes about 2 cm (3/4 inch) thick (1). Then cut the ropes of dough into 2.5 cm (1 inch) pieces and place them on a floured tray (2). If you want, you can also give the gnocchi their traditional shape, by rolling them on the ribs of a fork (or using the specific tool) with your thumb (3 – 4 – 5). Let them rest for 15 minutes before cooking them (6).

To cook the gnocchi, take a large pot and fill it with water. Put the pot on the fire and add a handful of sea salt into the water. When the water is boiling, put the gnocchi in. As soon as the gnocchi start floating, they are ready (they cook very quickly, usually 1 or 2 minutes).

Remove them with a slotted spoon and put them in the pan with the sauce of your choice. Mix well on low fire for a minute or two and serve hot. NOTE: the most popular sauces for potato gnocchi are tomato sauce, gorgonzola, butter and sage, or pesto. If you want to eat them with pesto, do not mix them with the sauce while on the fire as pesto should NEVER be cooked.
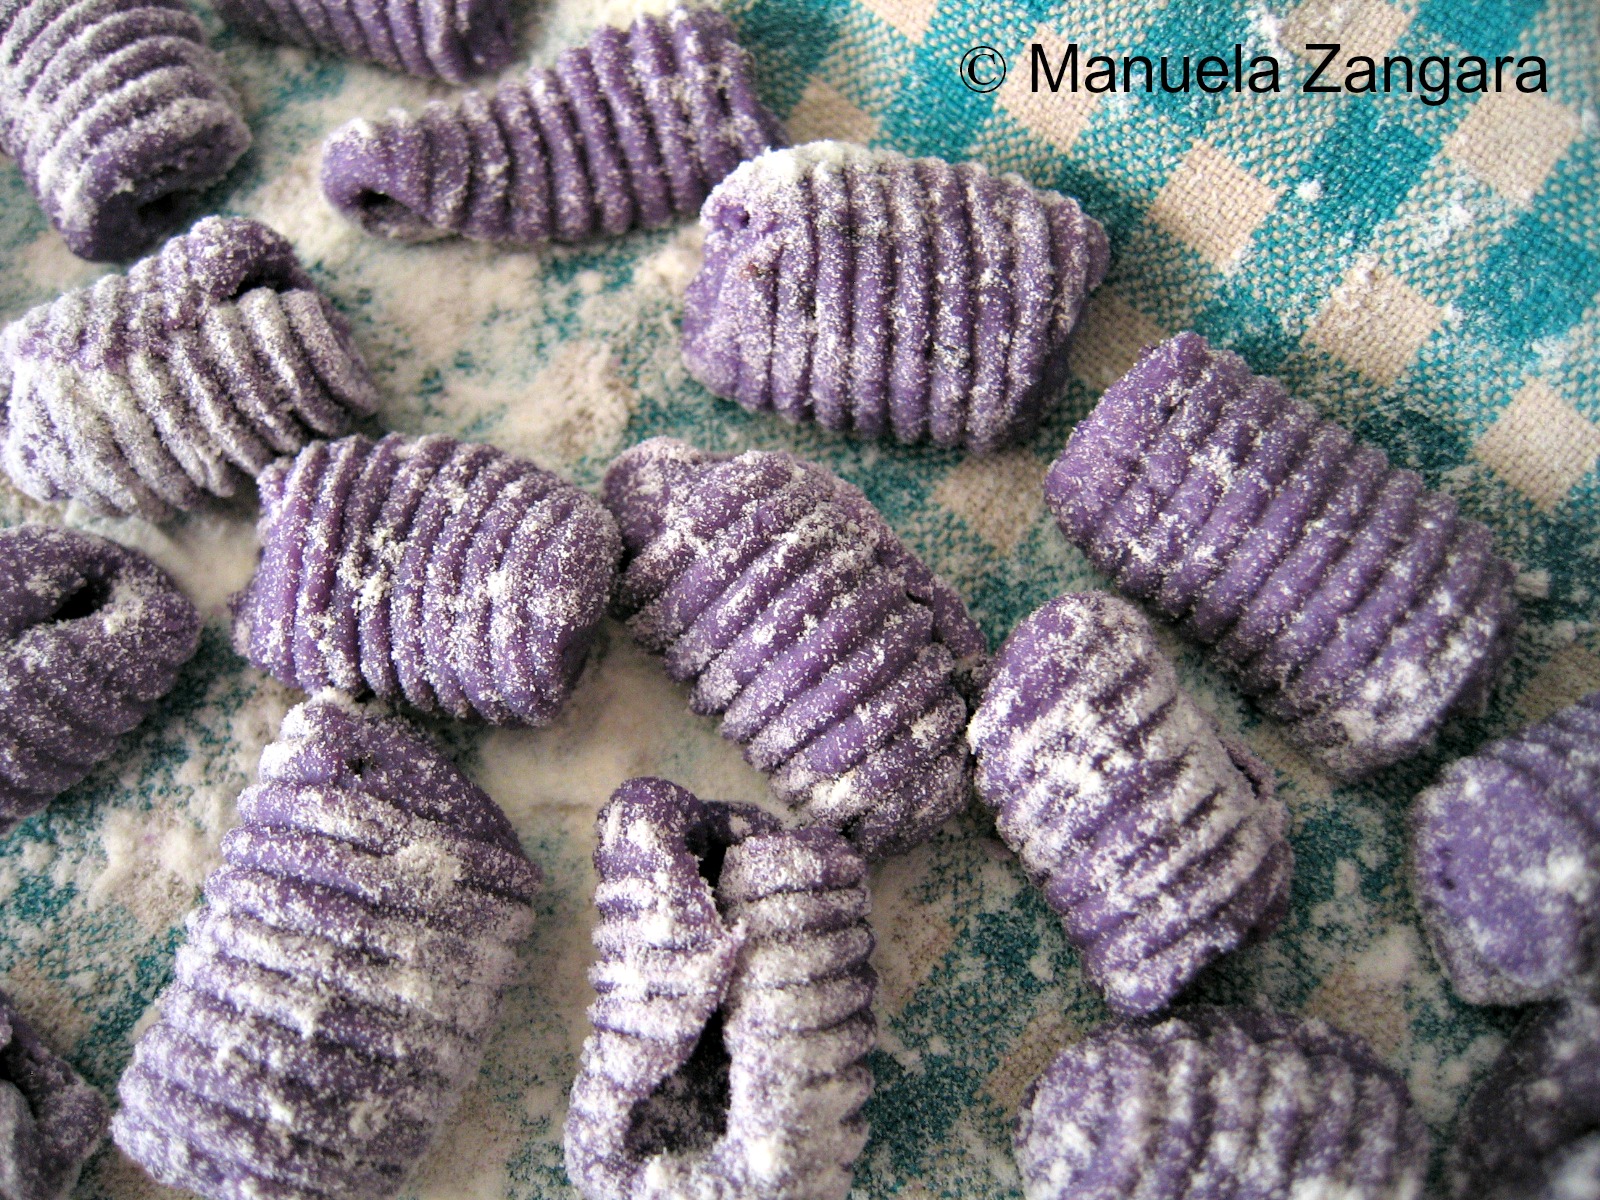
How to make Purple Potato Gnocchi
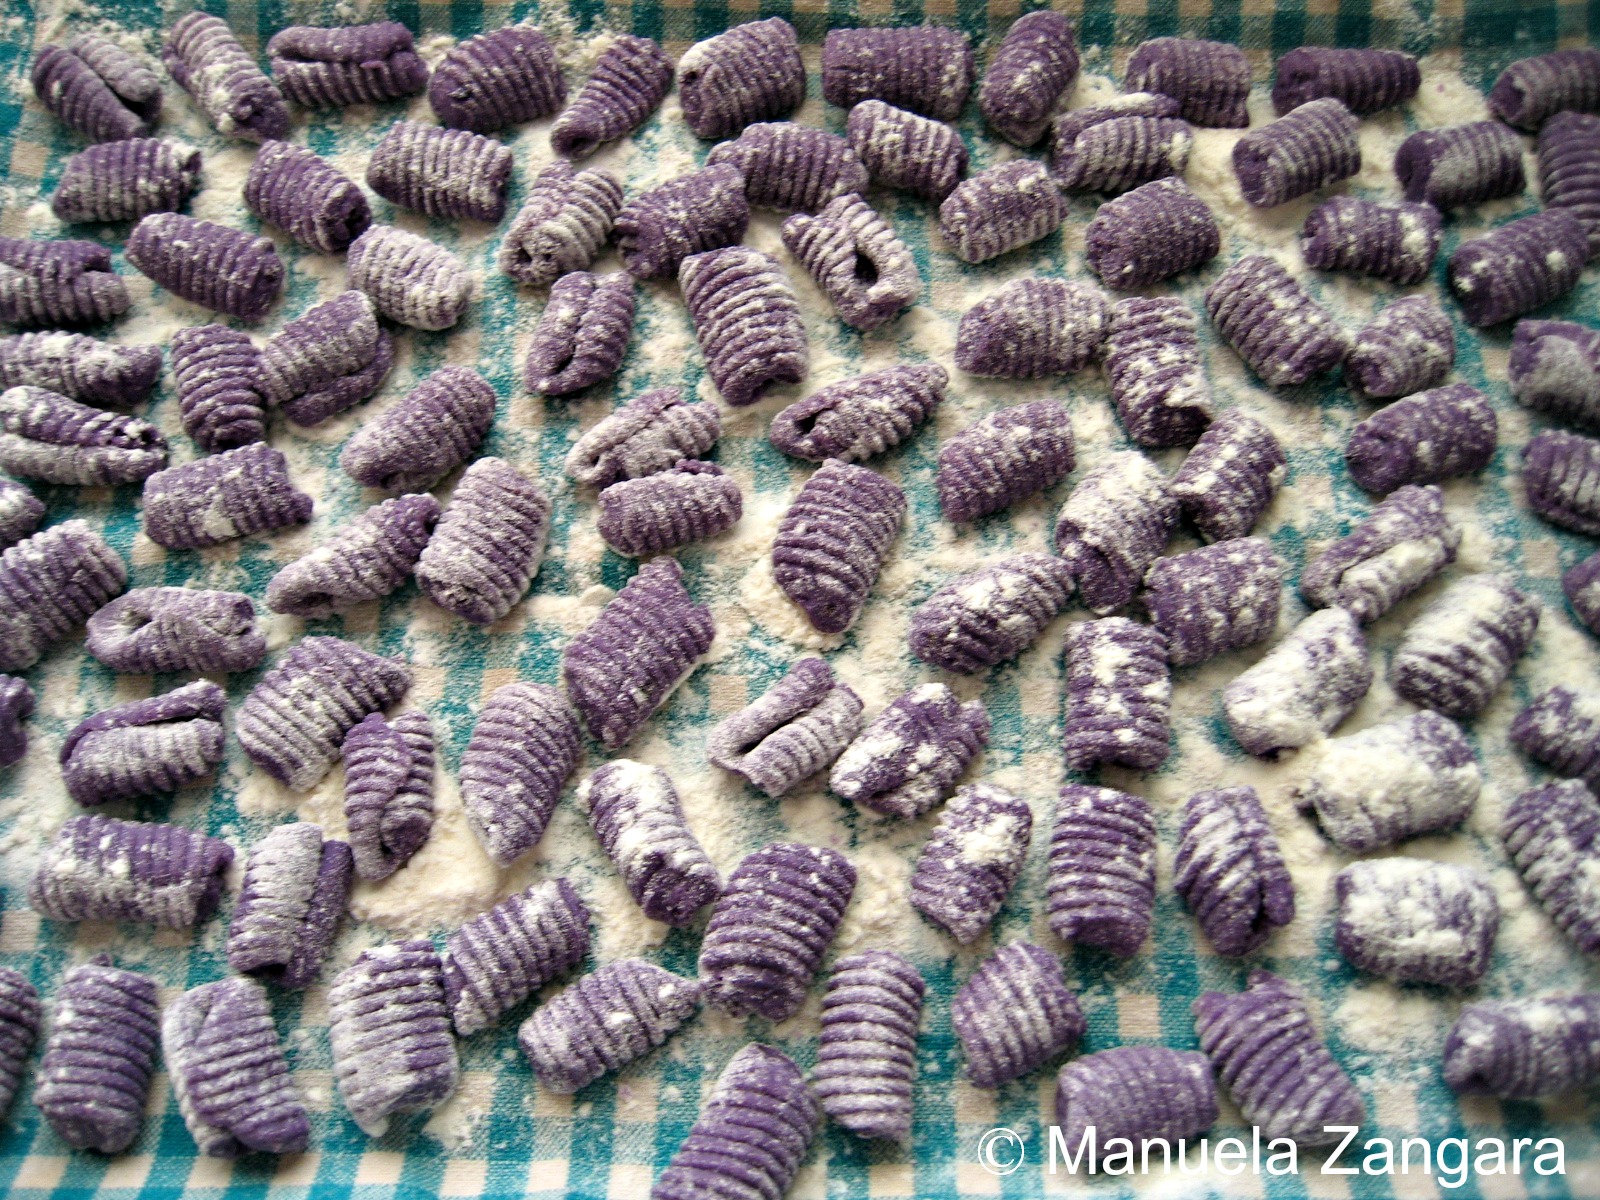
When I saw these purple potatoes at the market, I could not resist. I had to buy them! They have an intense purple colour when cut and I really wanted that colour to shine, so I thought of keeping it simple and make gnocchi with them. It was a great decision as the gnocchi turned out delicious and ever so pretty! Click here to see what sauce I made to serve these purple gnocchi with!
Ingredients (for 4 people)
1 kg – 2.2 lbs purple potatoes (I used Congo Purple)
1 egg
¾ tsp salt
250 gms – 1 cup flour (to add little by little, you may require more or less depending on the potatoes you are using)

Halve the purple potatoes and cook them in salted boiling water until tender.
Put the flour on the benchtop. Then put the warm boiled potatoes in a potato masher (there is no need to peel them as the skin will remain inside the masher) and squeeze them onto the flour. Add the salt and mix well. Then add the egg and keep kneading until you get a smooth dough. You may have to add a little more flour. The dough will be ready when it won’t stick to the surface anymore, but it is still soft and pliable.
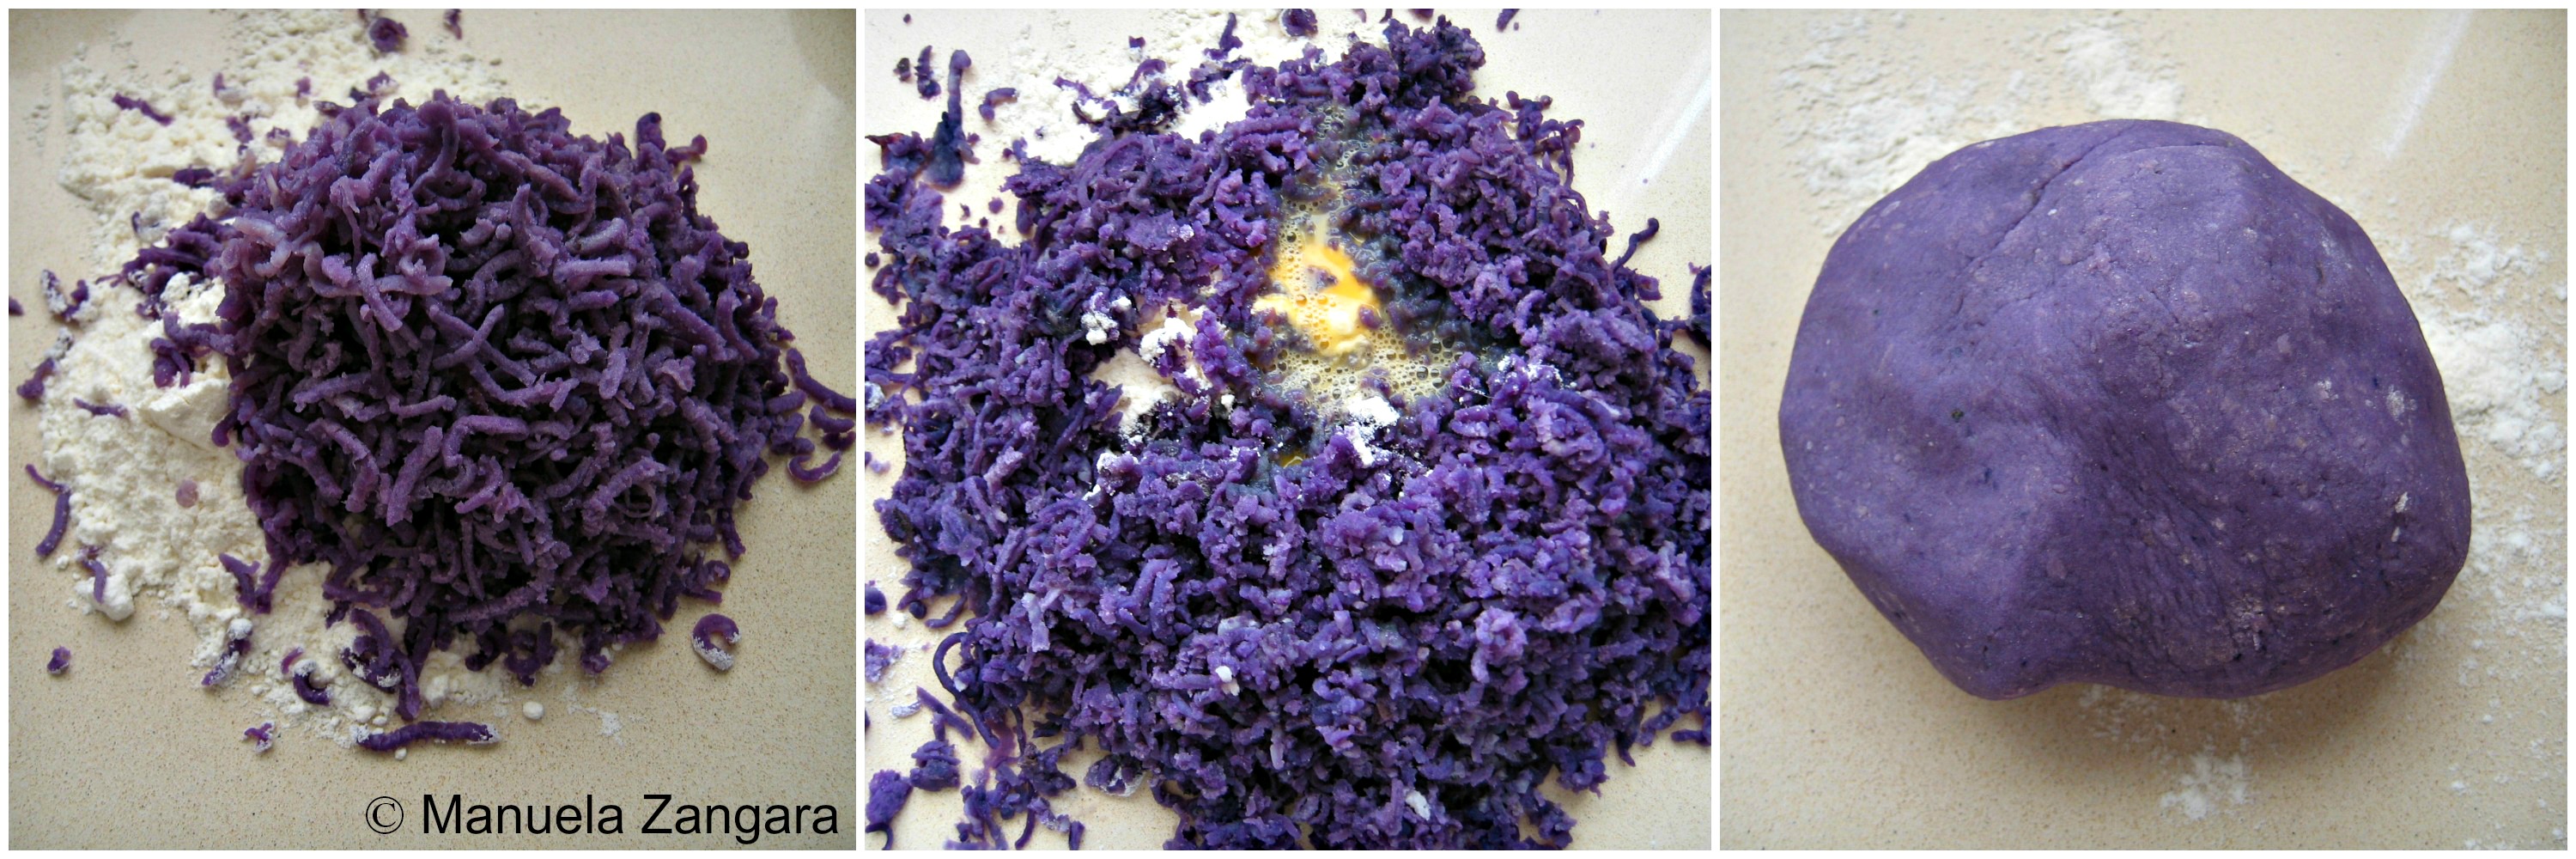
Divide the dough in 8 to 10 balls. Roll each ball of dough using your fingertips into ropes about 2 cm (3/4 inch) thick. Then cut the ropes of dough into 2.5 cm (1 inch) pieces and place them on a floured tray. If you want, you can also give the gnocchi their traditional shape, by rolling them on the ribs of a fork (or using the specific tool) with your thumb.

Let them rest for 15 minutes before cooking them.
To cook the purple gnocchi, take a large pot and fill it with water. Put the pot on the fire and add a handful of sea salt into the water. When the water is boiling, put the gnocchi in. As soon as the gnocchi start floating, they are ready (they cook very quickly, usually 1 or 2 minutes).
Remove them with a slotted spoon and put them in the pan with the sauce of your choice. Mix well on low fire for a minute or two and serve hot.
How to make Saffron Potato Gnocchi
Ingredients (for 4 people):
1 kg – 2.2 lbs potatoes
1 egg
¾ tsp salt
250 gms – 1 cup flour (to add little by little, you may require more or less depending on the potatoes you are using)
0.5 gms – ¾ tsp saffron powder

Halve the potatoes and cook them in salted boiling water until tender.
Put the flour on the benchtop. Then put the warm boiled potatoes in a potato masher (there is no need to peel them as the skin will remain inside the masher) and squeeze them onto the flour. Add the salt and mix well. Then add the egg and saffron powder and keep kneading until you get a smooth dough. You may have to add a little more flour. The dough will be ready when it won’t stick to the surface anymore, but it is still soft and pliable.
Divide the dough in 8 to 10 balls. Roll each ball of dough using your fingertips into ropes about 2 cm (3/4 inch) thick. Then cut the ropes of dough into 2.5 cm (1 inch) pieces and place them on a floured tray. If you want, you can also give the gnocchi their traditional shape, by rolling them on the ribs of a fork (or using the specific tool) with your thumb. Let them rest for 15 minutes before cooking them.
To cook the gnocchi, take a large pot and fill it with water. Put the pot on the fire and add a handful of sea salt into the water. When the water is boiling, put the gnocchi in. As soon as the gnocchi start floating, they are ready (they cook very quickly, usually 1 or 2 minutes).
Remove them with a slotted spoon and put them in the pan with the sauce of your choice. Mix well on low fire for a minute or two and serve hot.

Ingredients (for 4 people):
350 gms – 12.3 oz. potatoes
350 gms – 12.3 oz. pumpkin, skinned
300 gms – 10.5 oz. flour
1 egg
1 tsp salt
1 pinch nutmeg, grated

Slice the pumpkin and bake it in a preheated oven at 180°C – 355°F for 30 minutes or until soft.

Halve the potatoes and cook them in salted boiling water until tender. Then put the warm boiled potatoes in a potato ricer (there is no need to peel them as the skin will remain inside the ricer) and squeeze them into a bowl. Add the salt and mix well. Do the same for the pumpkin. Then add the egg, nutmeg and flour and mix well. Transfer the mixture onto a floured surface and knead until you get a smooth dough. You may have to add a little more flour. The dough will be ready when it won’t stick to the surface anymore, but it is still soft and pliable.

Divide the dough in 8 to 10 balls. Roll each ball of dough using your fingertips into ropes about 2 cm (3/4 inch) thick. Then cut the ropes of dough into 2.5 cm (1 inch) pieces and place them on a floured tray. If you want, you can also give the gnocchi their traditional shape, by rolling them on the ribs of a fork (or using the specific tool called tarocco) with your thumb. Let them rest for 15 minutes before cooking them.

To cook the gnocchi, take a large pot and fill it with water. Put the pot on the fire and add a handful of sea salt into the water. When the water is boiling, put the gnocchi in. As soon as the gnocchi start floating, they are ready (they cook very quickly, usually 1 or 2 minutes).

Remove them with a slotted spoon and put them in the pan with the sauce of your choice. Mix well on low fire for a minute or two and serve hot. They are perfect with butter and sage!
I just love ricotta gnocchi! Their texture is just perfect… soft and not chewy at all. I discovered them only a couple of years ago at a friend’s place, but it took a while to come up with my own version. So this is my take on another classic Italian recipe. Enjoy!
Ingredients for 4 persons:
300 gms – 10.5 oz. ricotta cheese
150 gms – 5 oz. thinly grated Parmigiano Reggiano or Grana Padano
140 gms – 5 oz. flour
Additional flour as required (you may need more depending on how soft the ricotta is)
1 egg
1 tsp salt

Put all the ingredients in a bowl and mix them well.

When they are well combined put the mixture on a board and knead well, adding the extra flour until the dough stops sticking to your hands. Do not put too much flour though or your gnocchi will become chewy.

Divide the dough in 8 to 10 balls. Roll each ball of dough using your fingertips into ropes about 2 cm (3/4 inch) thick.

Then cut the ropes of dough into 2.5 cm (1 inch) pieces and place them on a floured tray.


Here is a video I taped:
If you want, you can also give the gnocchi their traditional shape, by rolling them on the ribs of a fork with your thumb.


Here is a short video that I taped (sorry for the background sounds… it was my little one watching the Wiggles and calling me… ;-P I had thought of modifying the audio… but changed my mind… after all, this is US… and how I cook!):
To cook the gnocchi, take a large pot and fill it with water. Put the pot on the fire and add a handful of sea salt into the water. When the water is boiling, put the gnocchi in. As soon as the gnocchi start floating, they are ready (they cook very quickly, usually 1 or 2 minutes). Remove them with a slotted spoon and put them in the pan with the sauce of your choice. Mix well on low fire and serve hot.
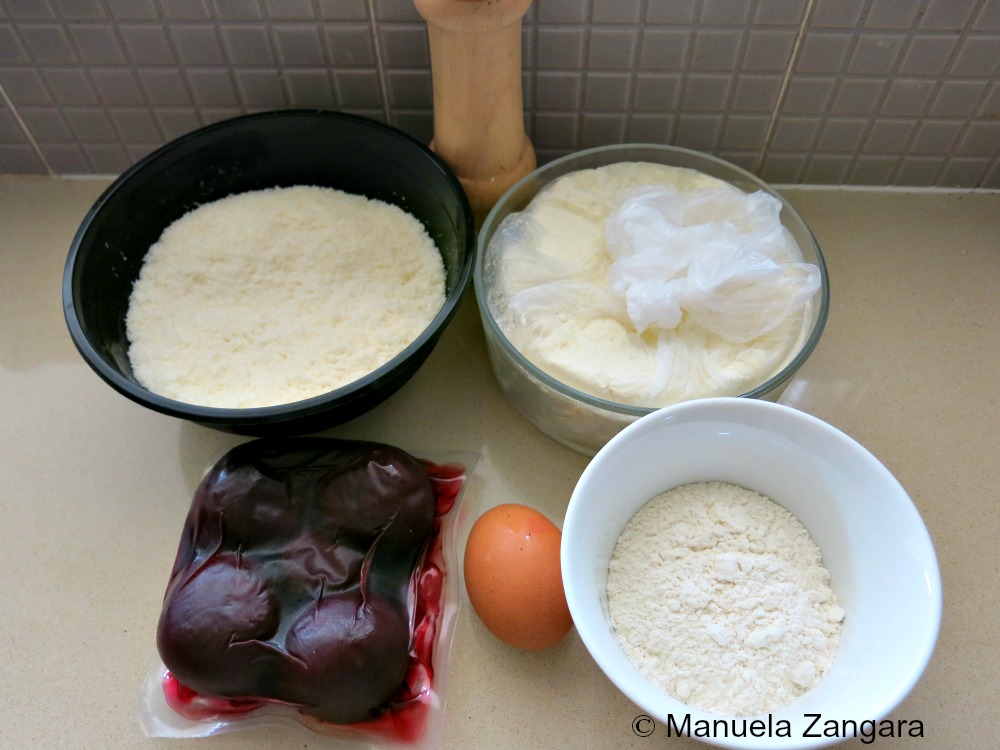
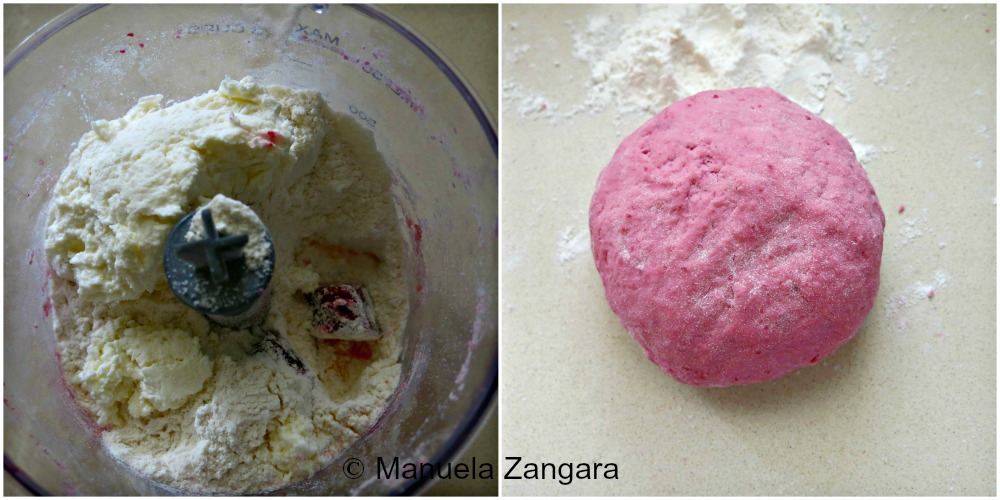
How to make Beetroot and Ricotta Gnocchi
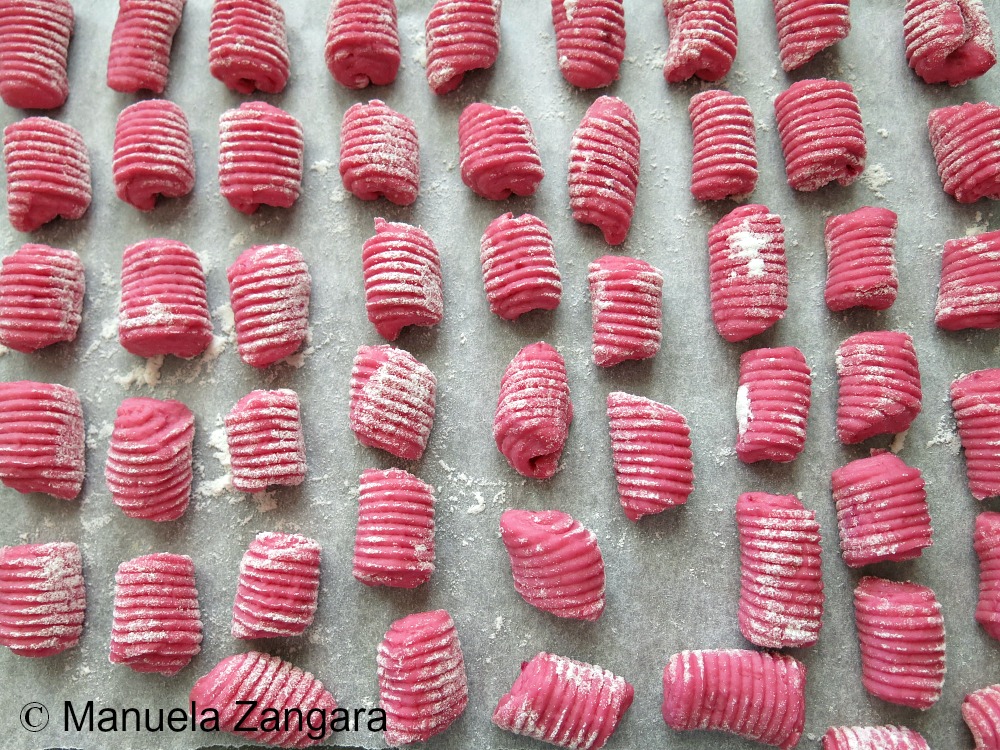
I love the intense pink colour of these gnocchi! The slight sweetness that the beetroot adds to these pillowy gnocchi is perfectly balanced by serving them with a sharp sauce (like a blue or goat’s cheese sauce).
Ingredients for 4 persons:
150 gms – ¾ cup beetroot, cooked, cooled and pureed
250 gms – 1 cup ricotta cheese
60 gms – 2/3 cup thinly grated Parmigiano Reggiano or Grana Padano
250 gms – 2 cups flour
Additional flour as required (you may need more depending on how soft the ricotta is)
1 egg
1 tsp salt
Put all the ingredients in a bowl and mix them well.
When they are well combined put the mixture on a board and knead well, adding the extra flour until the dough stops sticking to your hands. Do not put too much flour though or your gnocchi will become chewy.
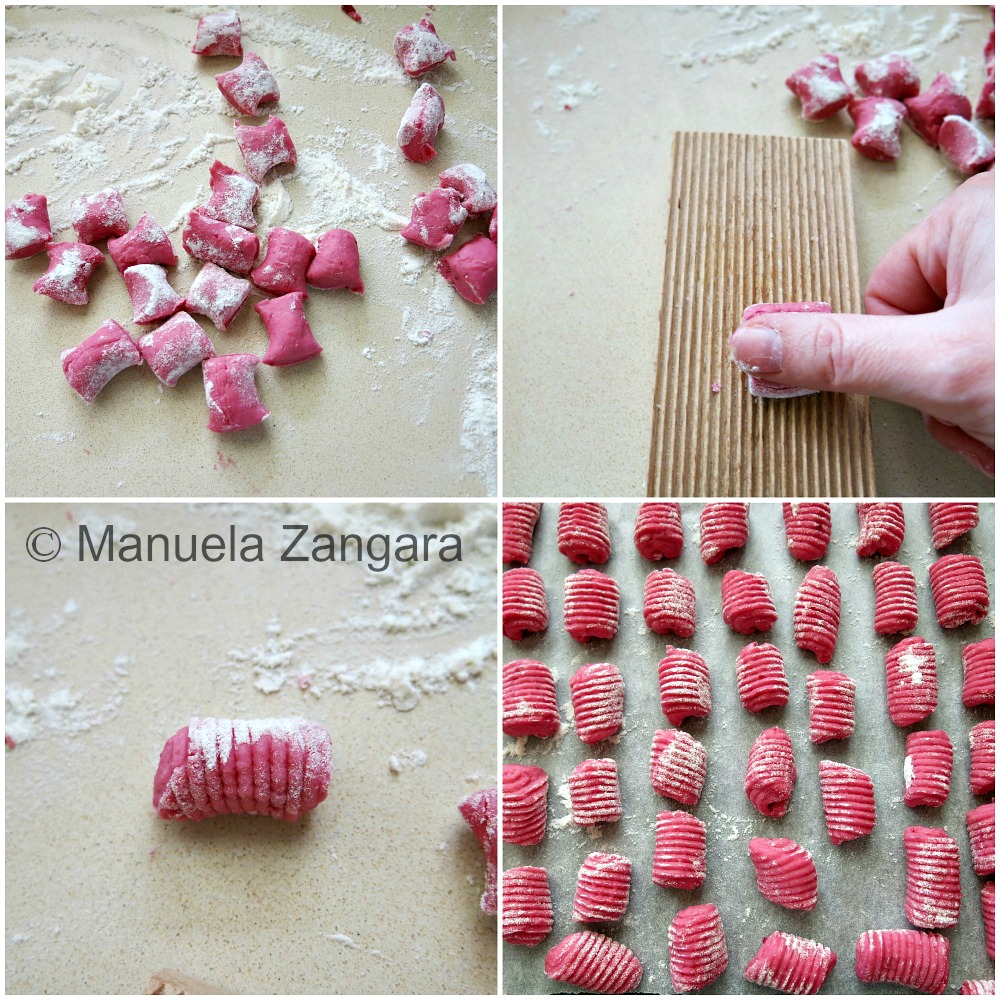
Divide the dough in 8 to 10 balls. Roll each ball of dough using your fingertips into ropes about 2 cm (3/4 inch) thick.
Then cut the ropes of dough into 2.5 cm (1 inch) pieces and place them on a floured tray.
If you want, you can also give the gnocchi their traditional shape, by rolling them on the ribs of a fork with your thumb or by using the specific tool.
To cook the gnocchi, take a large pot and fill it with water. Put the pot on the fire and add a handful of sea salt into the water. When the water is boiling, put the gnocchi in. As soon as the gnocchi start floating, they are ready (they cook very quickly, usually 1 or 2 minutes). Remove them with a slotted spoon and put them in the pan with the sauce of your choice. Mix well on low fire and serve hot.

Another recipe for gnocchi. These are made with all purpose and buckwheat flour mixed in equal proportions. It is a recipe from the Northern region of Valle d’Aosta, right on the Alps. They are the base for a traditional dish of the area called Gnocchi alla Bava, made with cheese.
Ingredients:
250 gms – 1 cup flour
250 gms – 1 cup buckwheat flour
300 ml – 1 ¼ cups water
½ tsp salt

These are very easy to make, especially if you have already made gnocchi, as they are shaped in the same way. The only difference is in the dough, which is made with a mix of regular flour and buckwheat flour. The first thing to do is to make the dough. Mix the flours and add enough lukewarm water to obtain a tough but pliable dough after kneading it for a few minutes. Add the water little by little, as it is easier to add it than to fix “soggy” dough. When you have the dough ready, make it into a ball, cover it with a clean tea towel (or cling wrap) and let it rest for 10-15 minutes.

Now you are ready to transform the dough into gnocchi. Divide the dough in 8 to 10 balls. Roll each ball of dough using your fingertips into ropes about 2 cm (3/4 inch) thick. Then cut the ropes of dough into 2.5 cm (1 inch) pieces and shape them like gnocchi, by rolling them on the ribs of a fork (or using the specific tool) with your thumb. Place the ready gnocchi on a floured tray.


To cook the gnocchi, take a large pot and fill it with water. Put the pot on the fire and add a handful of sea salt into the water. When the water is boiling, put the gnocchi in. As soon as the gnocchi start floating, they are ready (they cook very quickly, usually about 3 minutes). Remove them with a slotted spoon and serve hot with your favourite sauce. They are best eaten with cheese sauces and the most traditional recipe is Gnocchi alla Bava!


Today I had a gnocchi that looked like spaghetti. I bought it at the farmers market in Garbatella (just outside the mani part of Rome) and on the container it said gnocchi lungo. How do you think it was made? It was delicious.
Manu , this post is The Post of all Manu Posts. Unbelievable set of tutorials. I would need 3 months worth of Sundays to practice these… Love following your site and your emails. Keep them coming !
mick
https://www.coolonsale.com
I have just invested in a pasta machine, and this guide is super helpful. Thank you!
Excellent tutorials on handmade pasta, and great photos. Your whole blog is very inspiring! Thank you for all the wonderful recipes. I’m going to make the pesto lasagne tomorrow! I don’t have a pasta machine – can I use readymade lasagne sheets? Yours look thinner and not as doughy as packaged ones. 🙂
Hi Payal
Thank you so much for your wonderful comment! 🙂
You sure can. Of you think the ready made ones are too thick, just quickly roll them with a rolling pin. 🙂
Let me know how you like them! 🙂
Hi Manu,
Wouldn’t you really like to tell Stan that he doesn’t know what he’s talking about? Okay I’ll do it for you. Stan, you don’t know what you’re talking about. I grew up in a very Italian environment, and with every dish …. not just pasta, recipes varied depending upon who was in the kitchen and what ingredients were available. What has always separated Italian cooking from the rest is the passion, creativity and love that goes into preparing food. (With or without eggs) Manu’s recipes are as authentic as yours or mine.
Buon appetite!
Bob
Thank you so much Bob! I really appreciate your lovely comment and kind words!!! They mean a lot to me!!! Hope to “see you” around more often! 🙂
What an INCREDIBLE pasta tutorial Manu! I am amazed. Just found you via Sawsan’s gnocchi post and I am so glad to have stumbled upon your incredible blog. I haven’t had a great deal of luck with gnocchi so far but I’m going to try again with a couple of your recipes. Gorgeous. Thank you for sharing your experience! z
Dear Manu,
I love all your pasta recipes. I make pasta at home for some time and your great tutorial will give a great inspiration for another recipes and shapes.
Until this time I make pasta with all purpose and wholewheat flours.
Thank you very much!
Romana
Potato gnocchi is just that – potatos and flour. REAL gnocchi has NO EGG in it! Your variations, like so manty others, are more like spatzel than anything else.
Gnocchi is a peasant dish. Peasants didn’t have chickens lying around laying eggs for them to collect. Meat and eggs in general were considered a LUXURY at mealtime. Vegetables like eggplant, zucchini, etc… were seasonal to the region, unlike today where you can simply go grocery shopping and get most vegetables year-round.
I’ll bet that the gnocchi you so hated in school growing up was simply potato and flour – and overcooked so it was mushy and pasty – BUT it was REAL GNOCCHI! (you think your school actually put an expensive item like eggs in your gnocchi?! LOL!)
The same goes for pasta fagioli. It has NOT MEAT in it and no veggies other than onion. It is simply navy beans, diced onions, ditalini pasta, and tomato sauce! It is again a PEASANT DISH meant for sustainance, not extravagance and frivolity. Olive Garden is a prime example of the commercialized way to do pasta fagioli.
Other than that I am sure your other recipes are nice. Your gnocchi though, is not gnocchi if it has egg in it.
Hi Stan! Thanks for your massage, I appreciate reading your thoughts. I must say though that Italian potato gnocchi (the ones of the recipe) have been made with eggs since 1600’s! And Italian peasants usually had hens too. Gnocchi are the first form of pasta and before potatoes were introduced in Europe (after the discovery of Americas), they were simply made with flour and water. Dumplings are very common in Europe and there are probably areas where eggs were not traditionally employed, but that’s not the case in Italy. 🙂
Manu, don’t be discouraged by comments like the above. Who cares what is the “real” gnocchi: cooking isn’t antique collecting- it is about trying different things and if it tastes good. Anyway, I have some durum wheat in a cupboard and was thinking of making gnocchi but notice most recipes use regular flower. Is durum flower not really used for gnocchi?
Hi Adam! Thank you so much for your comment and encouraging words! They mean a lot to me! 🙂
You can use durum wheat flour for gnocchi if you like, but they may become a little less soft (depending on how much you will need to use). As a generic rule we use all purpose flour whenever eggs are used to make pasta as the eggs give the dough strength, so you don’t need to double up. But as I said, it’s just a generic rule… each region/family has its recipes. If durum wheat flour is harder to find or more expensive, don’t use for gnocchi. You can make pasta with it (in this same page I have a tutorial on how to make “malloreddus” which is pasta made with durum wheat flour and shaped like gnocchi). Hope it helps! 🙂
Bravissima grandissima MANU’ Thanks for esporting la cultura italiana nel mond. Ti meriti una medaglia tricolore. Buona fortuna a te e alla tua famiglia. Fai onore all’Italia. grazie mille dalla lontana vancouver island,Canada.
wow! Thank you I love this. Your presentation is such a useful knowledge. I love to eat pasta but don’t know how to make that much. I love the real Italian way. Just cross to your blog via culinary journey by chef Dennis.
As an avid cook (but have never made pasta or Gnocchi before!) this is a great website. A group of friends are currently hosting a “Come dine with me” event where each month it alternates as to who makes each course. I’ve promised Gnocchi with a Gorganzola sauce (had it in a restaurant lately and decided it was the perfect comfort food). Anyway, will post back when I’ve attempted it this Sunday!
Many thanks – Lee
Manu: ma questo post e’ fantastico. Me lo metto subito nei favorite bookmarks. Sei bravissima!
Wow! This is an awesome tutorial Manu. For a dummy like me who has never made her own pasta before, your tutorial is a perfect way to learn from. Your Malloreddus alla Campidanese post also looks very mouth watering. Thanks for sharing all this culinary knowledge. xoxo.