Celebrate the holidays with soft, golden Pandoro, a buttery sweet bread that fills your kitchen with vanilla and warmth. Slice, dust with icing sugar, and enjoy a simple Christmas tradition at home.
Christmas in Italy means Panettone or Pandoro. The rivalry between these two sweets is real, and people who love one often say they dislike the other.
As a child, I was firmly on Pandoro’s side. I’ve always liked sultanas (I used to sneak them from the jar my mum kept for baking), but I never cared for the candied fruit in Panettone. Pandoro felt softer and more delicate, which children tend to prefer.
Nowadays, I enjoy both, as my dislike for candied fruit has faded, but Pandoro will always have a special place in my heart. Whenever I smell vanilla-scented icing sugar, I’m transported back to my parents’ kitchen, reaching for the box of Pandoro, ready to dust it and dig in. That will always be the “smell of Christmas” to me.
Pandoro literally means “Golden Bread” and comes from Verona, in Veneto. I can find Pandoro here in Australia, imported from Italy, but I like making my own at home.
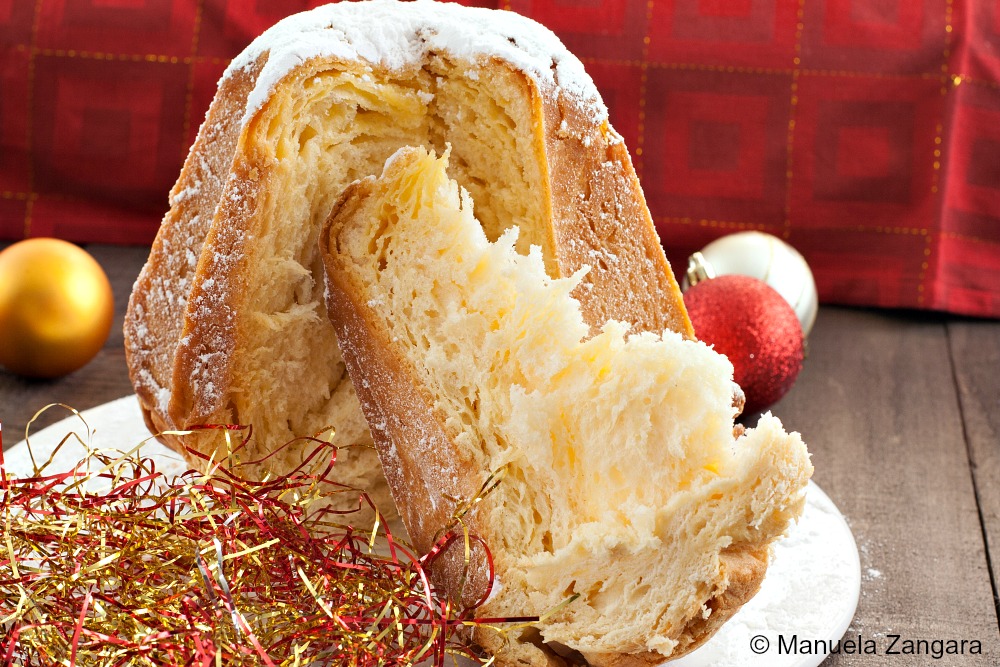
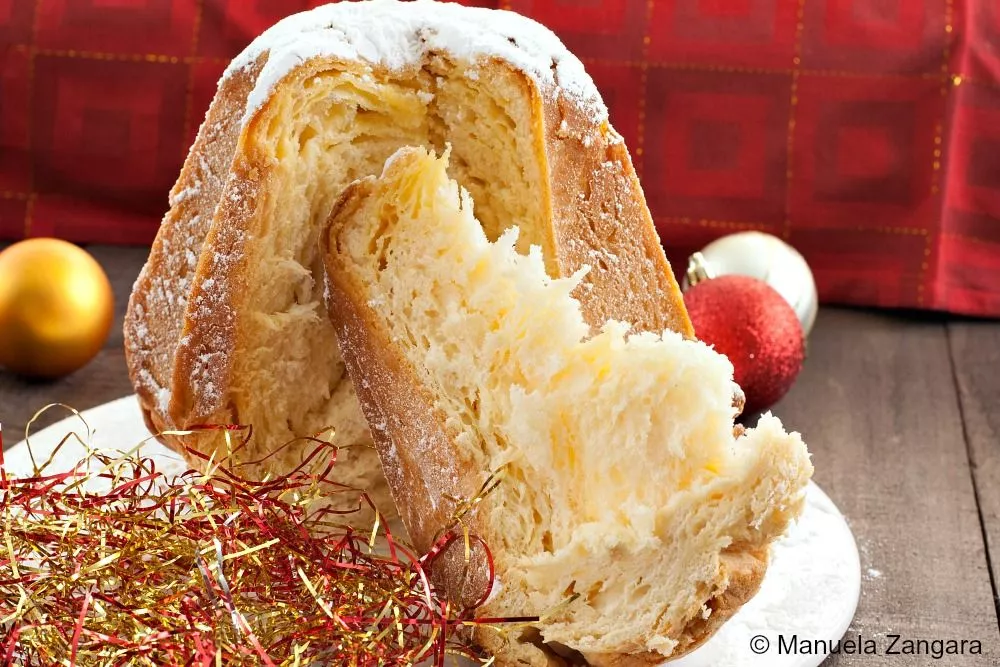
The recipe isn’t difficult, but it takes time and requires a digital scale. There are two versions of Pandoro: an easier one with a cakey result and this traditional method, which is flaky, airy, and decadent. It uses layering with folds, similar to puff pastry. The result is so good you’ll forget the work the moment you taste the first slice.
So, how will you be spending Christmas, and what is your “Christmas smell”? Merry Christmas to you and your loved ones.
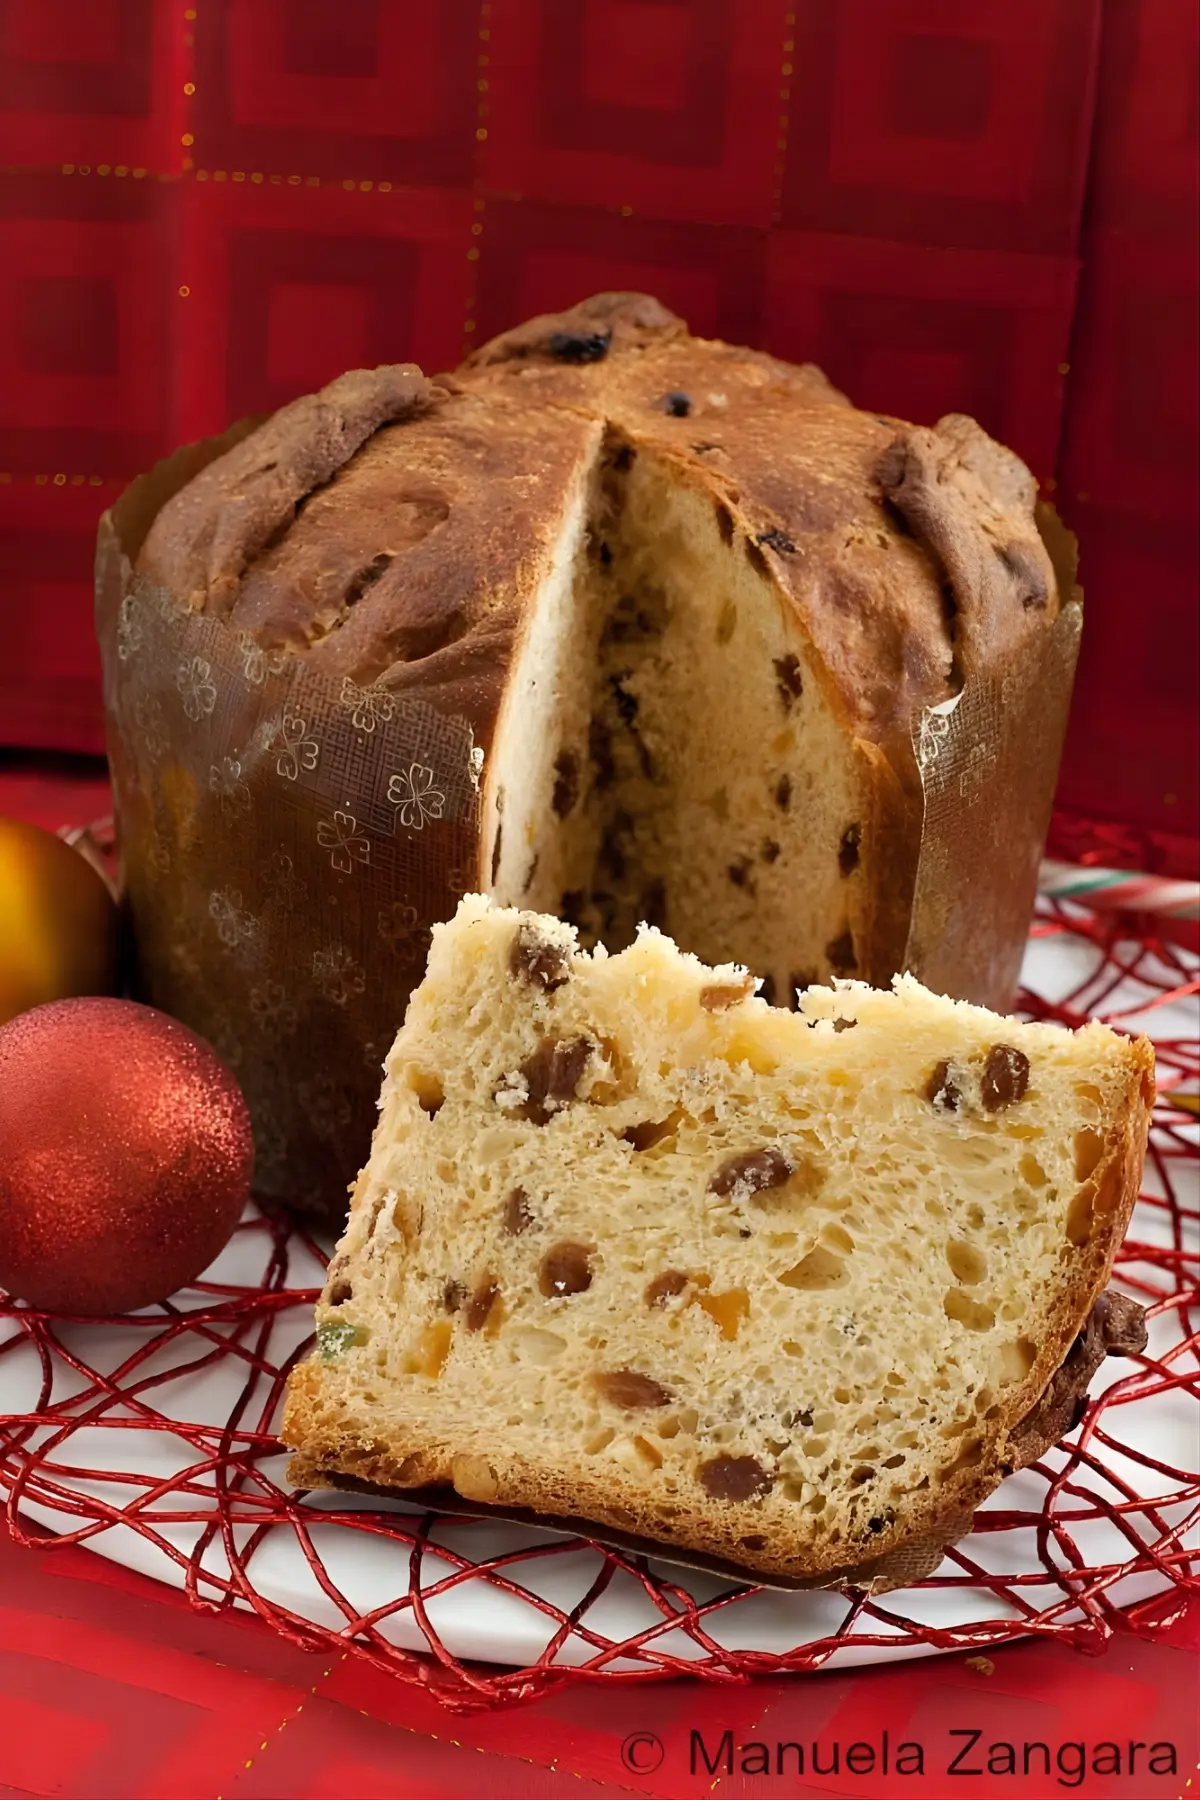
If you would like to bake the other Italian Christmas classic, try my Panettone recipe.
What is Pandoro?
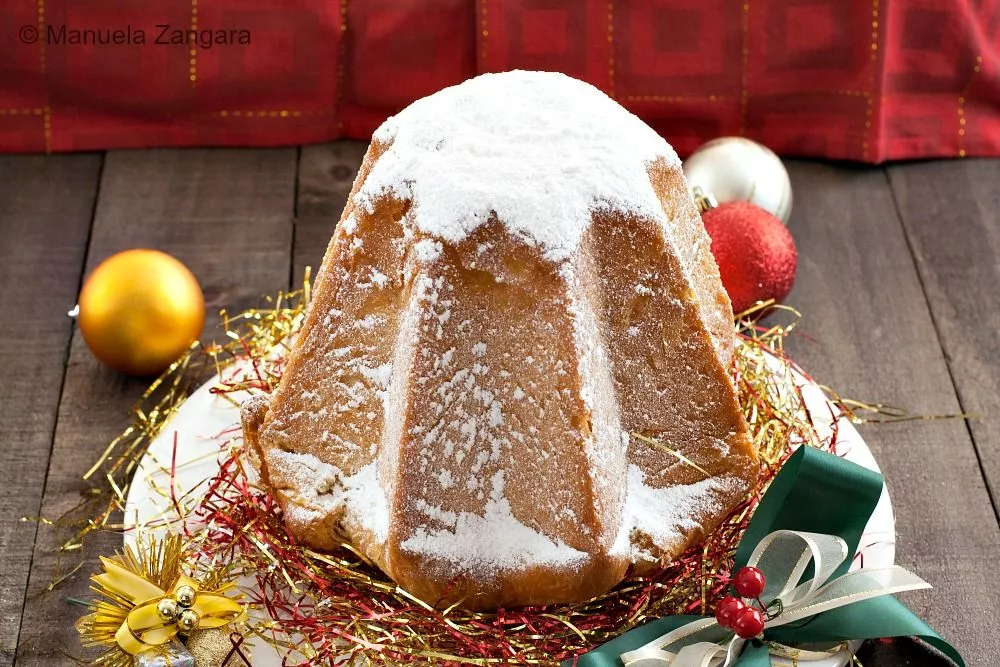
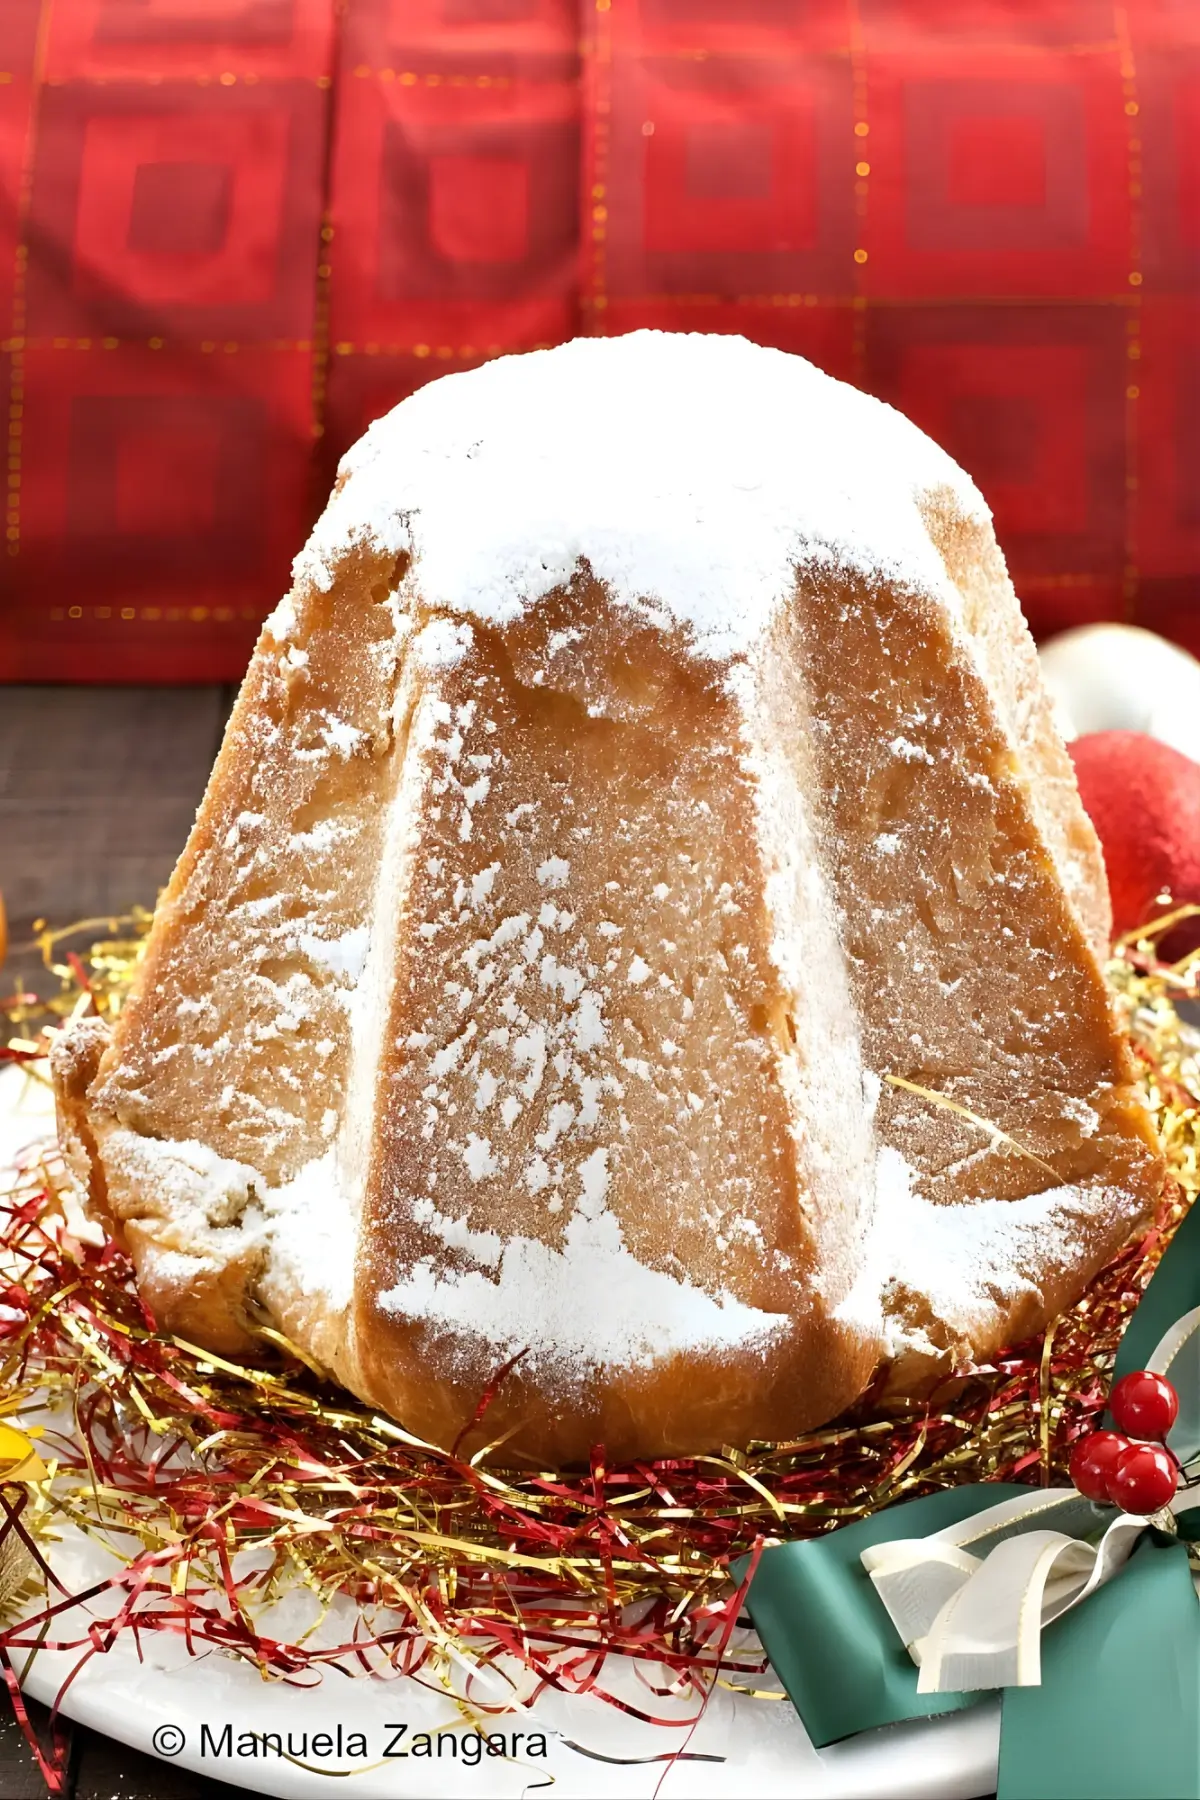
Pandoro is a classic Italian Christmas cake from Verona, famous for its tall, star-shaped form and golden, buttery crumb. Made from a rich, yeasted dough and layered with butter, it has a soft texture and a delicate flavour that feels both simple and festive.
It’s traditionally dusted with vanilla icing sugar to look like a snow-capped mountain and often served plain or with sweet spreads, cream, or custard. Unlike Panettone, which has dried fruit, Pandoro is all about its light, melt-in-your-mouth texture and gentle sweetness.
Why Home-Baked Pandoro Always Wins
- Made with fresh butter and eggs that give a richer flavour than any store-bought version.
- Perfect for gifting, especially when wrapped in cellophane and tied with a festive ribbon.
- Fills the kitchen with the scent of butter and vanilla, the true smell of Christmas.
Key Ingredients for Pandoro with Vanilla Icing Sugar
Beurrage Mixture
Butter, honey, vanilla, and white chocolate form the base for layering. Butter creates the soft, flaky crumb and golden crust. Choose butter with at least 82% fat for a smooth, rich result.
Leavening Base (Poolish)
Made with fresh brewer’s yeast, water, flour, sugar, and egg yolk, this starter builds flavour and helps the dough rise evenly for a light, airy texture.
White Chocolate
Adds depth and stability to the butter mixture. It melts smoothly into the dough, enhancing richness while keeping the texture balanced.
Honey
A small amount of honey gives gentle sweetness and helps the crumb stay soft for days. It also adds a mild floral note that complements the vanilla.
Find the complete list with measurements in the recipe card below.
How to Make Pandoro
Beurrage Mixture
Step 1: Place the cold butter between two sheets of baking paper and gently tap it with a rolling pin to make it more pliable.
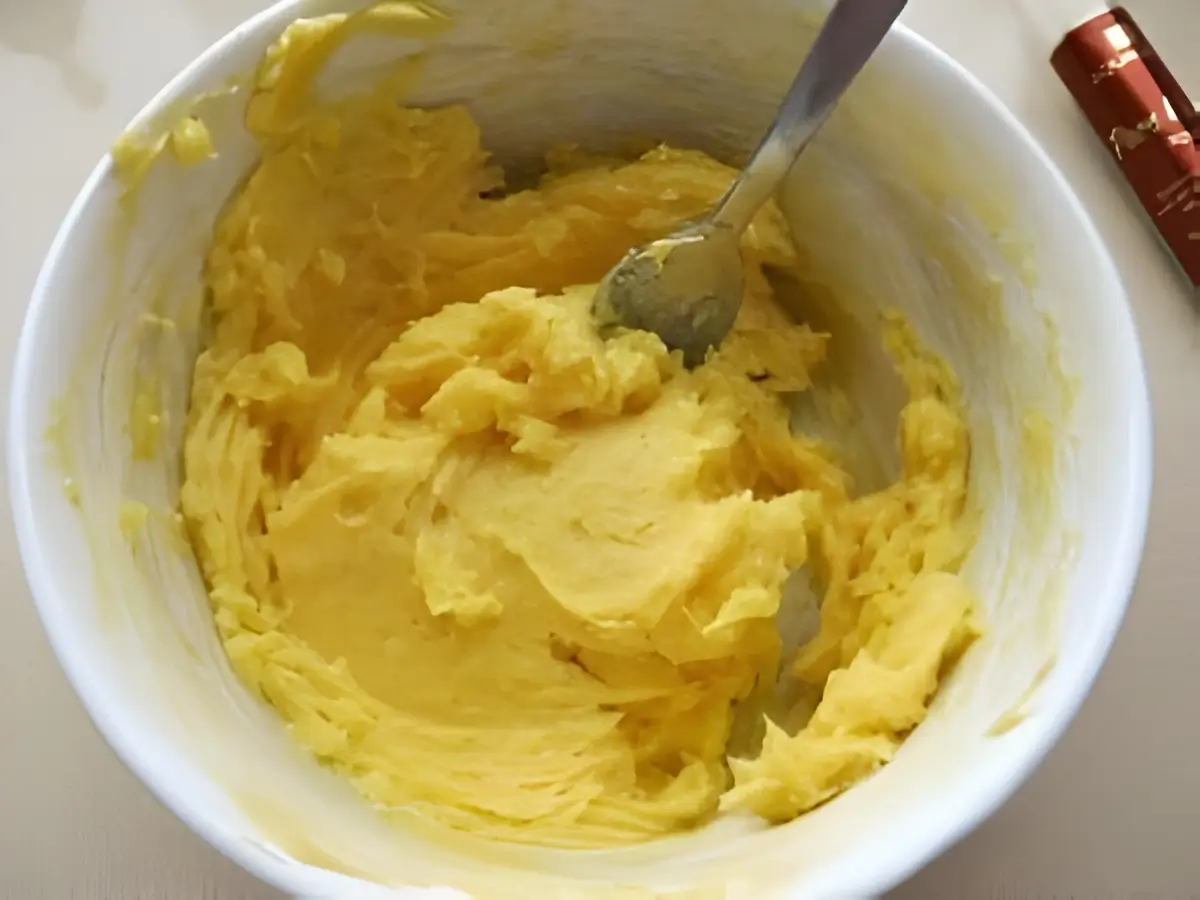
Step 2: Using a fork, mix the butter with the vanilla, honey, and melted white chocolate (make sure the chocolate is not hot, or it will melt the butter).
Step 3: Remove 35 g – 1¼ oz of the mixture and place it in a small bowl. Refrigerate until needed.
Step 4: Place the remaining mixture between two sheets of baking paper and gently shape it into a ½ cm thick rectangle. Refrigerate for 1 hour.
Poolish
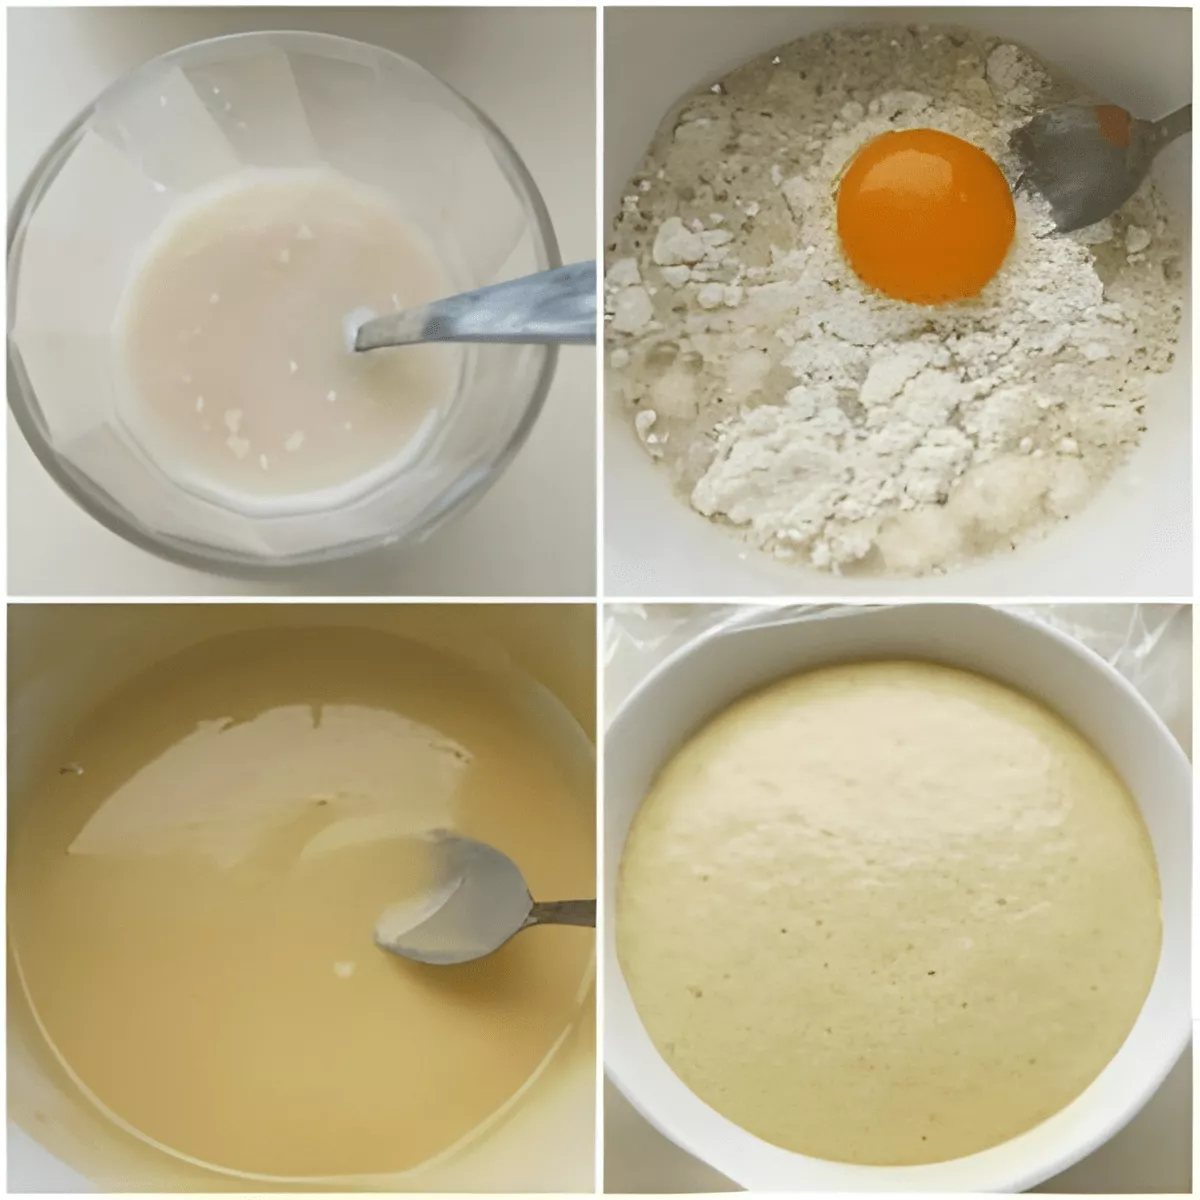
Step 1: Mix all the ingredients together in a bowl until smooth. The mixture should be quite liquid. Set aside to proof for 1 hour, or until doubled in size.
First Dough
Step 1: Add all the ingredients, except the reserved beurrage mixture, to the bowl of an electric mixer fitted with a paddle attachment. Knead until smooth and elastic, then add the 35 g – 1¼ oz of beurrage mixture. Continue kneading slowly until the butter is fully absorbed.
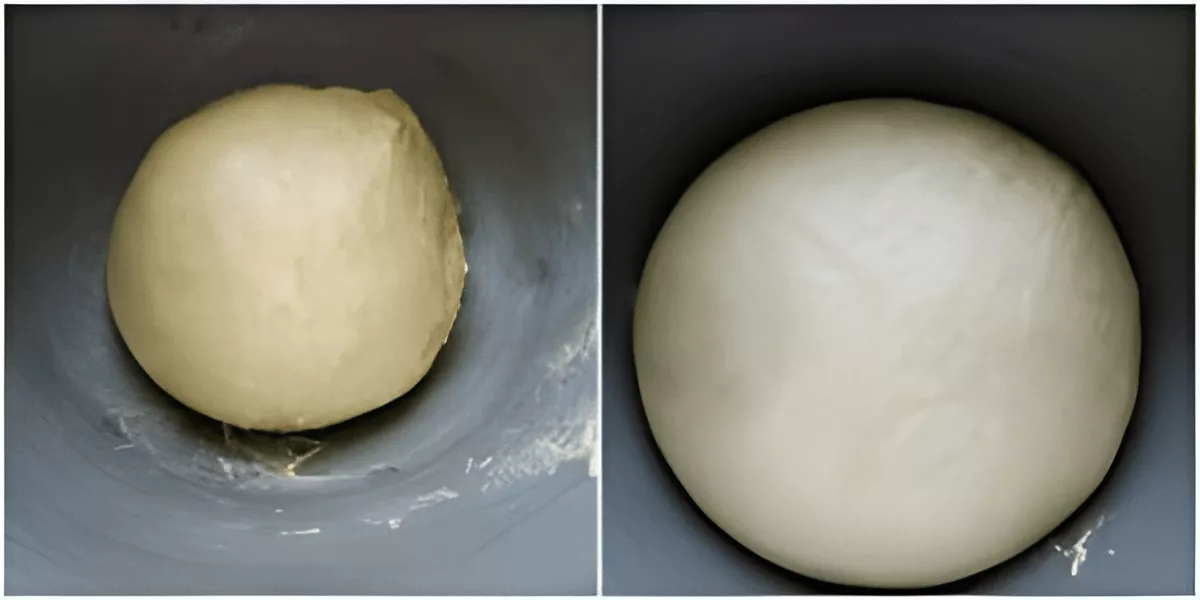
Step 2: Shape the dough into a ball and set aside to proof for 1 hour, or until doubled in size.
Second Dough
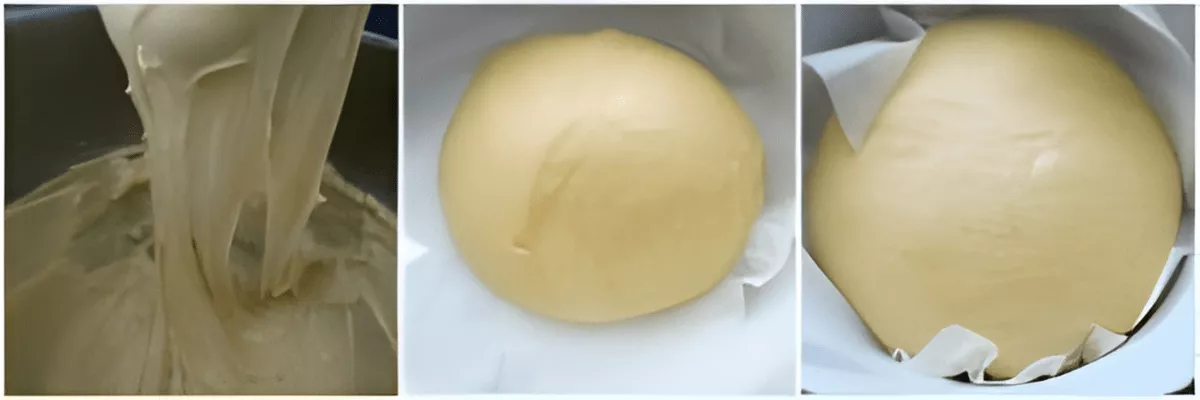
Step 1: Place all the ingredients in the bowl of an electric mixer fitted with a paddle attachment. Knead until the mixture becomes smooth and elastic. The dough is ready when it stretches around the paddle attachment, forming long strands like melted mozzarella. Be patient, as it will take time, and no extra flour is needed.
Step 2: Shape the dough into a ball and set aside to proof for 1 hour, or until doubled in size.
Layering
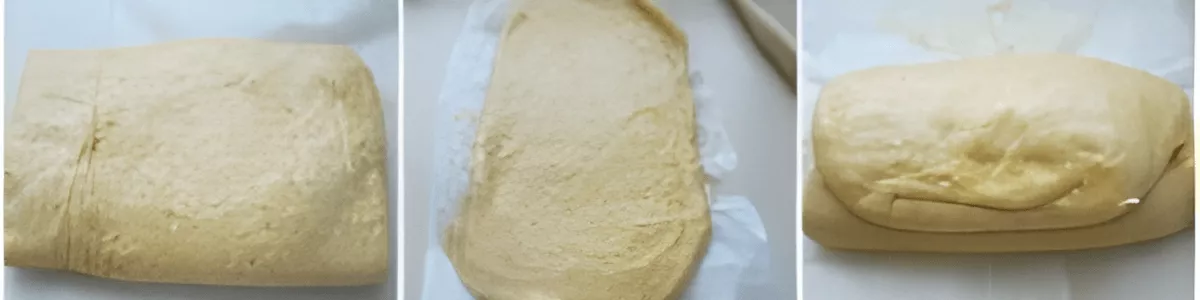
Step 1: Roll the dough into a 1 cm thick rectangle. Fold ⅓ of the dough over the centre, then fold the remaining ⅓ on top to create a simple 3-fold turn. Cover with cling wrap and refrigerate for 30 minutes.
Step 2: Roll the dough into a long rectangle. Place the beurrage to cover ⅔ of the dough. Fold the unbuttered ⅓ over the centre, then fold the remaining ⅓ on top to make another simple 3-fold turn.
Step 3: Press the dough down with your hands to seal the middle.
Step 4: Turn the dough so the closed edges are on the left and right, with the join running vertically. Roll into a 1.25 cm – ½ inch thick rectangle, mainly rolling up and down, with minimal side movement.
Step 5: Repeat another simple 3-fold turn, folding ⅓ over the centre and the last ⅓ on top. Cover with baking paper and refrigerate for 30 minutes.

Step 6: Give the dough one more 3-fold turn and rest it in the fridge for 30 minutes.
Shaping and Baking
Step 1: Give the dough a final 3-fold turn.
Step 2: Fold the dough onto itself and shape it into a smooth ball.
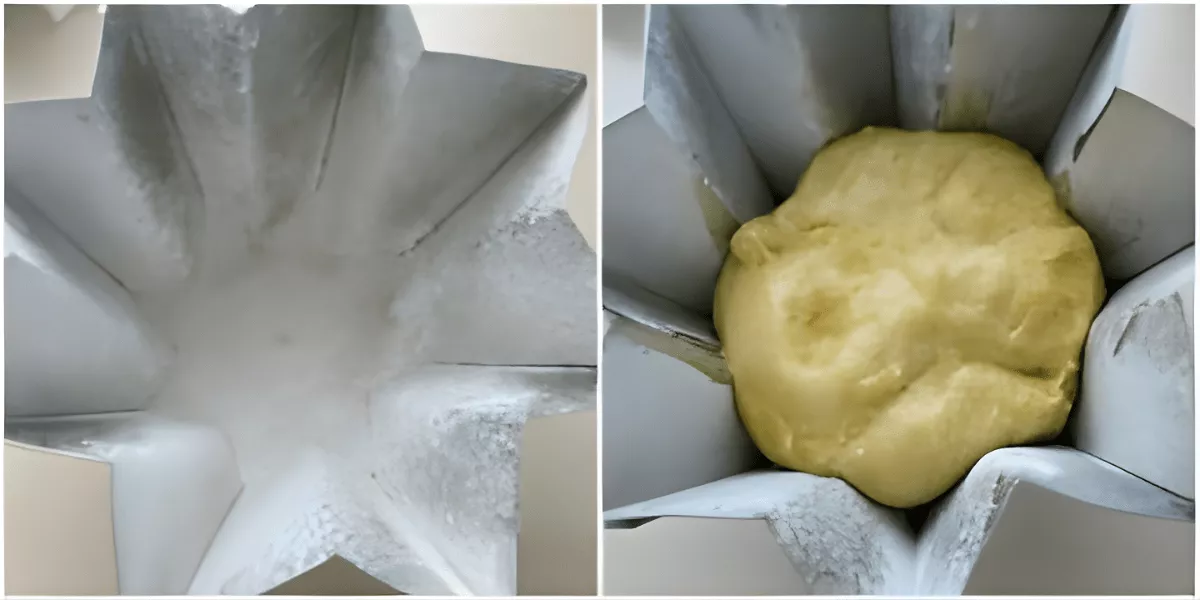
Step 3: Place it into a greased and floured Pandoro tin, with the smoother side facing down (this will become the top after baking).
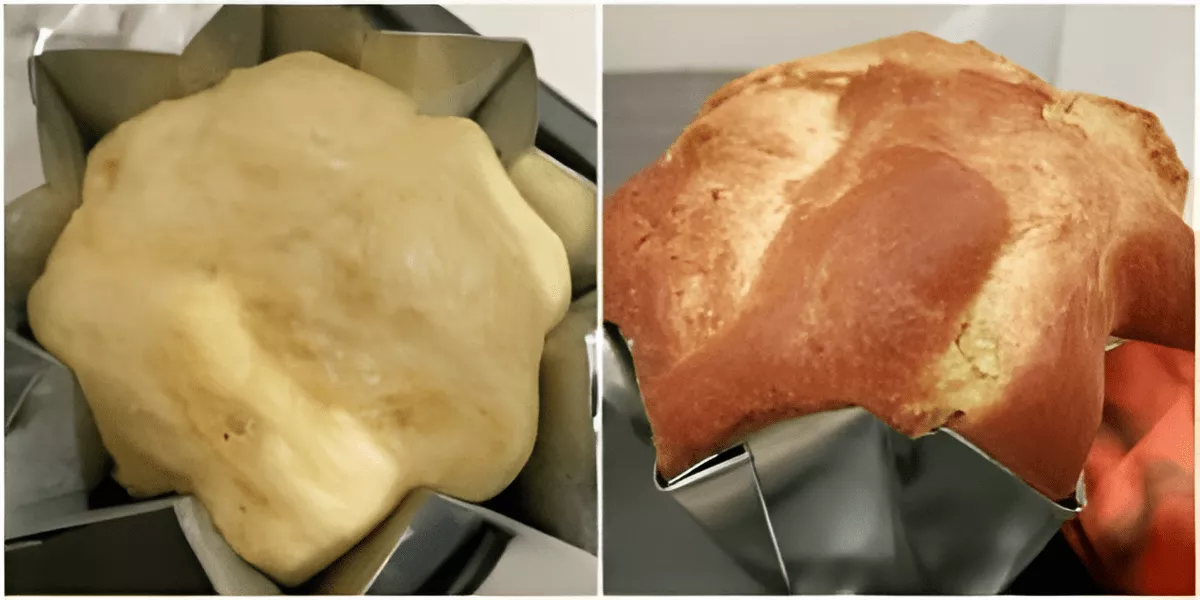
Step 4: Cover loosely and proof for about 5 hours, or until the dough reaches the edge of the tin.
Step 5: Bake in a preheated oven at 160°C – 320°F for 30 minutes. Then reduce the temperature to 150°C – 300°F, keeping the oven door slightly ajar with a pot holder. Continue baking for another 30 minutes, or until a toothpick inserted in the centre comes out clean.
Step 6: Leave the Pandoro in the tin for at least 6 hours before removing, to prevent it from collapsing. Leaving it overnight works best.
Step 7: Dust generously with vanilla-flavoured icing sugar before serving.
Frequently Asked Questions
Yes. You can use a deep round cake tin or bundt pan if you don’t have a star-shaped mould. The shape will differ, but the texture and flavour stay the same.
Yes. Replace 15 g – ½ oz of fresh yeast with 5 g – ⅙ oz of active dry yeast and dissolve it in warm water before mixing to activate it properly.
Slice it horizontally to form layers, then dust with icing sugar. You can also serve it with mascarpone cream, zabaglione, or warm chocolate sauce.
Yes. Add grated lemon zest or a spoonful of liqueur such as Grand Marnier to the second dough for a delicate variation. Keep additions light to maintain texture.
Extra Help from the Kitchen
Use a Digital Scale – Accuracy makes all the difference in enriched doughs. Weighing ingredients rather than using cups gives consistent hydration and perfect structure.
Proof in a Warm Spot – Gentle warmth encourages a steady rise without melting the butter. A closed oven with the light on is ideal for maintaining even proofing.
Handle Dough Gently – Avoid pulling or stretching when shaping. Gentle pressure keeps the internal texture even and helps the Pandoro rise uniformly in the tin.
Cool Completely Before Dusting – Always wait until the cake is fully cool before adding icing sugar. Dusting too soon causes the sugar to melt and disappear.
Variations and Twists
Create a Marbled Version – Gently swirl a small amount of cocoa powder into part of the dough for a two-tone effect.
Chocolate Pandoro – Stir cocoa powder into part of the dough or add dark chocolate chips before shaping for a rich, festive twist.
Pandoro Tiramisu – Slice the cooled Pandoro into layers and use it instead of sponge in a tiramisu. Add coffee, mascarpone, and cocoa for a Christmas version of the Italian classic.
Pandoro Fruit – Fold small pieces of candied orange, sultanas, or dried apricots into the dough for a fruitier take that recalls Panettone flavours.
Storage and Shelf Life
Store Traditional Pandoro in an airtight container or wrapped in cling film at room temperature for up to 5 days. Keep away from heat or moisture to preserve texture.
For longer storage, freeze the cake or individual slices for up to 1 month and thaw before serving. To reheat, warm slices for a few seconds in the microwave or for 5 minutes in an oven preheated to 150°C – 300°F until soft.
Christmas Recipes to Share and Celebrate Together
Pandoro Recipe
Celebrate the holidays with soft, golden Pandoro, a buttery sweet bread that fills the room with vanilla and warmth. Slice, dust with icing sugar, and enjoy a simple Christmas tradition at home.
Ingredients
Beurrage Mixture
- 220 g – 7⅔ oz butter
- 15 g – ½ oz honey
- 1 vanilla pod – scraped
- 4 white chocolate squares – melted
Poolish
- 15 g – ½ oz fresh brewer’s yeast
- 60 g – 2 oz water
- 50 g – 1⅔ oz flour
- 1 tbsp sugar
- 1 egg yolk
First Dough
- Poolish
- 3 g – 0.1 oz fresh brewer’s yeast
- 2 tsp water
- 25 g – 1 oz sugar
- 200 g – 7 oz flour
- 1 egg
- 35 g – 1¼ oz beurrage mixture
Second Dough
- First dough
- 2 eggs
- 100 g – 3½ oz sugar
- 200 g – 7 oz flour
- 1 tsp salt
Decoration
- Vanilla-flavoured icing sugar
Instructions
Beurrage Mixture
-
Place the cold butter between two sheets of baking paper and gently tap it with a rolling pin to make it more pliable.
-
Using a fork, mix the butter with the vanilla, honey, and melted white chocolate (make sure the chocolate is not hot, or it will melt the butter).
-
Remove 35 g – 1¼ oz of the mixture and place it in a small bowl. Refrigerate until needed.
-
Place the remaining mixture between two sheets of baking paper and gently shape it into a ½ cm thick rectangle. Refrigerate for 1 hour.
Poolish
-
Mix all the ingredients together in a bowl until smooth. The mixture should be quite liquid. Set aside to proof for 1 hour, or until doubled in size.
First Dough
-
Add all the ingredients, except the reserved beurrage mixture, to the bowl of an electric mixer fitted with a paddle attachment. Knead until smooth and elastic, then add the 35 g – 1¼ oz of beurrage mixture. Continue kneading slowly until the butter is fully absorbed.
-
Shape the dough into a ball and set aside to proof for 1 hour, or until doubled in size.
Second Dough
-
Place all the ingredients in the bowl of an electric mixer fitted with a paddle attachment. Knead until the mixture becomes smooth and elastic. The dough is ready when it stretches around the paddle attachment, forming long strands like melted mozzarella. Be patient, as it will take time, and no extra flour is needed.
-
Shape the dough into a ball and set aside to proof for 1 hour, or until doubled in size.
Layering
-
Roll the dough into a 1 cm thick rectangle. Fold ⅓ of the dough over the centre, then fold the remaining ⅓ on top to create a simple 3-fold turn. Cover with cling wrap and refrigerate for 30 minutes.
-
Roll the dough into a long rectangle. Place the beurrage to cover ⅔ of the dough. Fold the unbuttered ⅓ over the centre, then fold the remaining ⅓ on top to make another simple 3-fold turn.
-
Press the dough down with your hands to seal the middle.
-
Turn the dough so the closed edges are on the left and right, with the join running vertically. Roll into a 1.25 cm – ½ inch thick rectangle, mainly rolling up and down, with minimal side movement.
-
Repeat another simple 3-fold turn, folding ⅓ over the centre and the last ⅓ on top. Cover with baking paper and refrigerate for 30 minutes.
-
Give the dough one more 3-fold turn and rest it in the fridge for 30 minutes.
Shaping and Baking
-
Give the dough a final 3-fold turn.
-
Fold the dough onto itself and shape it into a smooth ball.
-
Place it into a greased and floured Pandoro tin, with the smoother side facing down (this will become the top after baking).
-
Cover loosely and proof for about 5 hours, or until the dough reaches the edge of the tin.
-
Bake in a preheated oven at 160°C – 320°F for 30 minutes. Then reduce the temperature to 150°C – 300°F, keeping the oven door slightly ajar with a pot holder. Continue baking for another 30 minutes, or until a toothpick inserted in the centre comes out clean.
-
Leave the Pandoro in the tin for at least 6 hours before removing, to prevent it from collapsing. Leaving it overnight works best.
-
Dust generously with vanilla-flavoured icing sugar before serving.
[mailerlite_form form_id=1]
*This post contains an affiliate link. If you make a purchase through it, I may earn a small commission at no extra cost to you.


I made this recipe yesterday and it really exceeded my expectations. It was a bit tricky, especially during the lamination, but it turned out very beautifully. I did, in fairness, drastically shrink the final rise to about 90 minutes by proofing in the oven with the light on. It turned out beautifully. Completely changed my family’s opinion on what pandoro could be!
HI Manu, this looks beautiful! I’m looking forward to trying it this weekend. One question: I’m not a fan of white chocolate, I find it way too sweet. Can I substitute for dark chocolate or can I leave white chocolate out completely? Any suggestions for similar substitutions?
Thank you,
Monica
Hi Manu,
I’m so excited to try this recipe this weekend! Your recipe looks really clear, I’m even going to wing it with a gluten free version (though I’m sure it won’t work).
I did wonder what type of butter (salted or unsalted), flour or sugar (caster?) you use or does it not affect the panettone?
How long does it last once baked?? We have a pandoro christmas morning and this year i want to make my own, can i make it two days before and it still be ok?
Hi Fiona! It shouldn’t be a problem at all. Just wrap it in a cello bag (like a store-bought pandoro) and keep it in a dry place and you should be fine. 🙂
If you were to freeze the dough before baking it, at what stage can you freeze? Just before you proof it in the cake tin? And then once frozen, what’s the best way to defrost?
Is it possible to also over proof at any stage?
Hi Angelica. I have never frozen Pandoro dough, so I am not 100% sure that it would work out. I have successfully frozen pizza/bread dough following these instructions: https://www.nigella.com/ask/freezing-pizza-and-other-dough But I am not sure pandoro dough would react in the same way because it also has butter in it. If you want to try it, I would try to freeze the 1st dough only – not after that. Do let me know if it works out!! 🙂
Hi Manu, I came across your website while searching for Pandoro recipe. Your Pandoro looks so delicious and tempting. I like to bake one but I can’t find fresh brewer’s yeast. Can I replace with instant yeast or active dry yeast?
I’ve made the pandoro in this recipe several times with active dry yeast, at half the amount listed (the dry stuff is more concentrated). Came out fine.
Perfect answer! Thank you, Andrew! Sorry I am late!!
I have this same question! Hoping for a reply from Manu.
When you say 4 white chocolate squares, how many grams or ounces is that? I hope you reply soon because I am in a hurry thanks
Hi Maria. Sorry, I just saw this! 4 squares is approximately 4 oz.
This Pandoro is incredible, your recipe was clear and it helped me a lot. Making a pandoro was one my wishes
Please advise what the yield is. for example is the loaf 500 grams?
Could you also tell me the size of the pan you used for this recipe?
I await your response as I’m looking forward to try and make this Pandoro.
Thank you,
Elio Moro
Hi Elio
The tin is about 25 cm high (10 inches) and it makes a 1 kg pandoro.
I hope you like it!
Manu
Hello, can you please tell me what temperature should the water added to poolish and 1st dough be?
Hi Kristine. Room temperature or lukewarm, depending on how cold it is where you live. Hope it helps. Cheers.
I purchase a Pandora each Christmas here in Australia with lemon curd in it, at which stage would I be able to add it to the recipe!
Hi! I assume you buy the store bought ones filled with lemon curd cream? If you make it at home you won’t be able to add it do the dough. We usually make the Pandoro and then we serve it with lemon curd (or mascarpone cream, chantilly etc.). 🙂
srry i couldnt find the recipe for the pandoro
I made my first ever pandoro yesterday and I must say it was superb! Your recipe was more detailed than others on the internet and I am a fairly experienced home baker but still this was so delicious. Thank you very much Manu
I’ve only ever had panettone but I’d love to have a go at making pandoro. You are so clever!
I’m more of a Panettone guy, if I have to choose, but I will make an exception for your Pandoro! Both cakes are considered challenging to make – I don’t know any Italians who actually make them from scratch, so I admire you even more. In my family we used to go for some known quality brands, or occasionally we would splurge for an artisan-made panettone or pandoro, bought in a local Pasticceria. Merry Xmas!
I want to try this one too!! I make candied chestnuts for my panettone but that’s all I put in it. With my panettone I stick wooden skewers in it and turn it upside down. You don’t have to do that for the Pandoro right? I will let you know what happens. ..lol my Christmas smells are of baking breads and sweet spices! ! Merry Christmas to you and your family! !