Today I will show you how to make a sourdough starter. Yes, I too have started baking with sourdough. Don’t worry, it is not as hard as it may seem.
I must admit that, before being forced at home, I had no intention of trying my hands at making sourdough. Don’t get me wrong, I love baking. However, I thought it would be way too much trouble and work having to “feed” this living thing all the time. I thought it would take me back to the time I had to wake up in the middle of the night to feed my crying babies. I loved my babies (I still do!), however, waking up at night… well, that’s a different matter altogether.
Anyhow, even before all the limitations were introduced, Australians started to panic buying millions of rolls of toilet paper, flour, pasta (not even Italians finished ALL the pasta in their supermarkets!), and yeast.
I have IBS, which means I cannot have “regular” flour. In fact, I can only have “Low Fodmap” flour – and the only brand we were able to buy, disappeared from all supermarkets. However, I can have sourdough though because the fermentation helps to make it ok for people with IBS. So… I was kind of forced to start experimenting with sourdough.
And I am happy I was! I won’t lie. It was a pain at the beginning. I just did not have a lot of patience. So much so that I named my starter Itazura-kun – Japanese for Mr. Mischief. However, thanks to the support and tips from my fellow bloggers (thank you Tandy of Lavender and Lime, and Jen of Milk and Honey), I made it and I now have a well-established starter. YAY!
That said, I am definitely no expert yet. I am just at the beginning of the journey. However, I thought that sharing this post may be useful for anyone who would want to start baking sourdough bread but hasn’t had the courage yet. If I made it, so can you!
I started by using this recipe. However, it uses way too much flour at a time when flour is so precious. So, I scaled it down.
A young starter is quite sensitive so when establishing your sourdough starter it is important to follow the process (measuring the flour and water accurately, feeding at the suggested times, etc.) But once mature and strong, it will have more flexibility so don’t worry too much if you occasionally miss a feeding by a day or so, just get back on track as soon as you can and your starter will bounce back.
Ingredients
Starter
50 gms – 1 3/4 oz. flour (see Tip #1 and Variations)
50 gms – 1 3/4 oz. bottled water, lukewarm (see Tips #2 and #3)
To feed the Starter
Flour (see Tip #1)
Bottled water, lukewarm (see Tips #2 and #3)
Instructions
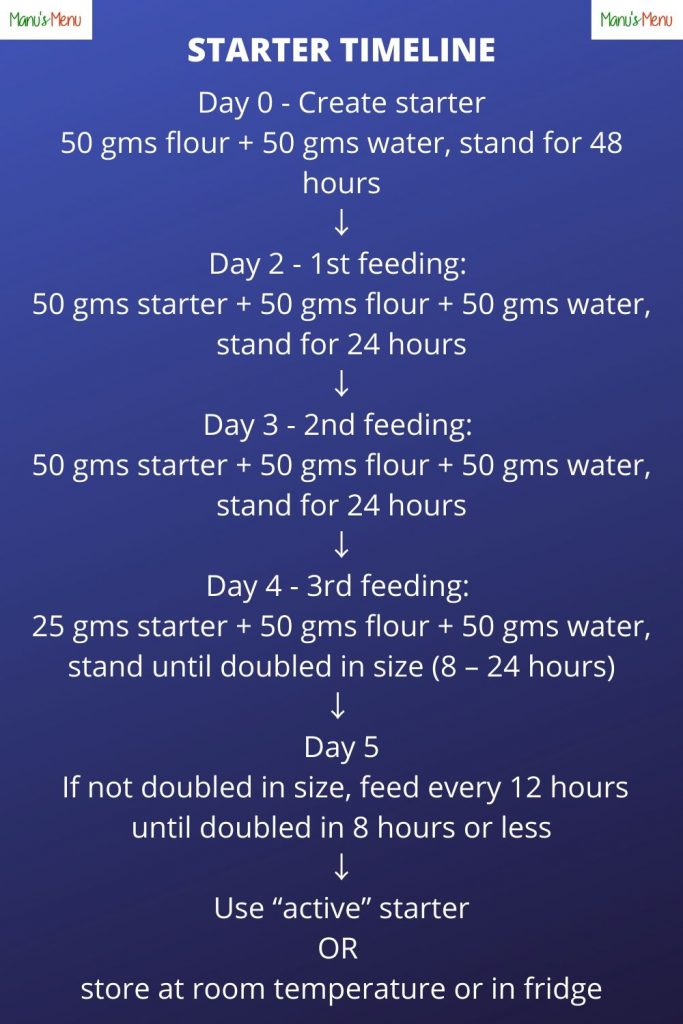
Day 0 – “Create” your Starter
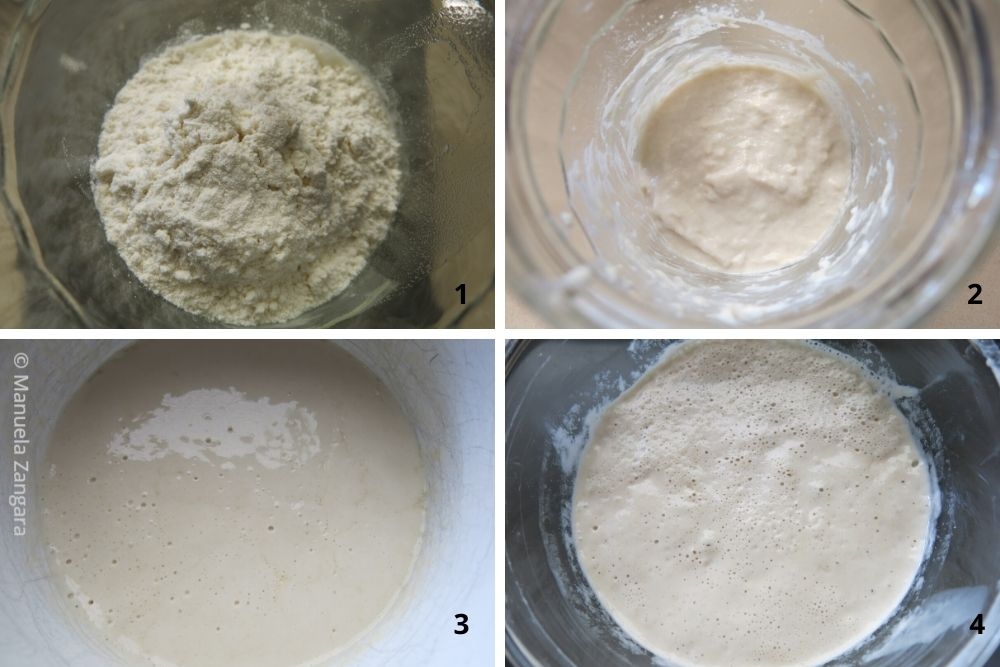
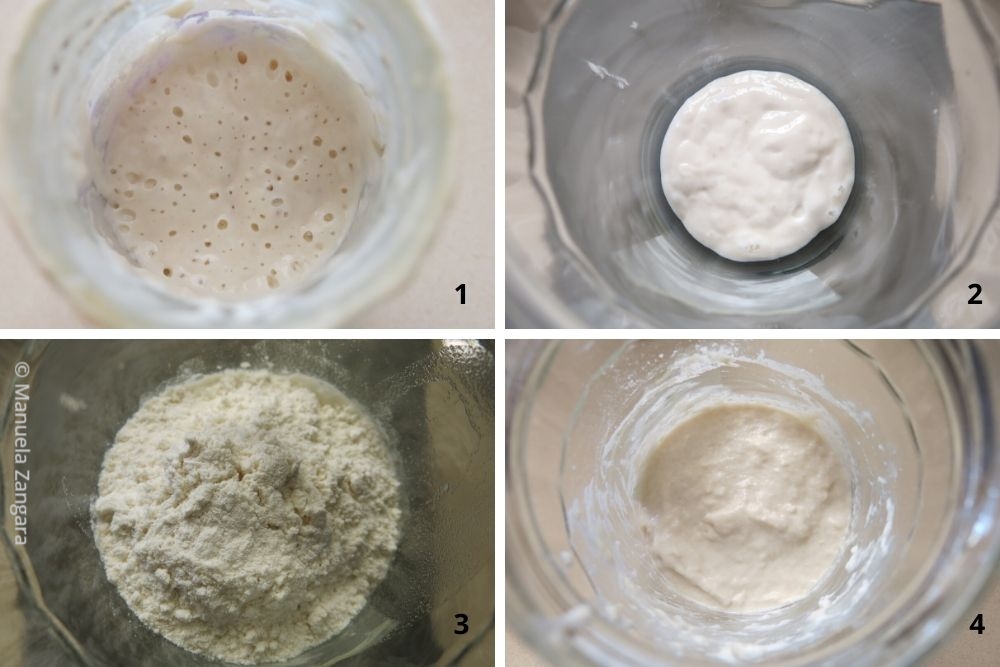
Place the flour and water in a medium clean, dry jar with a lid and stir until well combined.
Loosely put the lid on the jar and set aside in a warm draught-free place (see Tip #4) for 48 hours (see Tip #5).
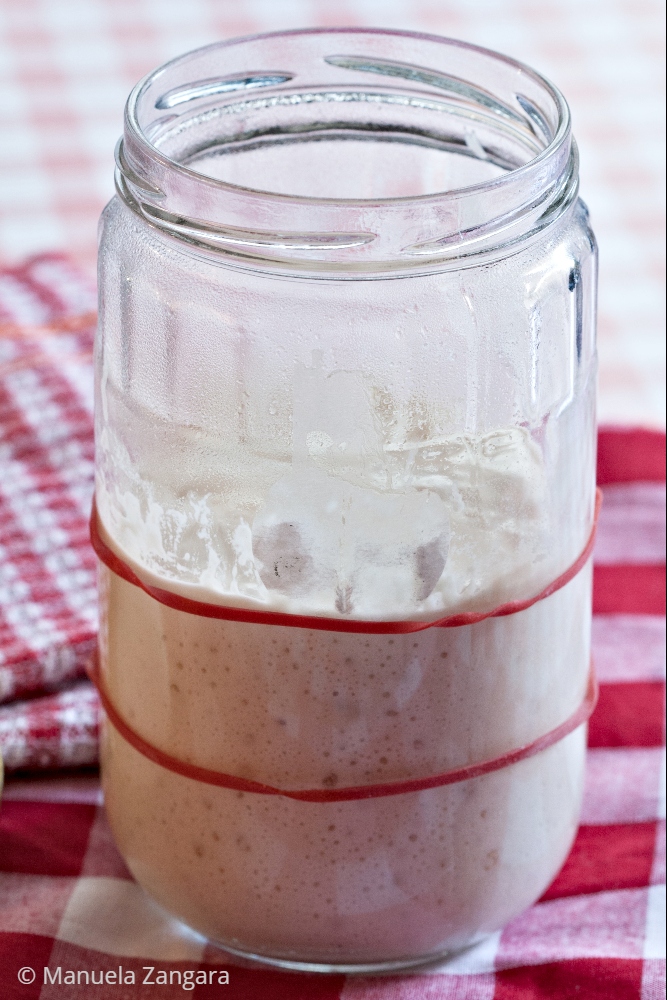
After 12 hours, there won’t be much change in your mixture although a few bubbles may start to appear through the side of the jar.
After 48 hours, the starter may have risen just a little and a dark skin would have formed. There may be a few bubbles on the surface and also noticeable through the side of the jar – but not always. Proceed to the first feeding.
If you don’t see these signs, set aside for another 24 hours – if there are no signs of activity by then, just continue with the first feeding. It will smell nasty – it’s normal!
Day 2 – First feeding after 48 hours
Remove and discard all but 50 gms of the sourdough starter from the jar.
Add 50 gms plain flour and 50 gms lukewarm bottled water to the jar and stir well to combine.
Use a clean spatula to scrape the sides of the jar down to clean (see Baker’s tip #6).
Loosely put the lid on the jar and set aside in a warm draught-free place 24 hours.
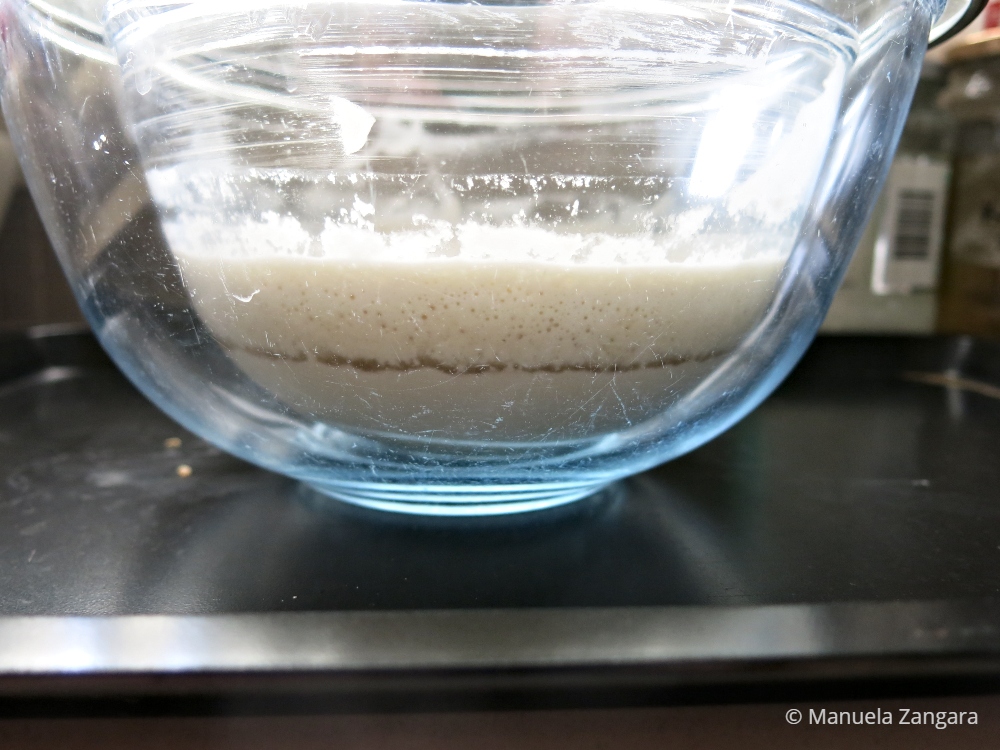
After the first feeding and rise, the starter would have risen slightly (up to 50%) and random bubbles will be visible on the surface as well as through the side of the jar indicating the wild yeast is active and starting the multiply.
Day 3 – Second feeding after 24 hours
Remove and discard all but 50 gms of the sourdough starter from the jar.
Add 50 gms plain flour and 50 gms lukewarm bottled water to the jar and stir well to combine.
Use a clean spatula to scrape the sides of the jar down to clean (see Baker’s tip #6).
Loosely put the lid on the jar and set aside in a warm draught-free place 24 hours.
After the second feeding and rise, there will be more visible bubbles but they will be smaller and more uniform. The aroma will be less pungent and a little sweeter.
Day 4 – Third feeding after 24 hours
Remove and discard all but 25 gms of the sourdough starter from the jar.
Add 50 gms plain flour and 50 gms lukewarm bottled water to the jar and stir well to combine.
Use a clean spatula to scrape the sides of the jar down to clean (see Baker’s tip #6).
Loosely put the lid on the jar and set aside in a warm draught-free place 24 hours.
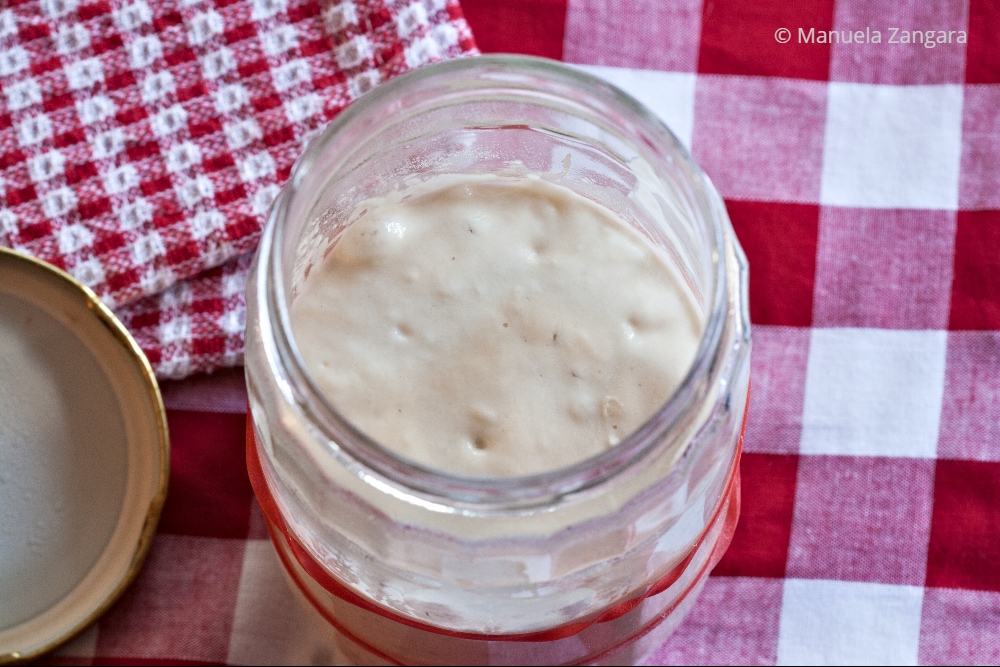
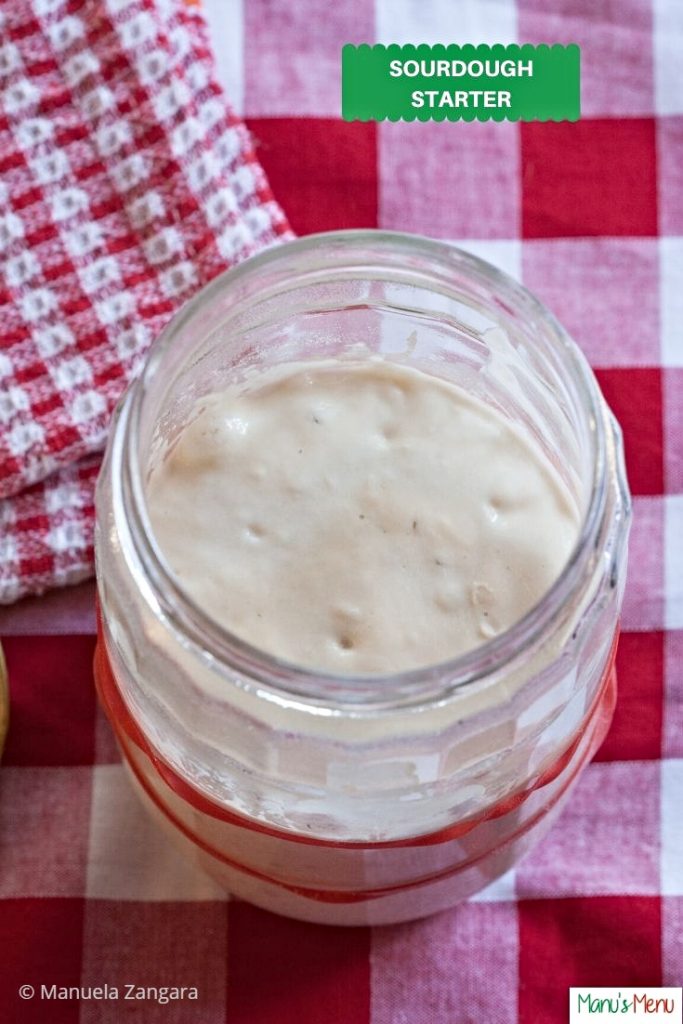
After the third feeding and rise, the starter will become more vigorous and may rise by up to 100% in less than 24 hours. Bubbles will be very evident on the surface as well as through the side of the jar. It will have a pleasantly sour, tangy, sweet aroma.
Day 5 onwards – Feeding every 12 hours
Depending on the strength of your sourdough and how quickly it ferments it may double in size in less than 24 hours. You may also notice that once it doubles it starts to lose volume and falls back on itself indicating that it needs regular feeding from this point.
If your starter has not doubled in 24 hours or less, continue the discarding and feeding process every 12 hours until it has the ability to double in size in 8 hours or less. When it does, it is now “active” and ready to use, or store in the fridge to be used at a later date.
Variations
Rye sourdough starter: at the beginning, use 40 gms rye flour (and feed with unbleached organic plain flour).
Wholemeal sourdough starter: at the beginning, use 50 gms organic wholemeal flour (and feed with unbleached organic plain flour).
White sourdough starter: at the beginning, use 50 gms unbleached plain flour (and feed with unbleached organic plain flour).
Tips
#1. You can use any kind of flour you have. I have made mine with plain flour. However, many people recommend using organic wholemeal flour and then switching to unbleached organic plain flour for feeding until it is established. Once mature, you can then just switch to regular plain flour or bread flour for feeding.
#2. Use bottled water (or water that is filtered and has been allowed to stand uncovered for at least 4 hours for the chlorine to dissipate) to give your sourdough starter the best possible chance of success. I use the filtered water I get straight from my fridge and it works.
#3. It’s a good idea to embrace measuring both your flour and water in grams/oz. when making and maintaining your sourdough starter. It is the most accurate way of measuring and will give you the best possible chance of success.
#4. The ideal temperature for proving sourdough starter is between 21°C-23.5°C (70°F-74°F). Don’t be tempted to keep the starter at higher temperatures to accelerate the process as it won’t necessarily mean you will get a better result. Higher temperatures can encourage more ‘bad’ bacteria to grow than the ‘good’ ones, which will ultimately ruin the starter. I keep mine in a cupboard in the kitchen.
#5. After each feeding, it’s a good idea to mark the side of the jar with tape (or an elastic band) so you can see how much it grows in the specified time.
#6. Make sure you scrape down the side of the jar after every feed – this will make it easier to see how much the starter has risen each time.
Storing your sourdough starter
A sourdough starter can either be kept at room temperature or in the fridge.
If you are not going to use your sourdough starter every day, it is best to keep it in the fridge. To do this, feed it as instructed above, seal the jar and then stand at room temperature for 2-3 hours (to help reinvigorate the yeast) before placing in the fridge to store.
A starter stored in the fridge will only require feeding once a week to maintain it.
Sourdough starter can be frozen, if you would like to store it for a long period without feeding. To do this, double the amount of flour added at feeding so that it is a very thick paste, place in an airtight container and freeze for up to 1 year. Thaw at room temperature and feed as above to regain its strength before using.
If you use your sourdough starter every day, keep it at room temperature. Follow the feeding instructions above and then leave it at room temperature. You will need to feed it twice every day (at the same time, if possible).
Quick Troubleshooting – Liquid on top?
If a grey-like liquid forms on top of your sourdough starter, this is an indication that an excess of alcohol has been produced as a by-product of the yeast fermentation. It often appears if the sourdough starter is “hungry” because it has been left for longer periods of time without feeding or if it requires more frequent feeding.
If there is only a thin layer, you can either stir this liquid back into the sourdough starter or drain it away before feeding it again. If you stir it through, it will add a more intense flavour to your sourdough starter and, in turn, your sourdough bread, then feed it.
However, if there is a thick layer, it is best to discard it before feeding.
Using your sourdough starter
When you want to use your sourdough starter in a recipe, feed it and stand at room temperature for 4-8 hours before you intend using it. It should at least double in volume and bubbles will start breaking the surface at this time, which will indicate that it is strong and active enough to use. The time will vary depending on whether it has been stored in the fridge and the temperature at which it is standing. If it doesn’t, repeat the feeding and standing process until it does.
Also, to check whether or not it is ready to use, drip a teaspoon of it in a glass filled with water. If it floats, it is ready. If it doesn’t, repeat the feeding and standing process until it does.
Remove the amount you require for the recipe and then repeat the feeding process and either stand at room temperature to use again or transfer to the fridge to store.
Come back in the next few days for some sourdough baking recipes!
How to Make Sourdough Starter
Ingredients
Starter
- 50 gms - 1 3/4 oz. flour see Tip #1 and Variations
- 50 gms - 1 3/4 oz. bottled water lukewarm (see Tips #2 and #3)
To feed the Starter
- Flour see Tip #1
- Bottled water lukewarm (see Tips #2 and #3)
Instructions
Day 0 – “Create” your Starter
-
Place the flour and water in a medium clean, dry jar with a lid and stir until well combined.
-
Loosely put the lid on the jar and set aside in a warm draught-free place (see Tip #4) for 48 hours (see Tip #5).
-
After 12 hours, there won’t be much change in your mixture although a few bubbles may start to appear through the side of the jar.
-
After 48 hours, the starter may have risen just a little and a dark skin would have formed. There may be a few bubbles on the surface and also noticeable through the side of the jar – but not always. Proceed to the first feeding.
-
If you don't see these signs, set aside for another 24 hours – if there are no signs of activity by then, just continue with the first feeding. It will smell nasty – it’s normal!
Day 2 - First feeding after 48 hours
-
Remove and discard all but 50 gms of the sourdough starter from the jar.
-
Add 50 gms plain flour and 50 gms lukewarm bottled water to the jar and stir well to combine.
-
Use a clean spatula to scrape the sides of the jar down to clean (see Baker’s tip #6).
-
Loosely put the lid on the jar and set aside in a warm draught-free place 24 hours.
-
After the first feeding and rise, the starter would have risen slightly (up to 50%) and random bubbles will be visible on the surface as well as through the side of the jar indicating the wild yeast is active and starting the multiply.
Day 3 - Second feeding after 24 hours
-
Remove and discard all but 50 gms of the sourdough starter from the jar.
-
Add 50 gms plain flour and 50 gms lukewarm bottled water to the jar and stir well to combine.
-
Use a clean spatula to scrape the sides of the jar down to clean (see Baker’s tip #6).
-
Loosely put the lid on the jar and set aside in a warm draught-free place 24 hours.
-
After the second feeding and rise there will be more visible bubbles but they will be smaller and more uniform. The aroma will be less pungent and a little sweeter.
Day 4 – Third feeding after 24 hours
-
Remove and discard all but 25 gms of the sourdough starter from the jar.
-
Add 50 gms plain flour and 50 gms lukewarm bottled water to the jar and stir well to combine.
-
Use a clean spatula to scrape the sides of the jar down to clean (see Baker’s tip #6).
-
Loosely put the lid on the jar and set aside in a warm draught-free place 24 hours.
-
After the third feeding and rise, the starter will become more vigorous and may rise by up to 100% in less than 24 hours. Bubbles will be very evident on the surface as well as through the side of the jar. It will have a pleasantly sour, tangy, sweet aroma.
-
Day 5 onwards – Feeding every 12 hours
-
Depending on the strength of your sourdough and how quickly it ferments it may double in size in less than 24 hours. You may also notice that once it doubles it starts to lose volume and falls back on itself indicating that it needs regular feeding from this point.
-
If your starter has not doubled in 24 hours or less, continue the discarding and feeding process every 12 hours until it has the ability to double in size in 8 hours or less. When it does, it is now "active" and ready to use, or store in the fridge to be used at a later date.
Recipe Notes
Variations
Rye sourdough starter: at the beginning, use 40 gms rye flour (and feed with unbleached organic plain flour).
Wholemeal sourdough starter: at the beginning, use 50 gms organic wholemeal flour (and feed with unbleached organic plain flour).
White sourdough starter: at the beginning, use 50 gms unbleached plain flour (and feed with unbleached organic plain flour).
Tips
#1. You can use any kind of flour you have. I have made mine with plain flour. However, many people recommend using organic wholemeal flour and then switching to unbleached organic plain flour for feeding until it is established. Once mature, you can then just switch to regular plain flour or bread flour for feeding.
#2. Use bottled water (or water that is filtered and has been allowed to stand uncovered for at least 4 hours for the chlorine to dissipate) to give your sourdough starter the best possible chance of success. I use the filtered water I get straight from my fridge and it works.
#3. It’s a good idea to embrace measuring both your flour and water in grams/oz. when making and maintaining your sourdough starter. It is the most accurate way of measuring and will give you the best possible chance of success.
#4. The ideal temperature for proving sourdough starter is between 21°C-23.5°C (70°F-74°F). Don’t be tempted to keep the starter at higher temperatures to accelerate the process as it won’t necessarily mean you will get a better result. Higher temperatures can encourage more ‘bad’ bacteria to grow than the ‘good’ ones, which will ultimately ruin the starter. I keep mine in a cupboard in the kitchen.
#5. After each feeding, it’s a good idea to mark the side of the jar with tape (or an elastic band) so you can see how much it grows in the specified time.
#6. Make sure you scrape down the side of the jar after every feed – this will make it easier to see how much the starter has risen each time.
Don’t forget to pin this post!


Firstly, many thanks for your wonderful food blog and inspiration. I discovered your blog when searching for answers on why my sour dough starter was failing. Having read your blog I’m on the right path now and have successfully made 3 wonderful sour dough loaves. They seem to get better as my level of experience increases. Thanks again for sharing your knowledge and the inspiration to keep trying.
A great blog post. Such a satisfying thing to do.