
Manu’s Menu

Authentic Italian Home Cooking & More

  • Home
  • About
    • About me
    • About this site
    • About my photography
    • Privacy and Disclosure Policy
  • Recipes
    • Visual Archive
    • Regional Italian Recipes
  • Books
    • The Cool Side of Summer
    • Manu’s Christmas Menus
    • MsM’s Mobile App
  • Work With Me
    • Affiliate Sign-Up
    • Featured On
  • Out & About
    • Africa
      • South Africa 2019
    • Americas
      • Mexico, Guatemala, Honduras and Belize
      • CHILE AND ARGENTINA 2018
    • Asia
      • India
      • Japan 2015
      • Japan 2017
      • Japan 2018
      • Singapore
    • Europe
      • Slovenia and Croatia 2019
      • Italy 2019
    • Oceania
      • French Polynesia (Tahiti) 2017
      • French Polynesia (Tahiti)
      • New Caledonia
      • New Zealand
      • South Island – New Zealand Guide
  • Blogging Tips
    • Blogging Platform
    • Web Hosting
    • Technology Tips
    • Food Photography
    • Increasing Traffic to your Blog
    • Links
      • MsM in Your Kitchen
      • Events
        • 150 years of the Unification of Italy
        • Olio, Erbe e Fantasia – LILT
  • Tips
    • Techniques
      • Pasta and Gnocchi
      • Pizza and Other Doughs
      • Sauces and Other Basics
      • Decorations
    • Cake and Cookie decoration
      • Cake & Marshmallow Pops
        • Flowery Cake Pops
        • Hello Kitty Cake Pops
        • Dorothy the Dinosaur Cake Pops
        • Christmas Tree Cake Pops
        • Sea Marshmallow Pops
      • Fondant Cakes
        • Moo Cake
        • South Pole Cake
        • Lola Cake
        • Hello Kitty Yogurt Cake
        • Dorothy the Dinosaur Cake
        • The Little Mermaid Yogurt Cake
        • The Little Mermaid Fondant Cake
        • Sweet Sushi Mini Fondant Cakes
        • Peppa Pig Cake
        • Tinkerbell Cake
        • Miffy Cake
        • Olaf Yogurt Cake
        • Frozen Cake
      • Sugar Cookies
        • Heart Sugar Cookies
        • Dorothy the Dinosaur Sugar Cookies
        • Christmas Tree Ornament Sugar Cookies
      • Eggless Sugar Cookies
        • Chinese New Year Cookies
        • St. Patrick’s Day Cookies
      • Shortbread Cookies
        • Shortbread and Chocolate Hearts
        • Baby Shower Shortbread Cookies
        • Flounder Shortbread Cookie Pops
      • Easy Chocolate Cookies
    • Conversion Tables
    • Gift Ideas
      • Christmas 2010
      • Christmas 2011
      • Christmas 2012
      • Christmas 2013
      • Christmas 2014
      • Christmas 2015
    • Ingredients
    • Where I Shop for Italian Food in Sydney
  • Contact
You are here: Home / Recipes / Bread / Kitty Cat Bread Buns

Kitty Cat Bread Buns

December 16, 2014 Last updated on March 23, 2026 By Manu 4 Comments

Jump to Recipe Print Recipe

Soft, fluffy bread shaped into the cutest little cats. These Kitty Cat Bread Buns are almost too adorable to eat.

Baked Kitty Cat Bread Buns with chocolate dough facial details on a wooden surface.

I made these savoury Kitty Cat Bread Buns for my daughter’s 5th birthday party, and they were very popular. They tasted good and looked quite cute, which always helps at a children’s party.

The brown dough comes from cocoa powder, but it is completely savoury. The cocoa is unsweetened and used only for colour, so the buns do not taste sweet.

They are easy to make, although they do take a bit of time. Like most bread buns, they need to proof twice. The advantage is that they can be prepared in advance and frozen.
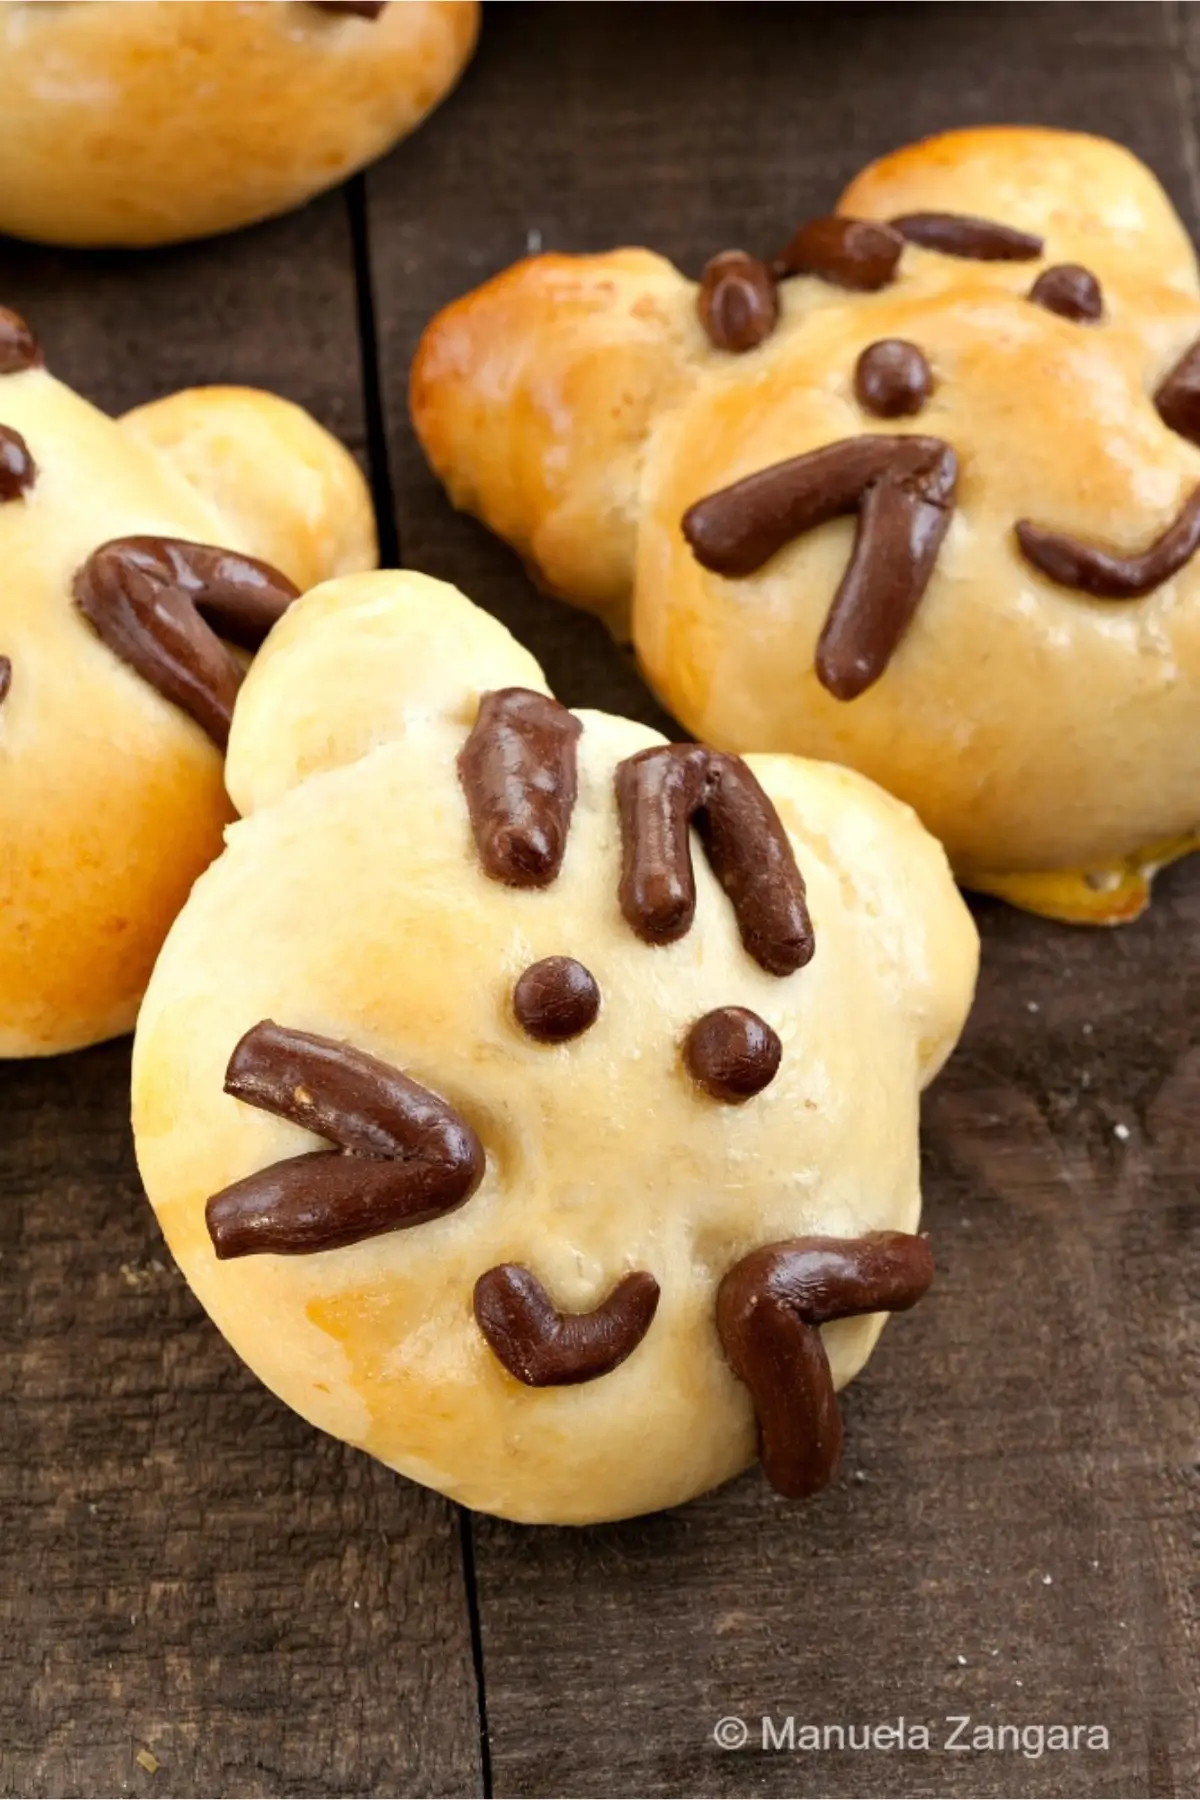
Close-up of a baked cat-shaped bread bun with chocolate dough details.

When I organise parties, I always try to make food that freezes well. There is usually a lot to do on the day, including decorating, and it is a relief knowing some of the food is already done and only needs defrosting. These freeze very well.

I enjoy shaping bread into animal faces. You might remember my pizza-flavoured Piggy Buns, which were just as fun to make and serve.

I filled these Kitty Cat Bread Buns with tuna and mashed potatoes, but you can use any filling you prefer.

Enjoy!

What Makes These Buns Worth Making

  • Creates soft bread buns with a filling that stays moist after baking, even when served later in the day.
  • Works well as a standalone snack or part of a spread, depending on the occasion.
  • Teaches basic bread shaping skills in a simple format, useful for anyone learning to bake with yeast.

Key Ingredients for Kitty Cat Bread Buns

Tuna

Makes up the savoury filling and adds protein. Choose tuna packed in water or olive oil, and drain it well so the filling stays compact and not watery.

Potato

Softens the filling and brings everything together. Floury potatoes, such as Russet or Yukon Gold mash smoothly and help keep the centre compact during baking.

Cocoa Powder

Adds colour to the decorative dough without changing its savoury character. Unsweetened cocoa powder works best, as sweetened types can affect both taste and texture.

Find the complete list with measurements in the recipe card below.

How to Make Kitty Cat Bread Buns

Bread Dough

Step 1: Put all the ingredients into the bowl of an electric mixer fitted with the hook attachment and knead until you obtain a smooth, pliable dough. Set aside to proof for 1 hour, or until doubled in size.
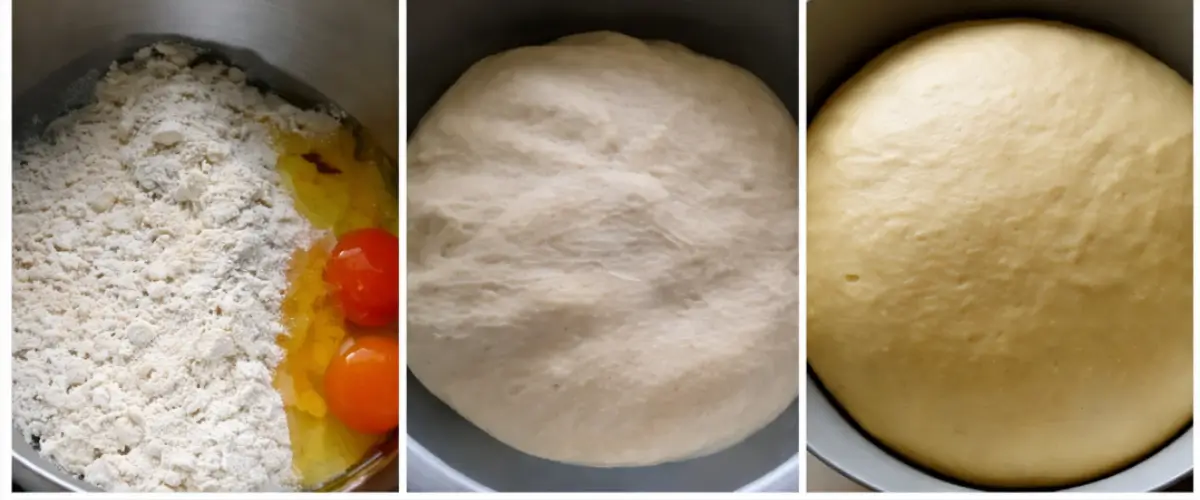
Mixing and proofing bread dough in a stand mixer bowl.

Chocolate Dough

Step 1: Put all the ingredients into the bowl of an electric mixer fitted with the hook attachment and knead until you obtain a smooth, pliable dough. Set aside to proof for 1 hour, or until doubled in size.

Tuna Filling

Step 1: Mix all the ingredients in a bowl and divide the mixture into 8 equal portions.

Assembling

Step 1: Divide the bread dough into 8 large portions (about 40 g – 1½ oz. each) and 16 small portions (about 10 g – ⅓ oz. each). Shape them into balls, loosely cover with cling wrap, and allow them to rest for 10 minutes.

Step 2: Flatten each large ball into a flat oval. Place one portion of tuna filling in the centre of the dough, then pinch the edges together to enclose it and form a bun. Place the buns seam side down on a baking tray lined with baking paper.

Step 3: Roll and shape two of the small balls into teardrop shapes and place them next to each larger bun to form the ears.

Step 4: Repeat with the remaining dough.

Step 5: Roll the chocolate dough into thin ropes, then cut and place them onto the buns to decorate the cat faces.

Step 6: Cover the buns loosely with cling wrap and allow them to proof for another hour.

Step 7: Once the buns have doubled in size, brush them with egg wash and bake in a preheated oven at 180°C – 355°F for 18 minutes.
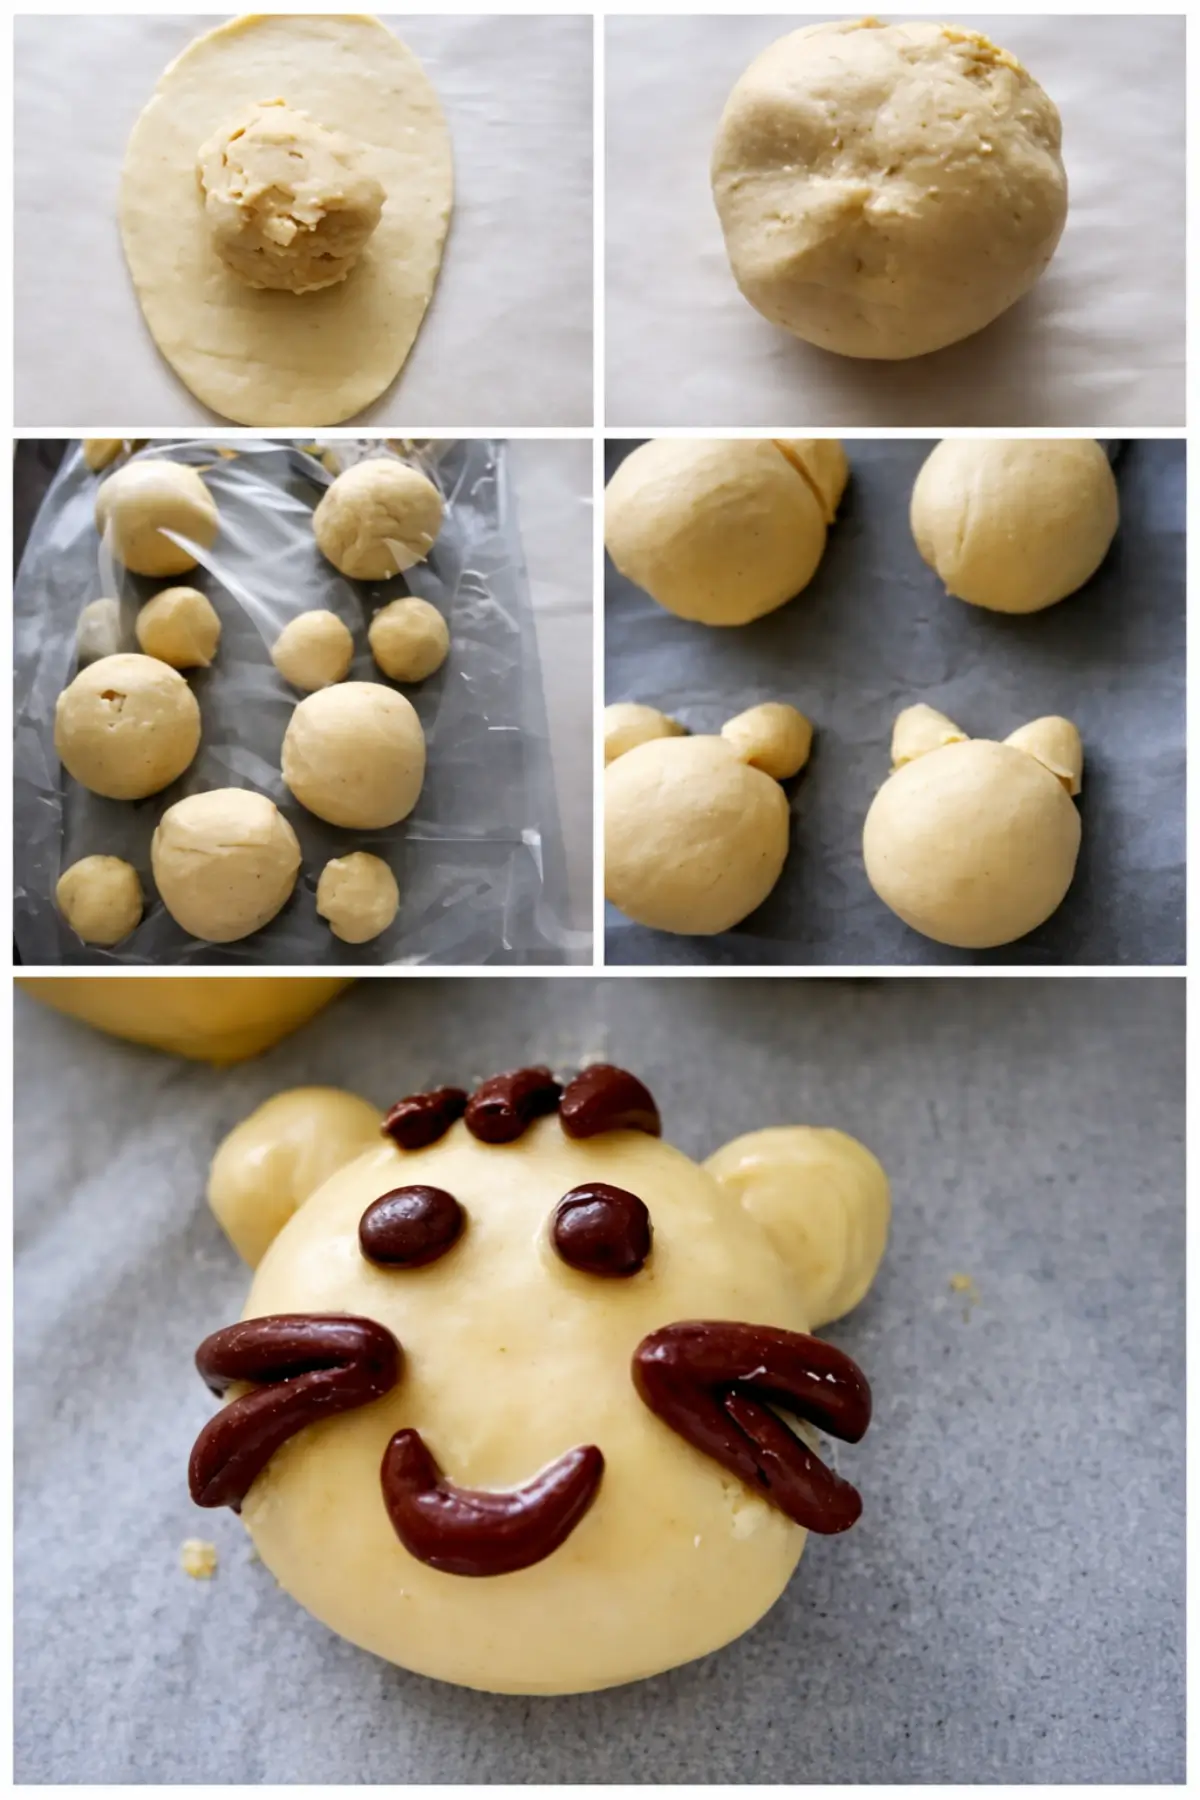
Shaping filled dough portions into small cat faces.

Step 8: Remove the buns from the baking tray and allow them to cool completely on a wire rack.

Step 9: Serve at room temperature.
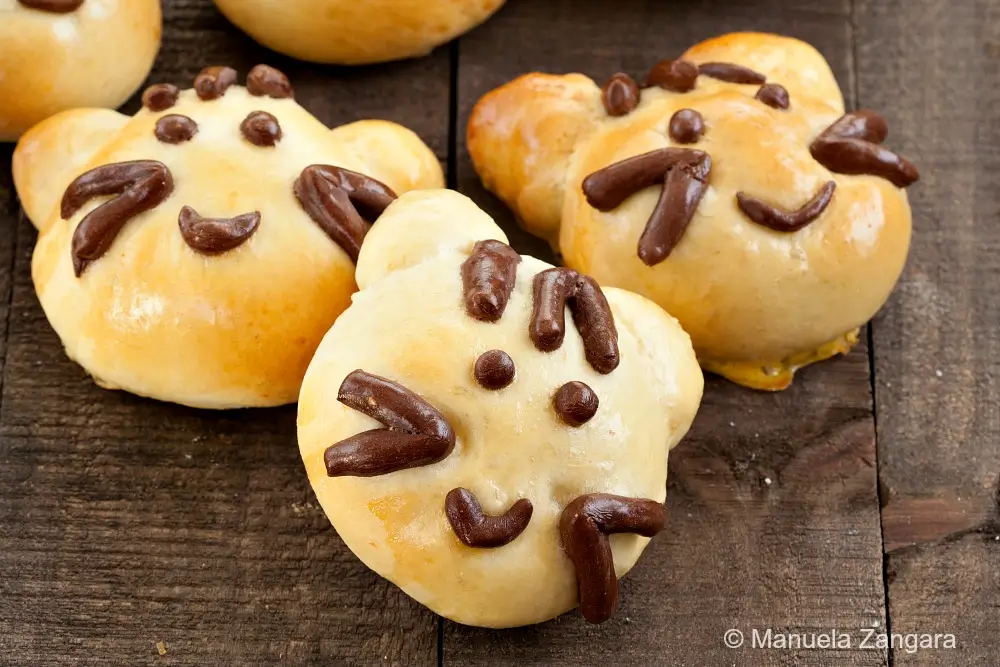
Group of baked cat-shaped bread buns arranged together.

Frequently Asked Questions

Can I add vegetables to the filling?

Yes. Small amounts of finely chopped, well-cooked vegetables such as zucchini, peas, or carrots can be added for extra variety.

What can I use instead of tuna for the filling?

Cooked chicken, finely diced ham, or a simple cheese filling all work well. Choosing a filling that stays fairly dry and compact helps it sit neatly inside the dough and bake evenly without leaking.

How can I make the buns extra soft?

Keeping the dough well-hydrated and allowing it to proof fully helps achieve a softer result. Using egg and olive oil in the dough also supports a tender crumb once baked.

Can I use all-purpose flour instead of bread flour?

Yes. All-purpose flour works well for this recipe and gives a softer texture, which suits filled buns better than a very chewy crumb.

What is the best way to draw the faces?

Rolling the cocoa dough into thin ropes works best. Cutting small pieces and placing them gently on the buns before the final proof helps the details stay in place during baking.

Extra Help from the Kitchen

Adjust Dough Hydration Gradually – Add liquid a teaspoon at a time during kneading if the dough feels stiff. Aim for a soft, pliable texture that stretches easily without sticking.

Drain the Tuna Thoroughly – Press the tuna gently in a sieve or with the back of a spoon to remove excess liquid. Keeping the filling dry helps the buns bake evenly and hold their shape.

Mash the Potato While Warm – Mash the potato while still warm so it blends smoothly with the tuna and cheese. A smooth mash gives the filling a consistent texture once baked.

Chill the Chocolate Dough Briefly if Needed – Place the cocoa dough in the refrigerator for about 10 minutes if it becomes too soft. Cooler dough holds fine decorative shapes more cleanly.

Rotate the Baking Tray Halfway Through Baking – Turn the tray once during baking to encourage even colouring, especially when decorative dough is placed on the surface.

Variations and Twists

Cheese-Filled Savoury Buns – Replace the tuna filling with cubed or grated melting cheese mixed with a small amount of Parmigiano, keeping the filling compact so it melts without leaking during baking.

Ham and Cheese Buns – Replace the tuna with finely diced cooked ham and grated cheese to create a balanced savoury filling that works well inside the soft bread dough.

Everything Seed-Topped Buns – Brush the buns with egg wash after proofing and sprinkle with sesame seeds, poppy seeds, and dried onion flakes to add texture and savoury flavour to the crust.

Tuna and Sweet Corn Buns – Stir well-drained sweet corn into the tuna and potato mixture before shaping; the corn adds mild sweetness and texture.

Curry-Style Filled Buns – Replace the tuna and potato filling with a mild curry-flavoured tuna or vegetable filling, keeping it fairly dry so it stays contained during baking.

Storage and Shelf Life

Store the cooled Kitty Cat Bread Buns in an airtight container at room temperature for up to 2 days. For longer storage, freeze the buns once fully cooled, placing them in freezer bags or well-sealed containers for up to 2 months.

Thaw the buns at room temperature until soft. Reheat briefly in a low oven at 160°C – 320°F before serving.

You May Also Enjoy These Bread Recipes

  • Chocolate Chip Buns
  • Kitty Cat Doughnuts
  • Durum Wheat Italian Bread Rolls
  • Danubio
  • Olive Oil Snail Bread Rolls
Baked Kitty Cat Bread Buns with chocolate dough facial details on a wooden surface.

Kitty Cat Bread Buns Recipe

Soft, fluffy bread shaped into the cutest little cats. These Kitty Cat Bread Buns are almost too adorable to eat.
5 from 2 votes
Print Pin Rate
Course: Bread
Cuisine: International
Prep Time: 3 hours hours
Cook Time: 18 minutes minutes
Total Time: 3 hours hours 18 minutes minutes
Servings: 8
Author: Recipe adapted from Bake for Happy Kids

Ingredients

Bread Dough

  • 300 g – 2 ½ cups flour
  • ½ tsp yeast
  • 1 egg
  • 20 g – 6 tsp sugar
  • ⅛ tsp salt
  • 20 g – 1 ¼ tbsp extra virgin olive oil
  • 150 ml – ⅔ cup water – lukewarm

Chocolate Dough

  • 100 g – ¾ cup flour
  • ¼ tsp yeast
  • ½ tsp sugar
  • 60 ml – ¼ cup + 1 tbsp water
  • 1 tbsp cocoa powder

Tuna Filling

  • 95 g – 3.5 oz tuna
  • 1 potato – boiled and mashed
  • 2 tbsp Parmigiano Reggiano – finely grated
  • salt and pepper – to taste

Egg Wash

  • 1 egg
  • 1 – 2 tbsp milk

Instructions

Bread Dough

  • Put all the ingredients into the bowl of an electric mixer fitted with the hook attachment and knead until you obtain a smooth, pliable dough. Set aside to proof for 1 hour, or until doubled in size.

Chocolate Dough

  • Put all the ingredients into the bowl of an electric mixer fitted with the hook attachment and knead until you obtain a smooth, pliable dough. Set aside to proof for 1 hour, or until doubled in size.

Tuna Filling

  • Mix all the ingredients in a bowl and divide the mixture into 8 equal portions.

Assembling

  • Divide the bread dough into 8 large portions (about 40 g – 1½ oz. each) and 16 small portions (about 10 g – ⅓ oz. each). Shape them into balls, loosely cover with cling wrap, and allow them to rest for 10 minutes.
  • Flatten each large ball into a flat oval. Place one portion of tuna filling in the centre of the dough, then pinch the edges together to enclose it and form a bun. Place the buns seam side down on a baking tray lined with baking paper.
  • Roll and shape two of the small balls into teardrop shapes and place them next to each larger bun to form the ears.
  • Repeat with the remaining dough.
  • Roll the chocolate dough into thin ropes, then cut and place them onto the buns to decorate the cat faces.
  • Cover the buns loosely with cling wrap and allow them to proof for another hour.
  • Once the buns have doubled in size, brush them with egg wash and bake in a preheated oven at 180°C – 355°F for 18 minutes.
  • Remove the buns from the baking tray and allow them to cool completely on a wire rack.
  • Serve at room temperature.

Filed Under: Baking, Birthday, Bread, Finger food, Snack, Special Occasions Tagged With: baking, birthday, bread, buns, cat, fun, kids, kitty, party, tuna

« Kitty Cat Doughnuts
Cookies and Cream Fudge »

Comments

  1. Mary says

    January 11, 2021 at 10:54 am

    These look so good! I was wondering if you have a suggestion to replace tuna? Can it be replaced with chocolate to make a dessert bun or another savoury filling? I want to make these with my step daughter but I am allergic to tuna (canned meats preservative allergy) I’d appreciate any suggestions that would still hold the right consistency

    Reply
    • Manu says

      January 15, 2021 at 11:55 am

      Hi Mary! Sorry for the late reply. The filling can be anything. You could add cheese or ham or both instead of tuna. 🙂

      Reply
  2. Maureen | Orgasmic Chef says

    December 16, 2014 at 10:34 pm

    What a fantastic mother you are and what a terrific baker too. I wish I’d had these when I was 5.

    Reply
  3. Nagi@RecipeTinEats says

    December 16, 2014 at 9:48 pm

    These are so adorable!! The tuna filling was a surprise – I wasn’t expecting that, which s a GREAT thing! The kids will gobble these right up!!

    Reply
5 from 2 votes

Leave a Reply Cancel reply

Your email address will not be published. Required fields are marked *

Recipe Rating:


Welcome to Manu’s Menu!

Hi! I am Manu, the author of Manu's Menu. I was born and brought up in Italy and my blog can show you how to create authentic Italian food in your own home! Read More…

  • Email
  • Facebook
  • Instagram
  • LinkedIn
  • Pinterest
  • RSS
  • Twitter
  • YouTube

HOMEMADE PASTA MADE SIMPLE – THE BOOK. CLICK TO BUY IT FROM AMAZON NOW!

Homemade Pasta Made Simple

Archives

Categories

  • Email
  • Facebook
  • Flickr
  • Instagram
  • LinkedIn
  • Pinterest
  • RSS
  • Twitter

Video Recipe: Orecchiette with Crudaiola Sauce

https://www.youtube.com/watch?v=QqSyzFElbRY
foodgawker bowls-150x150
tastespotting150
Tasteologie badge
Pasta & Gnocchi

The Cool Side of Summer e-Book – Click to buy it now! On SALE for only $9.99!

The Cool Side of Summer e-Book

MsM’S EBOOK – CLICK TO BUY IT NOW!

MsM’S EBOOK – CLICK TO BUY IT NOW!
Community Table Contributor Badge
Sunday Supper Movement

manusmenu

Food blogger, cookbook author, food photographer & stylist.

A batch of homemade flaxseed crackers is always ha A batch of homemade flaxseed crackers is always handy to have in the kitchen.

They're crisp, easy to store, and pair well with dips, soft cheeses, fresh vegetables, or your favourite toppings whenever you need a quick snack.

#flaxseedcrackers #mealprep #healthysnacks #homemade #manu #manusmenu
Creamy goat cheese, crunchy pistachios, and a driz Creamy goat cheese, crunchy pistachios, and a drizzle of honey 🍯

The combination of creamy, sweet, and crunchy textures makes this such an easy appetiser to put together when you want something simple but a little different.

Serve with crusty bread or your favourite crackers and enjoy. 

#pistachios #HoneyDrizzle #sharingplatter #manusmenu
After sharing the scrambled eggs and tomato toast After sharing the scrambled eggs and tomato toast recently, I thought it would be a good time to highlight one of my favourite herb blends 🌿

Herbes de Provence is a traditional French herb blend usually made with herbs such as thyme, rosemary, oregano, and savoury.

It's a simple way to add extra flavour to everyday ingredients and works especially well with eggs, tomatoes, roasted vegetables, potatoes, chicken, and soups.

Have you used Herbes de Provence before?

#herbesdeprovence #frenchcooking #mediterraneanfood #herbblends #manu #manusmenu
Scrambled eggs with tomato on toast is one of thos Scrambled eggs with tomato on toast is one of those simple meals that always works 🍅

Warm, savoury, filling, and made with ingredients most people already have at home.

#scrambledeggs #QuickMeals #breakfastideas #homemademeals #manu #manusmenu
This calamari risotto turned out creamy, rich, and This calamari risotto turned out creamy, rich, and so satisfying 🍚

Made as a low FODMAP recipe, it’s a homemade seafood dinner option that feels filling and easier to enjoy for those with sensitive stomachs or lower FODMAP dietary needs.

 #lowfodmap #calamaririsotto #seafoodrecipes #homemademeals #manu #manusmenu
Pumpkin has a naturally gentle sweetness, which is Pumpkin has a naturally gentle sweetness, which is why ingredients like ginger, coconut cream, herbs, curry paste, or lime work so well with it.

Those subtle layers of flavour help create soups that feel comforting, warming, and more rounded 💛

 #pumpkinsoup #thaifood #homemademeals #homemade #manusmenu
Smooth, creamy, and filled with delicious Thai-ins Smooth, creamy, and filled with delicious Thai-inspired flavours 🍲 This pumpkin soup makes such a lovely homemade dinner idea ✨

#PumpkinSoupRecipe #homemadefood #thaifood #manu #manusmenu
A sweet homemade treat for the person who made lif A sweet homemade treat for the person who made life sweeter first 💖
These chocolate date hearts are filled with soft dates, rich chocolate, and a little homemade love for Mother’s Day 🌷

 #mothersday #mothersdaygiftideas #datehearts #manusmenu
more stories beyond the menu ✈️ #MatchaMoments #t more stories beyond the menu ✈️

#MatchaMoments #travelreels #travelwithmanuela
A simple treat for Mother’s Day 🌸 These chocolate A simple treat for Mother’s Day 🌸

These chocolate covered dates pair perfectly with a warm cup of tea and make a lovely homemade gift or afternoon treat.

Simple, sweet, and easy to make at home.

#mothersday #chocolatecovereddates #HomemadeTreats #dessertideas #teatime #manusmenu
This iced chai is simple to make and perfect when This iced chai is simple to make and perfect when you want something calm and comforting.

Made with a few ingredients and warm spices, it’s a drink you can easily prepare at home without much effort.

Sometimes it’s the simple drinks that you keep coming back to. 💓

#icedchai #homedrinks #teatime #homemade #manu #manusmenu
Ever wondered why your iced matcha tastes differen Ever wondered why your iced matcha tastes different every time?

It’s not just about the ingredients. Small details like the quality of the matcha, how you sift it, and how you whisk it can completely change the result.

Even the texture and colour can tell you a lot before you even take a sip.

Once you start paying attention to these steps, it becomes much easier to get a smoother, more balanced matcha at home 🍵

 #matcha #icedmatcha #Matchalatte #JapaneseTea #manusmenu
Follow on Instagram

Privacy Policy

Copyright © 2011–© 2026 - Manu's Menu and Manuela Zangara. All rights reserved.
Baked Kitty Cat Bread Buns with chocolate dough facial details on a wooden surface.

Rate This Recipe

Your vote:


A rating is required
A name is required
An email is required

Recipe Ratings without Comment

Something went wrong. Please try again.
We use cookies to ensure that we give you the best experience on our website. If you continue to use this site we will assume that you are happy with it.