

Turn a children’s party spread into something memorable with Pizza Flavoured Piggy Buns, filled with tomato sauce, oregano and cheese inside soft, flaky dough.
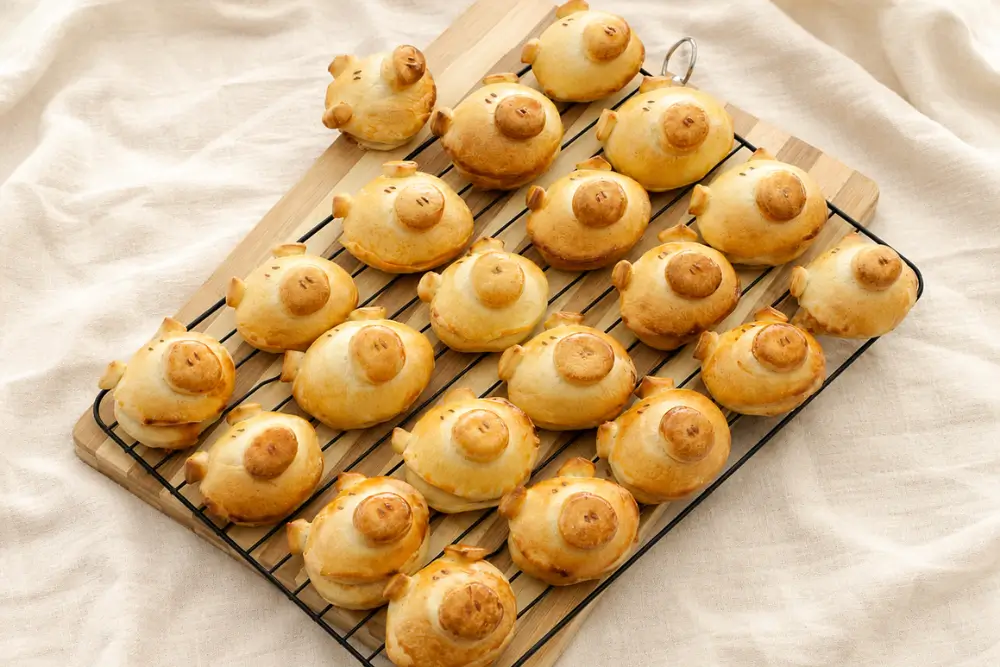
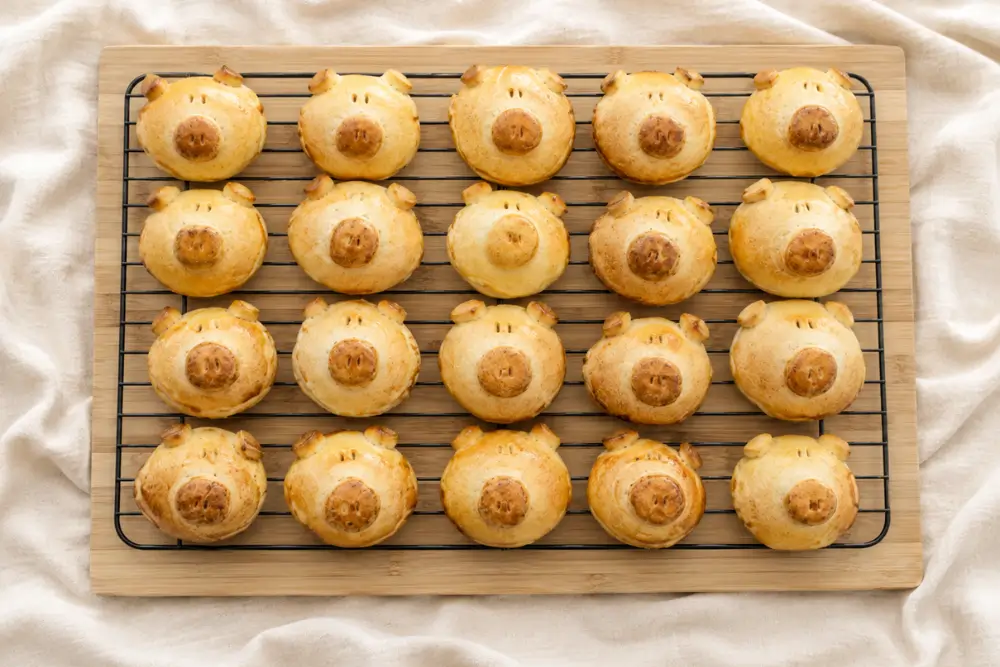
I saw these piggy-shaped buns on Pinterest and couldn’t get them out of my mind! They looked too cute! As the theme of my youngest daughter’s birthday party was Peppa Pig, I thought it would be the perfect opportunity to try making these Pizza Flavoured Piggy Buns. They’re soft, flaky savoury buns shaped like little pigs and filled with tomato sauce, oregano and cheese.
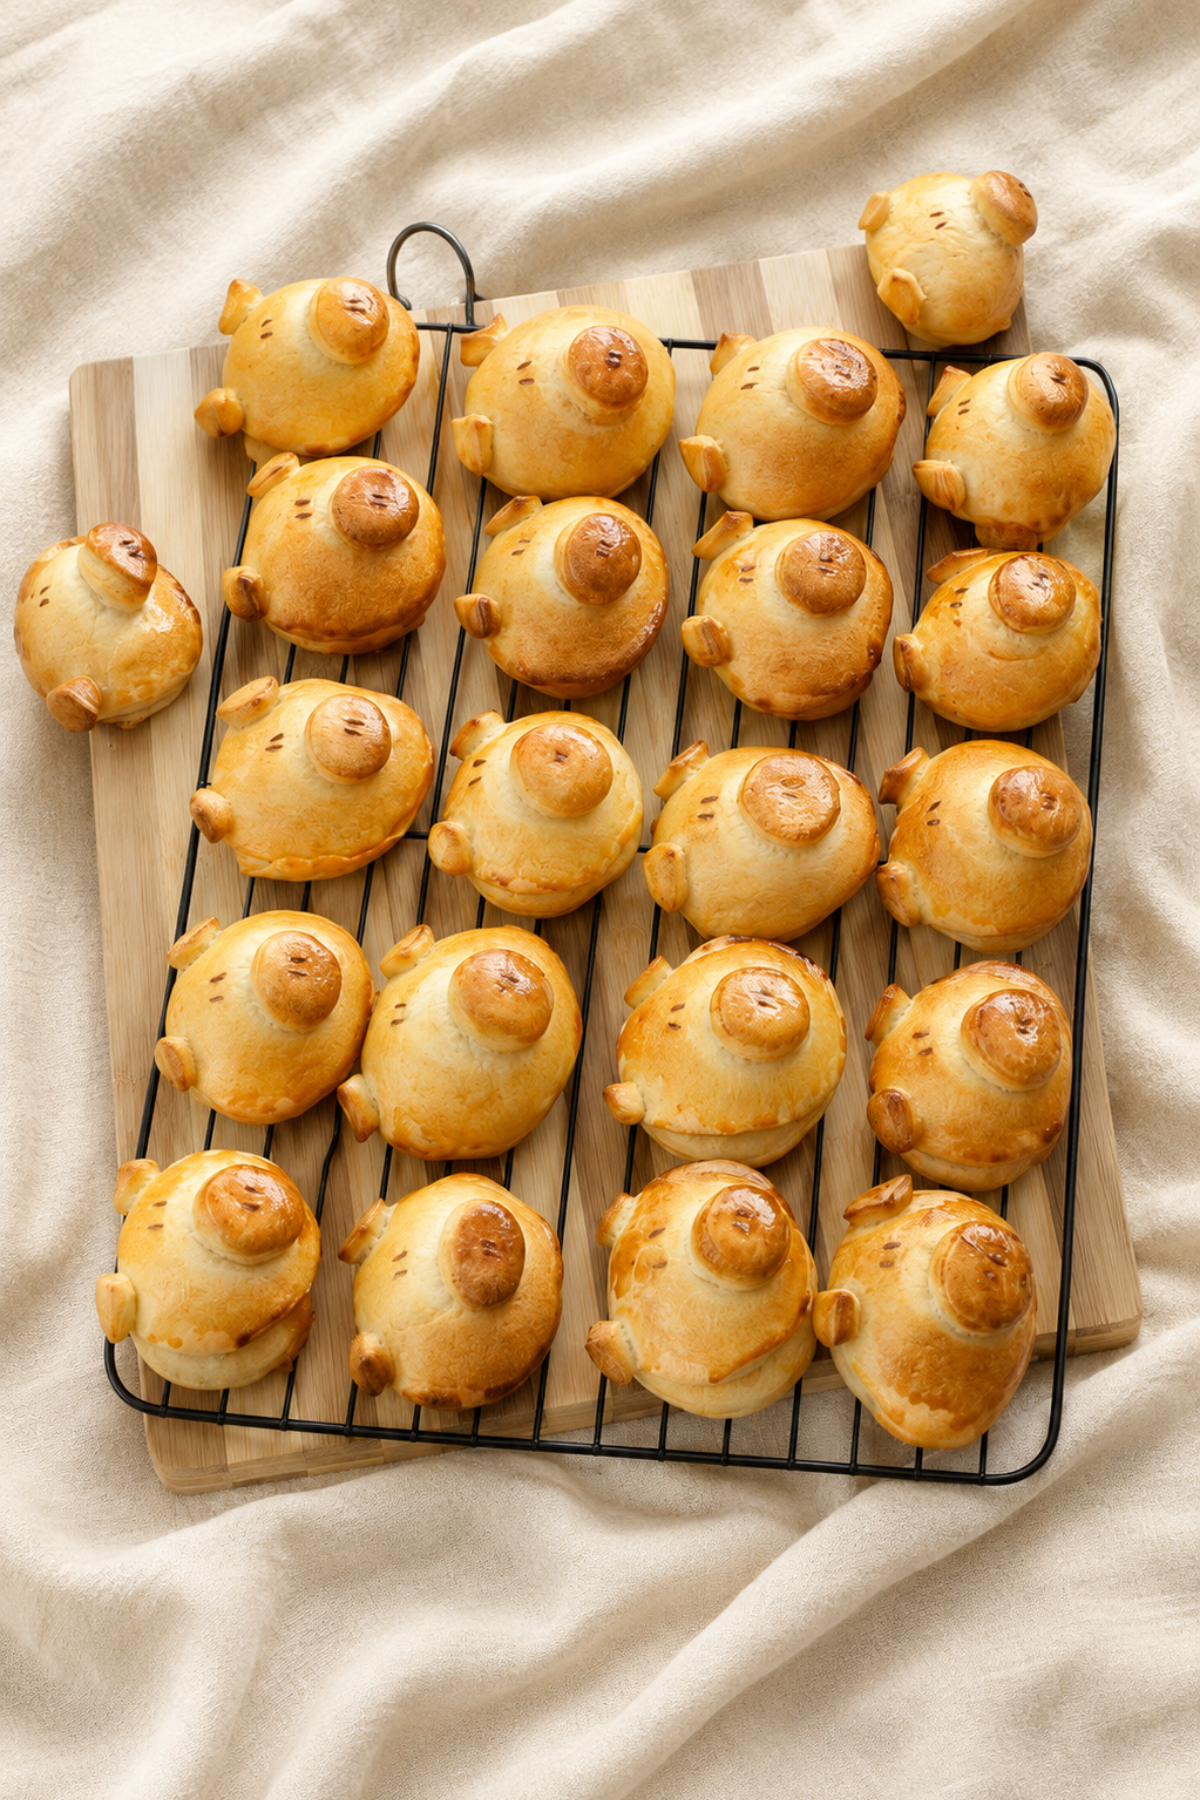
I had so much fun making them, and they looked almost too cute to eat! Luckily, the kids didn’t have a problem biting into them, and they pretty much finished the whole batch!
They were delicious, with a texture somewhere between bread rolls and flaky pastries.
The great thing about this recipe is these buns freeze very well, so you can make them a few days in advance and defrost them when you’re ready to serve them. You can reheat them in the oven and serve them warm or at room temperature.
You can also fill them with anything you fancy, and I think they’d make a great addition to any kids’ lunch box! They’re also handy to keep in the freezer, ready to defrost for packed lunches. Have fun!
Why These Piggy Buns Are a Kid Favourite
- Individual portions are easy for kids to hold and don’t require slicing or cutlery.
- Cute shapes make homemade food more inviting for kids while remaining easy to eat.
- Freezer-friendly pizza buns are practical for preparing ahead for parties, lunches, or busy weeks.
Key Ingredients for Pizza Flavoured Piggy Buns
All-Purpose Flour
All-purpose flour gives the buns a soft yet sturdy texture, while the flour in the flaky dough contributes to their pastry-like quality. Keep a little extra on hand, as a thinner yoghurt may require slightly more flour.
Instant Dry Yeast
Instant dry yeast gives the buns their light, bread-like texture and gentle rise. For reliable results, use yeast within its expiry date and store opened packets according to the packaging instructions.
Plain Yoghurt
Plain yoghurt keeps the dough soft and tender with a subtle tang. Choose unsweetened plain yoghurt, preferably one with a thick consistency, as thinner yoghurt can make the dough stickier.
Milk
Milk contributes to the soft, tender crumb and adds a mild dairy richness. It also combines with the egg yolk for the final egg wash.
Tomato Sauce
Tomato sauce adds a slightly tangy, savoury contrast to the buttery dough and cheese. A thicker tomato sauce works particularly well because it gives the centre plenty of flavour without being too runny.
Swiss Cheese
Swiss cheese gives the centre a creamy texture and mild, slightly nutty flavour. Its subtle sweetness and savoury notes pair well with the tangy tomato sauce and earthy oregano.
Find the complete list with measurements in the recipe card below.
How to Make Pizza Flavoured Piggy Buns
Preparing the Yeast Dough
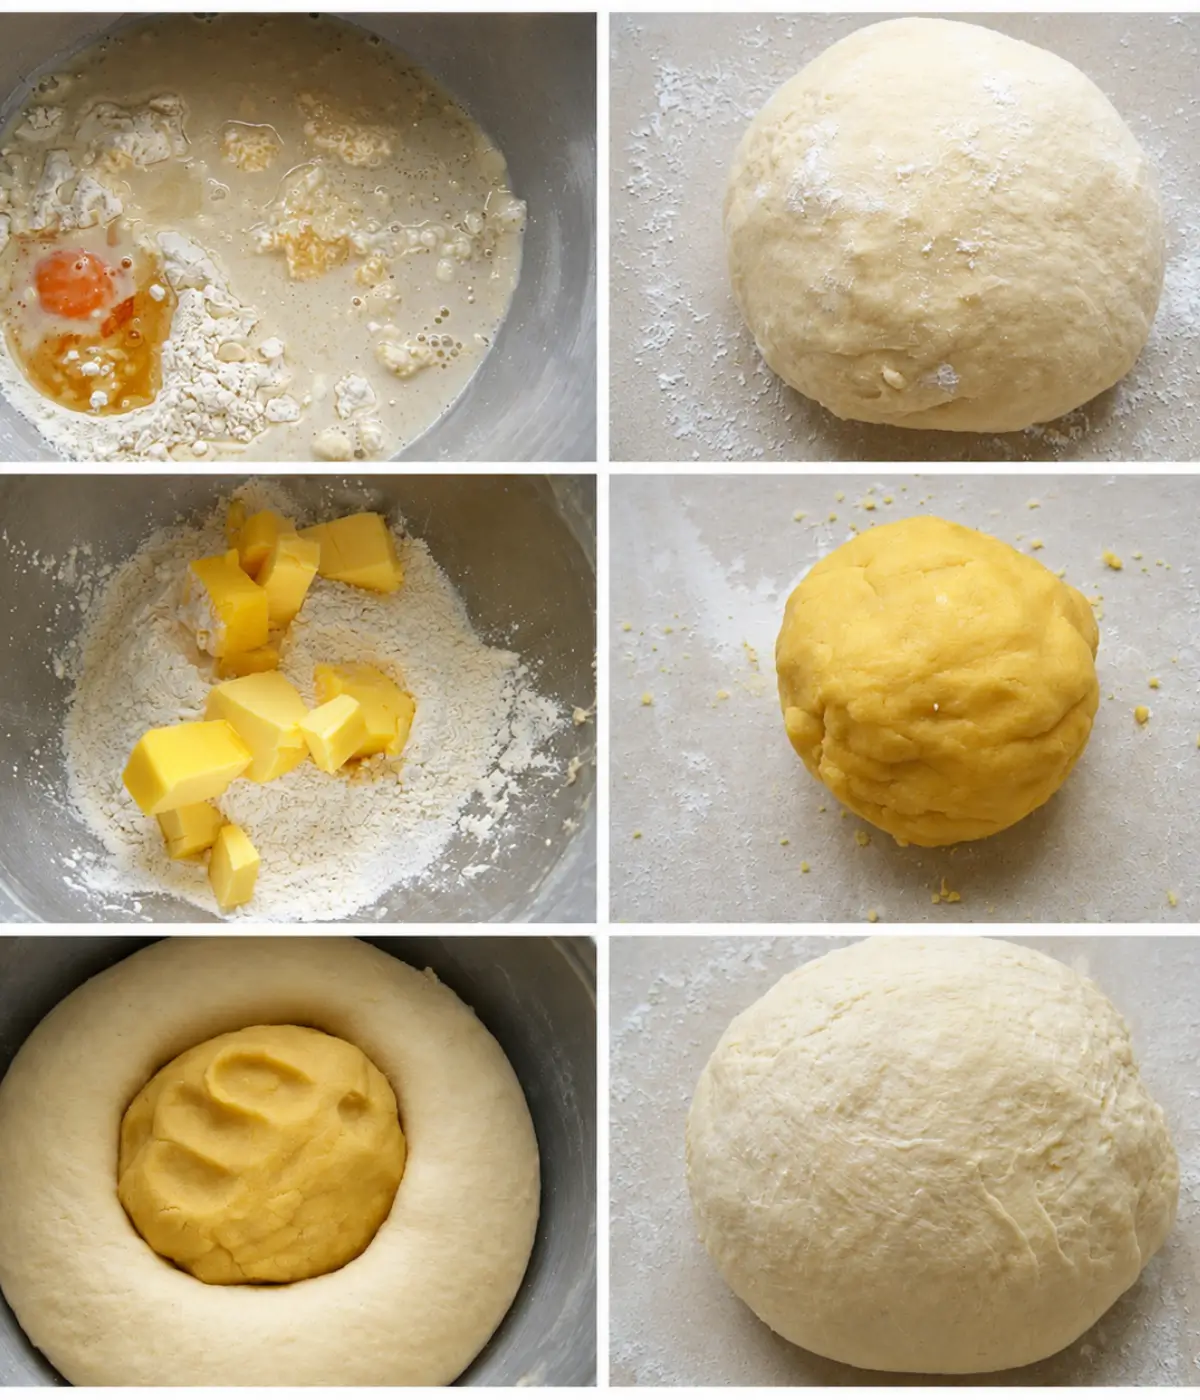
Step 1: Place all the ingredients in the bowl of an electric mixer and knead well. Add a little extra flour if needed, depending on the thickness of your yoghurt.
Note: The dough should be soft and easy to handle, but not sticky. If it feels too sticky, gradually add a little more flour until it reaches the right consistency.
Step 2: Shape the dough into a ball and set aside to rise for at least 1 hour.
Preparing the Flaky Dough
Step 1: Knead all the ingredients together until well combined.
Step 2: Once the yeast dough has risen, add the flaky dough and knead together until fully combined.
Shaping the Piggy Buns
Step 1: Roll the combined dough into a 3 mm – ⅛ inch thick sheet. Cut out circles measuring 6 cm – 2.4 inches in diameter.
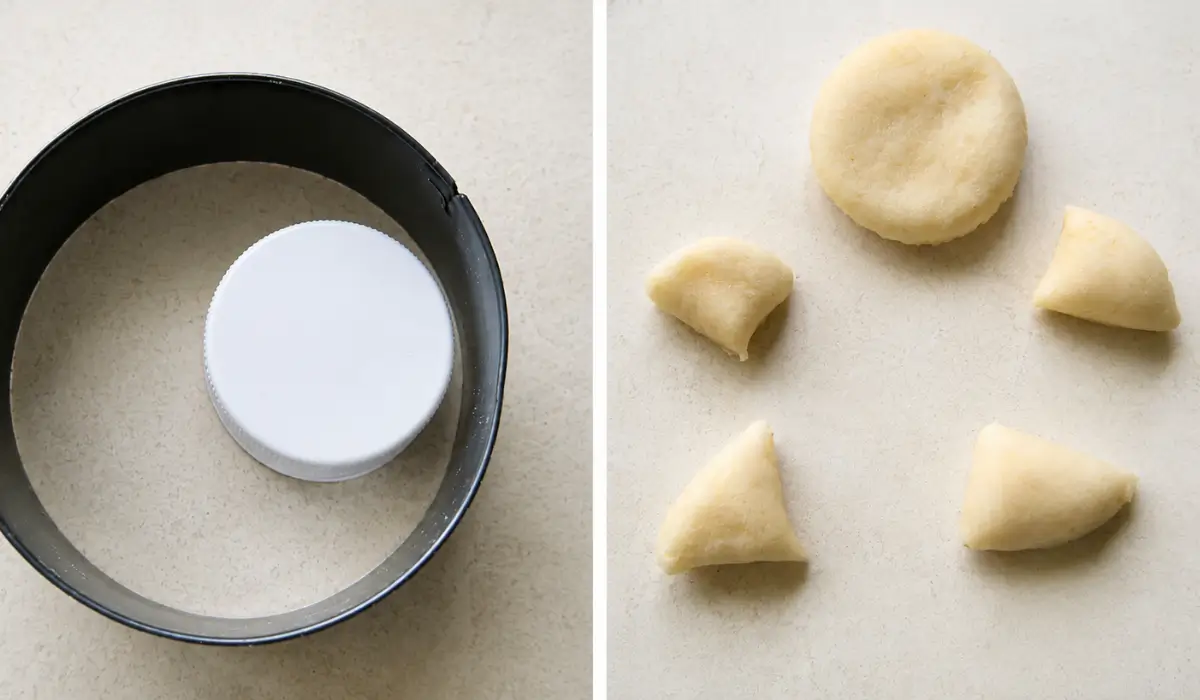
Step 2: Cut out smaller circles measuring 3 cm – 1.2 inches in diameter for the noses and ears. Cut some of the smaller circles into quarters to make the ears.
Preparing the Filling
Step 1: Mix the tomato sauce with a little salt and oregano until well combined.
Assembling the Piggy Buns
Step 1: Place half of the large dough circles on an oven tray lined with baking paper. Spoon 1 teaspoon of the tomato and oregano sauce into the centre of each circle, then top with a small piece of cheese.
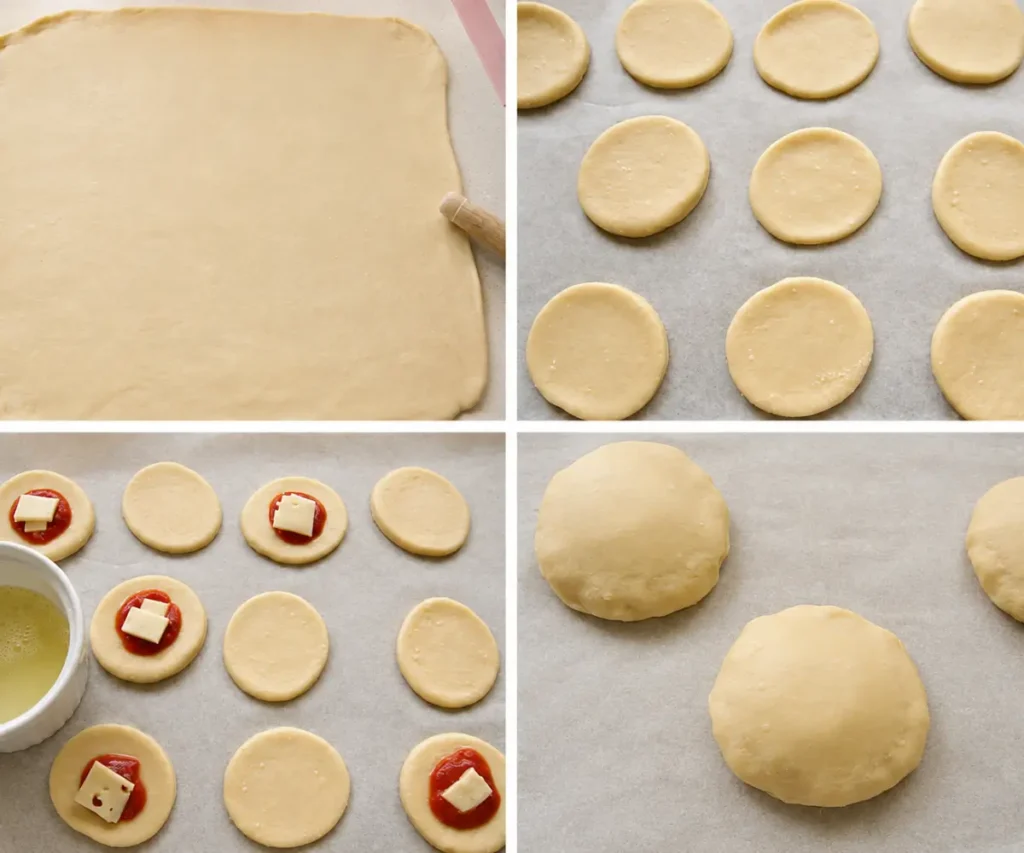
Step 2: Brush the edges with egg white, then place the remaining large dough circles on top. Press the edges firmly with your fingers to seal.
Step 3: Attach the noses and ears using egg white wash, then use cumin seeds to create the eyes and nostrils. Leave the Piggy Buns to rise for another 30 minutes, then brush them with egg yolk wash mixed with a little milk.
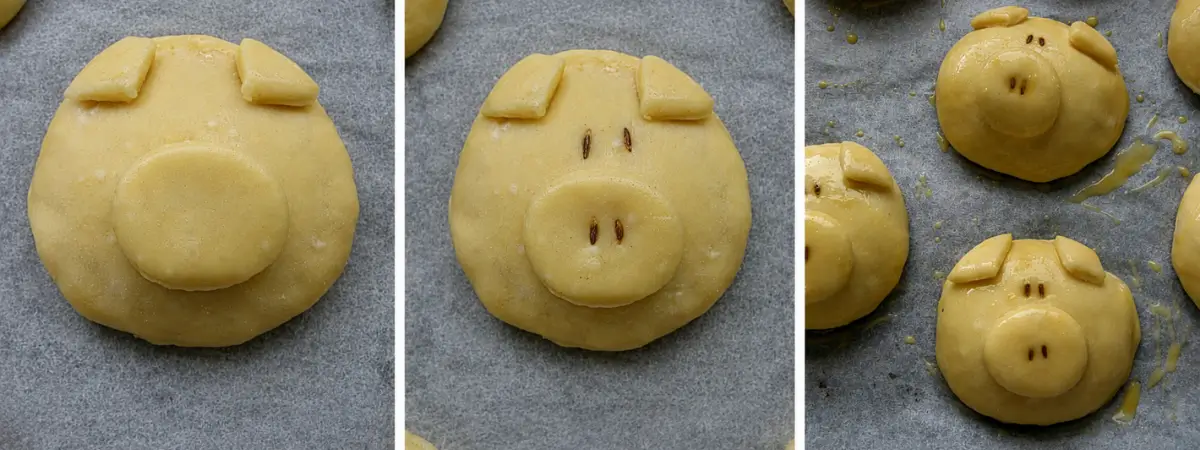
Step 4: Bake in a preheated oven at 190–200°C – 375–390°F for about 15 minutes.
Step 5: Serve warm or at room temperature.
Frequently Asked Questions
Swiss cheese is used in the original recipe, but a cheese that melts well is suitable for this style of bun. Keep the pieces small enough to fit comfortably inside the dough without making the buns difficult to seal.
Keep the tomato sauce and cheese in the centre, leaving enough space around the edges. Brush the edges with egg white, then press them firmly together to create a secure seal.
Yes. You can knead the dough by hand until it becomes soft, smooth, and no longer sticky. The original recipe uses an electric mixer, so hand-kneading may take longer.
Try combinations such as ham and cheese, pepperoni and mozzarella, or cooked vegetables and cheese. Keep the filling fairly dry and compact so the buns are easy to seal.
Extra Help from the Kitchen
Keep the Dough Even – Roll the dough to a consistent thickness so the tops and bottoms cook evenly, and the piggy shapes remain uniform.
Use Sharp Cutters – Press the cutters straight down through the dough rather than twisting them to create well-defined circles that are easier to align.
Keep the Shapes Similar – Match the top and bottom circles as closely as possible so their edges line up properly when you seal the filling inside.
Leave Space Between the Buns – Arrange the Piggy Buns apart on the baking tray so they have room to expand during the final rise and baking.
Position the Features Securely – Press the noses and ears gently onto the egg-white-brushed dough so they stay attached while the buns rise and bake.
Variations and Twists
Choose a Different Cheese – Replace the Swiss cheese with low-moisture mozzarella, provolone, fontina or mild cheddar. Use a similar-sized piece so the buns seal properly.
Try Pepperoni – Place one flat slice of pepperoni over the tomato sauce, then top with cheese. Its thin shape keeps the filling compact and easy to seal.
Use Finely Chopped Vegetables – Try green pepper, mushrooms or ripe olives. Sauté peppers and mushrooms to reduce moisture, and pat olives dry before mixing them into the tomato sauce.
Boost Savoury Flavour – Stir finely grated Parmesan and a pinch of garlic powder into the tomato sauce with the oregano and salt.
Finish with Hot Honey – Drizzle hot honey over the Piggy Buns while still warm for a sweet and spicy contrast.
Storage and Shelf Life
Store cooled Pizza Flavoured Piggy Buns in an airtight container in the fridge for up to 2 days. For longer storage, place them in an airtight container or freezer-safe bag and freeze for up to 3 months. Thaw frozen buns overnight in the fridge.
To reheat, place them on a baking tray in a preheated oven at 180°C – 350°F for 5 – 10 minutes, or until piping hot throughout. You can also serve the buns at room temperature once thawed.
Recipes for Your Next Party Spread
- Kitty Cat Bread Buns
- Pizza Flavoured Savoury Pastries
- Pizzette
- Ham and Stracchino Pinwheels
- Elsa’s Plait
Pizza Flavoured Piggy Buns Recipe
Ingredients
Yeast Dough
- 400 g – 13.5 oz all-purpose flour you may need a little more
- 1 7 g – ¼ oz package instant dry yeast
- 1 egg
- 200 ml – 7 oz plain yoghurt
- 100 ml – 3.5 oz warm milk
- 1 pinch of salt
Flaky Dough
- 150 g – 5.5 oz flour
- 100 g – 3.5 oz butter
- 1 pinch of salt
Filling
- cheese – I used Swiss cheese
- tomato sauce
- oregano
- salt
Egg Wash
- egg white
- egg yolk and some milk – for brushing
Instructions
Preparing the Yeast Dough
- Place all the ingredients in the bowl of an electric mixer and knead well. Add a little extra flour if needed, depending on the thickness of your yoghurt.Note: The dough should be soft and easy to handle, but not sticky. If it feels too sticky, gradually add a little more flour until it reaches the right consistency.
- Shape the dough into a ball and set aside to rise for at least 1 hour.
Preparing the Flaky Dough
- Knead all the ingredients together until well combined.
- Once the yeast dough has risen, add the flaky dough and knead together until fully combined.
Shaping the Piggy Buns
- Roll the combined dough into a 3 mm – ⅛ inch thick sheet. Cut out circles measuring 6 cm – 2.4 inches in diameter.
- Cut out smaller circles measuring 3 cm – 1.2 inches in diameter for the noses and ears. Cut some of the smaller circles into quarters to make the ears.
Preparing the Filling
- Mix the tomato sauce with a little salt and oregano until well combined.
Assembling the Piggy Buns
- Place half of the large dough circles on an oven tray lined with baking paper. Spoon 1 teaspoon of the tomato and oregano sauce into the centre of each circle, then top with a small piece of cheese.
- Brush the edges with egg white, then place the remaining large dough circles on top. Press the edges firmly with your fingers to seal.
- Attach the noses and ears using egg white wash, then use cumin seeds to create the eyes and nostrils. Leave the Piggy Buns to rise for another 30 minutes, then brush them with egg yolk wash mixed with a little milk.
- Bake in a preheated oven at 190–200°C – 375–390°F for about 15 minutes.
- Serve warm or at room temperature.

Love travelling as much as cooking?
Many of the recipes I share are inspired by places I’ve visited around the world. On Travel with Manu you’ll find destination guides, itineraries and travel inspiration to help you plan your next adventure.












I’m considering to add garlic butter on top but not sure on the impact with the egg wash. Or would I replace it. Suggestions?
You could just brush the garlic butter on the top and skip the egg wash. 🙂 Hope you enjoy them!
Can you make the dough a day ahead?
I just wanted to say I am so impressed by your Peppa Pig creations among other things and these buns are just the best. You make it look so simple and everything is amazing.
I love your piggy buns!!! It is such a great idea! I want to make them for my daughter’s party. Can I make them a day before and bake them on time for the party? Or will they not rise?
Would i be able to replace the natural yoghurt with something else?
These look amazing!!! So cute! In all your recipes do you use medium or large eggs please? Going to attempt these tomorrow-fingers crossed! X
Hi there! I use medium to big eggs (not jumbo ones)… not sure of what the US/UK size might be… in Australia they are the 700 gms eggs.
As a pig owner, I nearly squealed when I saw these! How absolutely adorable! Now I want to make them for Cupcake’s (my piglet) birthday! Think it’d be too much? 😉
These are absolutely delightful. You are such an artist.
These are SO fantastic…like…beyond adorable. I just love them, and can’t think of anything else to say. Tongue tied!
Clever idea … 🙂
They do look adorable! And delicious too!
These are just adorable! The dough recipe is very interesting and sounds delicious with any filling.
love these so darn cute
These are absolutely the cutest things EVER! It’d be funny to put a bit of bacon or pancetta inside! haha! Then they’d be Piggy Piggy Buns 😉