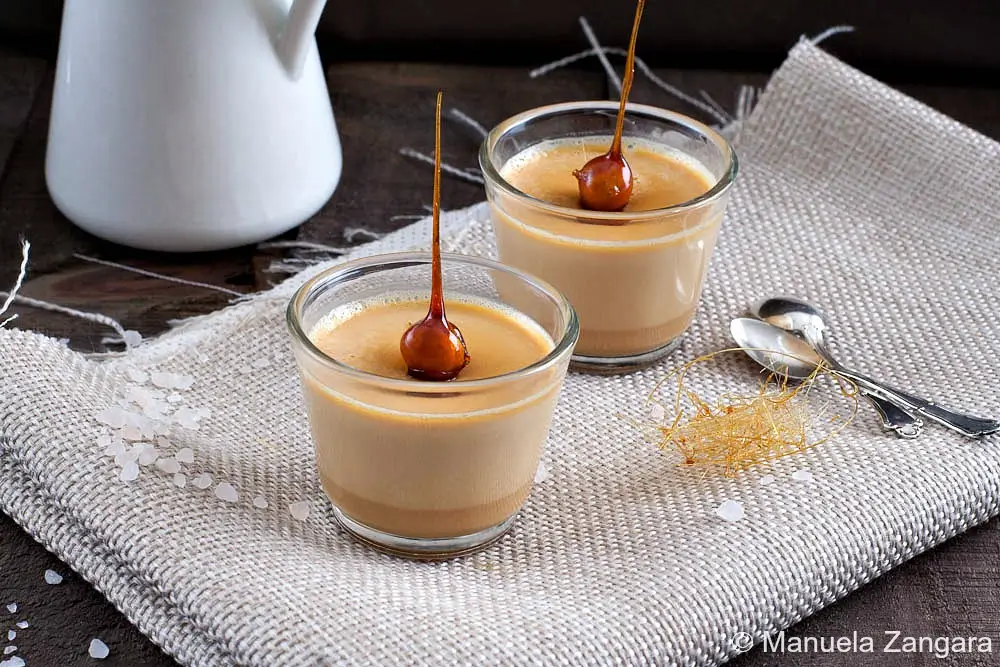
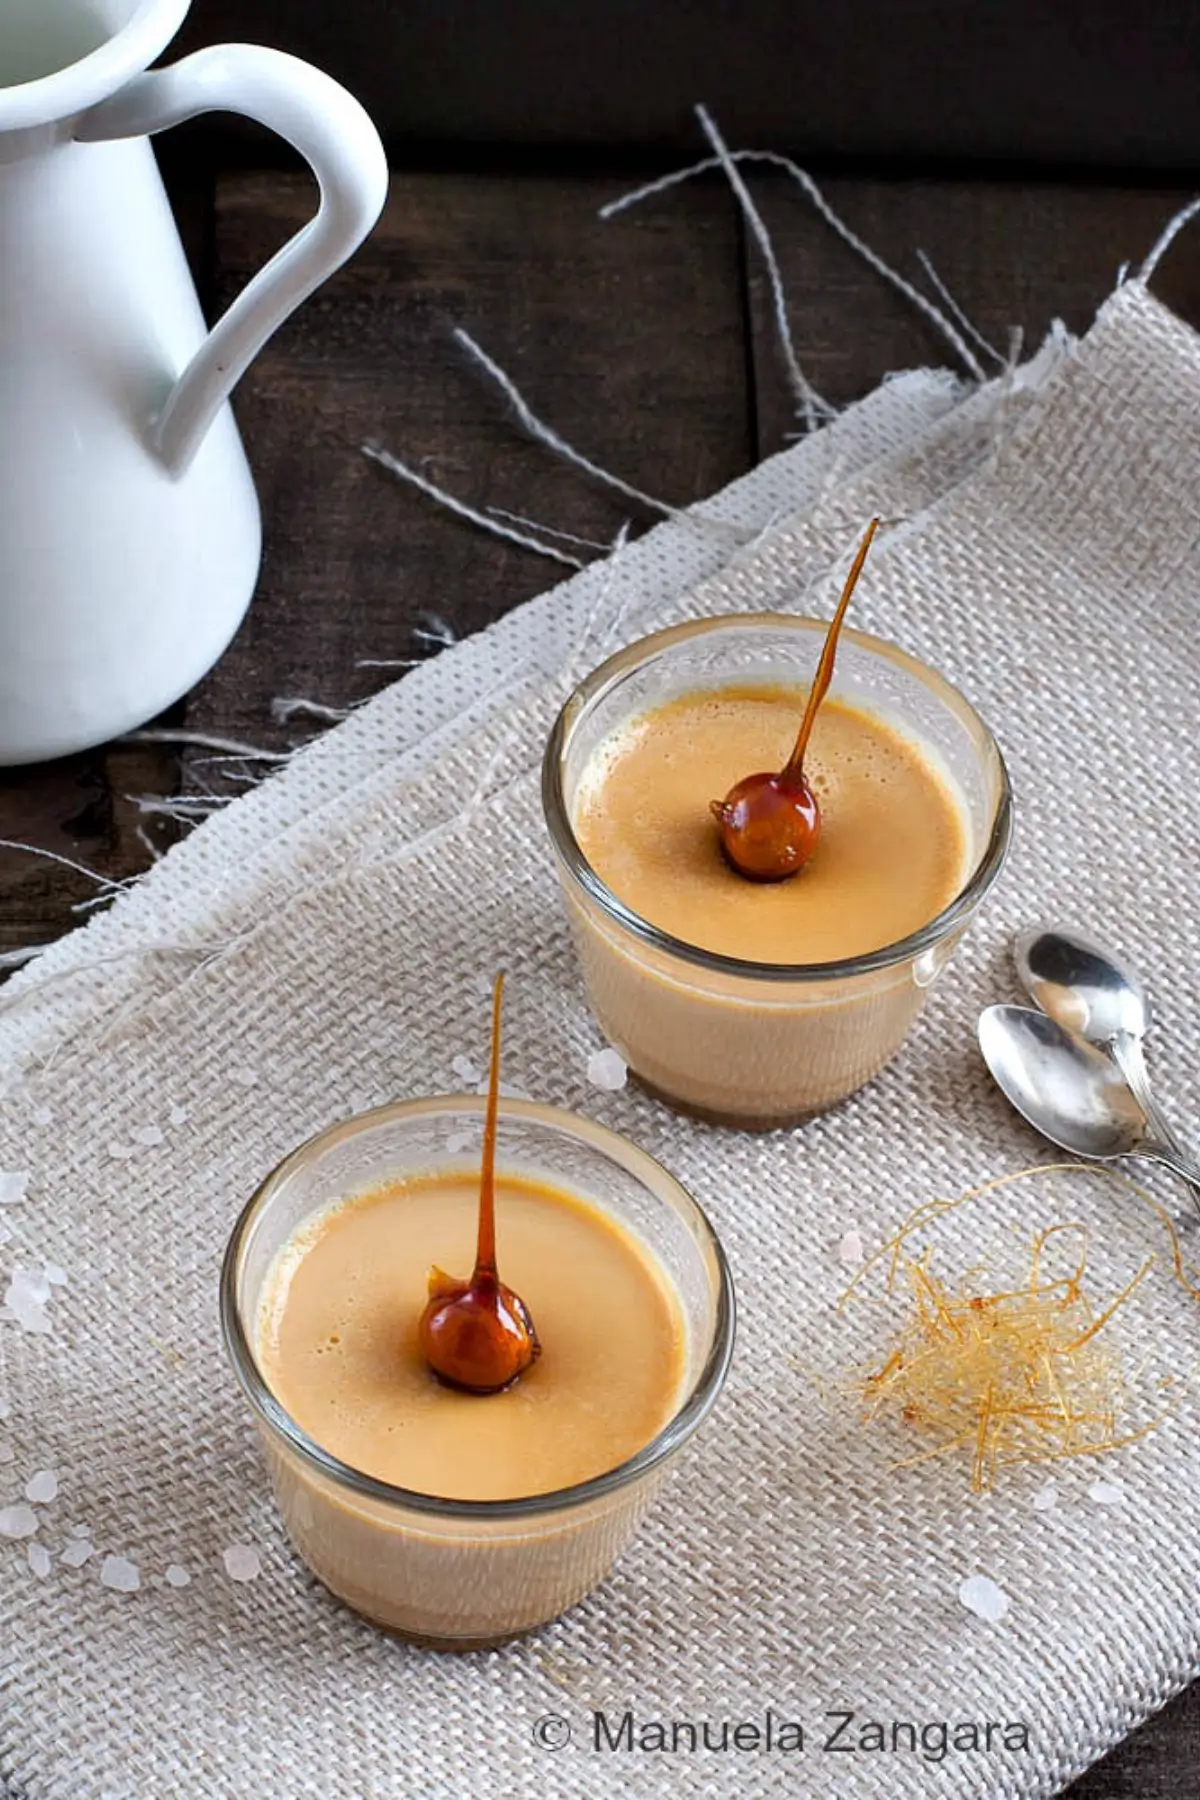
Every spoonful of Salted Caramel Panna Cotta has a soft, silky wobble that melts in your mouth, with balanced sweetness and a mellow caramel note.
You know how much I love panna cotta, but what you may not know is that I consider it my go-to dessert when I have little time and still want to impress my guests. You do need to make it in advance, but the hands-on work takes only 15 to 20 minutes.
It’s also a very versatile dessert, and you can create so many flavours and looks that it never feels repetitive. In fact, you can see a few of my favourite combinations here.
This time, I’m sharing one of my husband’s favourite variations, Salted Caramel Panna Cotta, and I’ll show you how easy it is to make those caramel decorations to go with it. Enjoy!
Reasons You’ll Enjoy Panna Cotta with Caramel Sauce
- Creates a smooth, creamy spoonful that feels light after any meal, offering gentle comfort.
- Comes together in under 20 minutes, which is always welcome on busy days.
- Uses everyday ingredients already in most kitchens, keeping things simple always.
Key Ingredients for Salted Caramel Panna Cotta
Cream
Gives the dessert its smooth, rich feel and helps the caramel blend evenly. Full-fat cream keeps the texture soft and consistent once set.
Milk
Keeps the mixture lighter so the panna cotta stays tender. Whole milk works best because it supports the creamy finish without thinning the flavour.
Sugar
Cooks into a dark amber caramel that defines the taste of this dessert. Fine sugar melts cleanly and makes it easier to control the colour.
Vanilla Extract
Adds warmth that complements the caramel without taking over. A good extract gives a cleaner, rounded flavour.
Gelatine Sheets
Create the silky set panna cotta is known for. Soaking until fully soft helps them melt smoothly into the warm caramel mixture.
Find the complete list with measurements in the recipe card below.
How to Make Salted Caramel Panna Cotta
Panna Cotta
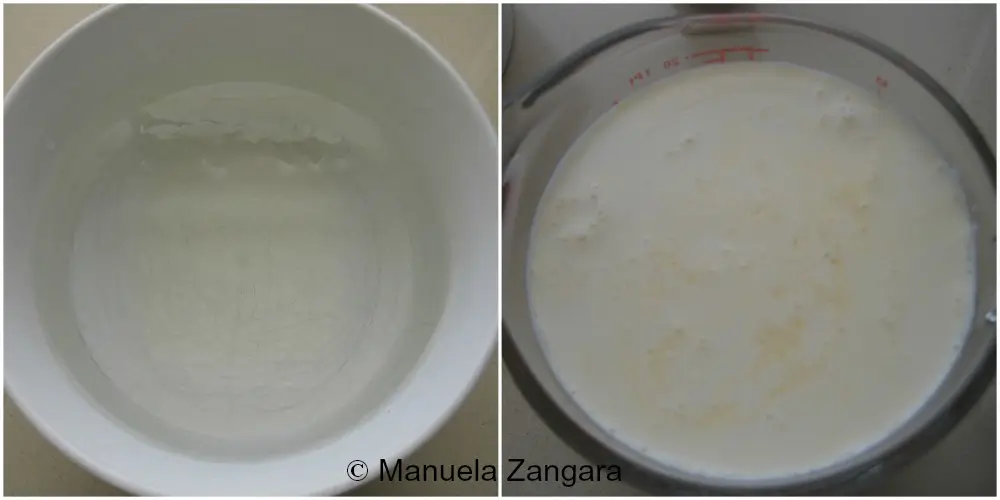
Step 1: Put the gelatine sheets in a bowl filled with cold water for 10 minutes or until soft.
Step 2: Put the cream, milk, and vanilla extract into a mug and heat it in the microwave for 40 seconds.
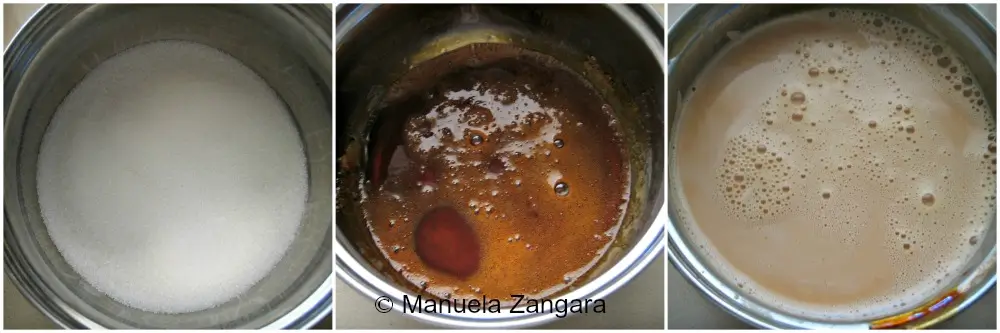
Step 3: Put the sugar in a heavy-bottomed saucepan and melt it over medium heat until it becomes a dark amber colour. Do not stir, but swirl the pan if lumps start forming.
Step 4: Carefully add the warm cream mixture, stirring it into the caramel while keeping the pan on the heat; the caramel may solidify at this point, so keep stirring until it melts again.
Step 5: Add the sea salt and mix.
Step 6: Squeeze the excess water from the gelatine sheets and add them to the hot caramel cream; mix well until completely incorporated.
Step 7: Strain the mixture into glasses or moulds.
Step 8: Refrigerate for at least 4 hours or overnight before serving.
Decorations
Step 1: Melt the sugar in the water over medium heat and let it become a medium dark amber.
Step 2: Insert a toothpick into each hazelnut and dip them in the caramel, then keep them upside-down to drain the excess caramel until it solidifies.
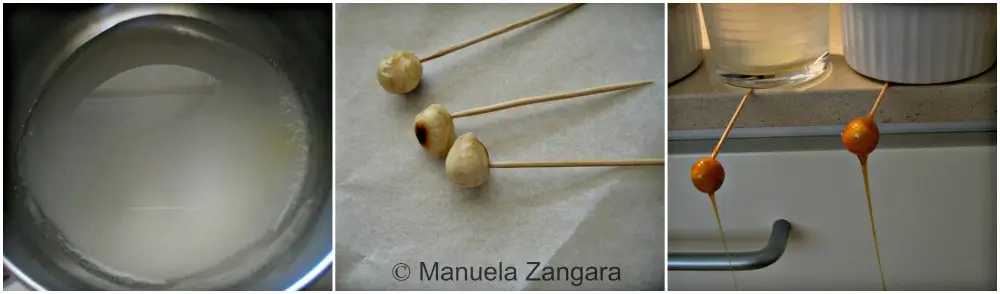
Step 3: Remove the toothpick and place the caramel-coated hazelnut on top of the set panna cotta.
Frequently Asked Questions
Warm the cream mixture before pouring it in so the caramel doesn’t harden when you add the cream. Add it slowly while stirring, and any firm spots will melt back over gentle heat.
Yes, you can. 2 teaspoons powdered gelatine hydrated in cold water replace three sheets without changing the texture. Make sure it softens fully before adding it to the warm caramel mixture.
A light coating of oil inside each mould and a well-chilled mixture make it easier to turn out the caramel-based panna cotta, which sets a little softer than plain panna cotta.
You can, but the flavour will be milder than caramel cooked in the pan. Warm the sauce gently before mixing so it blends smoothly with the cream.
Extra Help from the Kitchen
Control the Heat When Making Caramel – Keep the heat steady on medium so the sugar melts evenly without burning around the edges.
Pierce Hazelnuts Without Cracking – Insert the toothpick through the flatter side of the hazelnut with slow, steady pressure. Roasted nuts are slightly softer, so pushing gently helps the toothpick slide in without splitting the nut.
Avoid Over-Whisking – Stir gently once the cream mixture goes into the caramel to keep excess air out of the final set.
Cool Slightly Before Straining – Let the mixture rest for 1–2 minutes off the heat so bubbles rise before pouring it through the sieve.
Check Gelatine Softness – Lift each sheet after soaking to make sure it feels completely soft, because any firm spots can leave uneven lines in the panna cotta.
Variations and Twists
Salted Caramel Panna Cotta with Peanut Brittle – Swap the caramel-coated hazelnuts for small pieces of peanut brittle and keep the topping crisp until serving. The brittle adds a firm, sweet–salty crunch that complements the caramel base.
Salted Caramel Panna Cotta with Butter Toffee Pretzels – Crush butter toffee pretzels and use them in place of hazelnuts to finish each glass. The pretzels bring a light salted edge and caramelised crunch.
Salted Caramel Panna Cotta with Layered Caramel – Pour 1–2 teaspoons caramel into each glass and chill it for a few minutes before adding the panna cotta mixture. The two layers create a clean finish and separate the caramel from the cream.
Salted Caramel Panna Cotta with Fresh Berries – Add 1–2 tablespoons fresh berries in place of the hazelnuts. The fruit brings colour and a light contrast to the creamy caramel base.
Storage and Shelf Life
Store Caramel Panna Cotta in the fridge for up to 2-3 days, keeping each glass or mould covered with cling wrap to prevent odours transferring from other foods.
Avoid freezing, as the gelatine turns grainy once thawed. Add the caramel-coated hazelnuts only at serving time so they stay crisp.
More Ways to Enjoy Panna Cotta
Salted Caramel Panna Cotta Recipe
Every spoonful of Salted Caramel Panna Cotta has a soft, silky wobble that melts in your mouth, with balanced sweetness and a mellow caramel note.
Ingredients
Panna Cotta
- 300 ml – 10 oz cream
- 100 ml – 3.5 oz milk
- 100 g – 3.5 oz sugar
- 1 tsp vanilla extract
- 3 gelatine sheets OR 2 tsp gelatine powder
- 1 pinch sea salt
Decoration
- hazelnuts – roasted and peeled
- 45 ml – 3 tbsp water
- 65 g – 5 tbsp sugar
- 1 pinch of salt
Instructions
Panna Cotta
-
Put the gelatine sheets in a bowl filled with cold water for 10 minutes or until soft.
-
Put the cream, milk, and vanilla extract into a mug and heat it in the microwave for 40 seconds.
-
Put the sugar in a heavy-bottomed saucepan and melt it over medium heat until it becomes a dark amber colour. Do not stir, but swirl the pan if lumps start forming.
-
Carefully add the warm cream mixture, stirring it into the caramel while keeping the pan on the heat; the caramel may solidify at this point, so keep stirring until it melts again.
-
Add the sea salt and mix.
-
Squeeze the excess water from the gelatine sheets and add them to the hot caramel cream; mix well until completely incorporated.
-
Strain the mixture into glasses or moulds.
-
Refrigerate for at least 4 hours or overnight before serving.
Decorations
-
Melt the sugar in the water over medium heat and let it become a medium dark amber.
-
Insert a toothpick into each hazelnut and dip them in the caramel, then keep them upside-down to drain the excess caramel until it solidifies.
-
Remove the toothpick and place the caramel-coated hazelnut on top of the set panna cotta.


HI
For me it seems impossible to get the toothpick from the solid caramel. Is there any trick to it?
How do you stick a toothpick into a hazelnut without the nut cracking open?
Hi there!
Come across this recipe when looking for a new dessert idea for my next sunday lunch with friends. come across this and it looks like the perfect recipe. Just wondering, how many days ahead can i make it, if I keep it covered in the fridge?
Thank you!
Hi Keziah! It will easily last 2 or 3 days in the fridge. 🙂 Hope you like it!
Thanks Manu!
I want to make 20 servings but when I change this quantity at the top of your recipe, the amount of powdered gelatin used doesn’t convert to the right amount for 20 servings?
Can you let me know the best way to work this out?
Thanks again!
Hi Keziah. Unfortunately, the automatic conversion works only for the first column. In this case, you would need 10 tsp of gelatine for 20 servings. Hope it helps and sorry for the delay, I just saw this comment!
Its looks so yummy! Can i use whipping thickened cream ?
Hello, Would love to make this gorgeous panna cotta with gelatine sheets. Could you please tell me what strength do you use….gold or titanium?
Thanks so much, Angela
Hi Angela
I used gold strength gelatine sheets. 🙂
Let me know how you like it!
I’m considering making these, but I would like to make them vegetarian friendly for some friends that would appreciate it. Do you have any suggestions for using a vegetarian alternative to gelatin, such as agar-agar (or something else) ?
Hi Heather! Even though I haven’t tried it myself yet, I know that you can use agar agar to make vegetarian friendly panna cotta. For this specific recipe you will need about 1 to 1 1/4 tsp of agar agar and you will need to dissolve it in the boiling mixture, stir and simmer for 3 to a max of 5 minutes and then proceed as per the recipe. Please, let me know how it comes up, so I can update the recipe with this suggestion! 🙂
I will definitely let you know how it turns out! I have to go shopping for the agar agar, but I want to try it out soon so I can bring it to our next get-together.
the instructions say you can use gelatin powder in place of gelatin sheets. If so, do you just sprinkle in the powder at the same point that you would mix in the moist sheets? Please clarify – this looks delicious!
Hi Adrienne
The process is slightly different… My friend Mareena made my chocolate panna cotta with powder gelatine. You can see her post here: http://mareenasrecipecollections.com/2012/10/19/chocolate-panna-cotta/ It is the same process with any flavour panna cotta. Hope it helps!
G’day and who could go past this great combination of flavors, true!
Wish could come through the screen and try some now too!
Cheers! Joanne
Viewed as part of Nancy’s YBR Oct Round Up
This is a must make! And that caramelized hazelnut…wow!
Hi, I want to make this but I have a quick question: is it firm enough to come out of moulds, or does it have to be served in a glass?
Hi Alicia. You can also unmould it if you like. Make sure to slightly wet your moulds before putting the liquid panna cotta in it, that will make it easier to unmould. 🙂
Oh YUM! You just combine one of my most favorite desserts with my most favorite dessert flavor!!
I love panna cotta too! I have not tried a salted caramel one yet. Yours look so delicious. And that hazelnut sugar piece just bring the whole presentation to another level. Amazing work!
This looks great, but I have some questions about the caramel hazelnuts. Are you using a candy thermometer? Doesn’t the extra sauce drip onto the floor when they dry? How long do they take to harden?
Hi there! I didn’t use a candy thermometer for the hazelnuts. You just want the caramel to become a golden amber colour and let it cool down just enough (a few seconds) so that you can get it to solidify while dripping. You can put some baking paper on the ground so you avoid caramel on it… that’s what I did. 😉 They do harden pretty fast though, so you need to work quickly. If the caramel becomes too cold you will need to re melt it on the fire for a few seconds.
Wow…this looks stunning.
looks amazing!
They look absolutely perfect! I just bought water tumblers from Ikea that look just like these glasses – looks like they’re gonna be used for something else too now 🙂
I adore panna cotta and consider caramel to be God’s gift to us. It’s absolutely amazing. Your dessert looks delicious and I love the caramel/hazelnut decorations on top.
I am a panna cotta freak and I also think it is the ideal dessert for company – easy to make AND make ahead! This is a stunning recipe and gorgeous!