Bring the fun of Peppa Pig to your celebration with this easy Peppa Pig Cake. Simple fondant decorations, bright colours, and a soft sponge make it perfect for every birthday.

Georgia has been absolutely obsessed with Peppa Pig lately. She knows every song, every line, and could happily sit in front of the TV for hours if I let her. So when it came time to plan her third birthday, the choice was obvious. Of course, it had to be a Peppa Pig cake!

I decided to make a fondant cake with a flat Peppa design on top instead of using figurines. I’ve always preferred this style because it looks closer to the cartoon and is much easier to work with, especially when it’s warm. It was summertime in Sydney then, and I didn’t want the fondant to melt or lose its shape before the party.
When the cake was finally finished, I couldn’t stop smiling. It had everything I imagined, with little flowers, a pond with a duck, and the sweetest details that brought it all to life.
If your little one loves Peppa too, you’ll probably know every character by heart, so have fun with it and make the decorations your own. That’s the part I love most, seeing a cake come to life with a bit of imagination and a whole lot of joy.

What Everyone Loves About This Homemade Fondant Cake
- Bright colours and playful details make the whole party table feel more cheerful and inviting.
- A homemade cake always feels more heartfelt and thoughtful than a store-bought one.
- Works perfectly for cupcakes or smaller birthday treats when serving a crowd.
Key Ingredients for Peppa Pig Cake
Yoghurt Cake
Soft, light, and gently sweet, this cake makes a reliable base for fondant decorating. I like using my classic yoghurt cake recipe because it keeps the crumb moist without feeling heavy.
Fondant
Coloured fondant brings Peppa and her playful world to life. You’ll need shades of pink, red, green, light blue, yellow, white, and black.
Icing for Crumb Coating
A smooth layer of icing locks in crumbs and helps the fondant adhere evenly. Use a soft, spreadable consistency that’s easy to work with once the cake is chilled.
Find the complete list with measurements in the recipe card below.
How to Make Peppa Pig Cake
Preparing the Cake Base
Step 1: Start by baking the cakes. I made two yoghurt cakes and froze them for later use.
Step 2: Next, prepare the fondant you’ll need. Dip a toothpick into the gel colour, rub it onto the fondant, and knead until the colour is evenly blended.
Making the Decorations
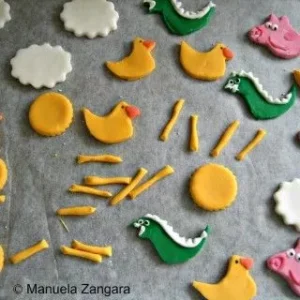
Step 1: Begin preparing the fondant decorations 3 to 4 days before the party. Keep them wrapped and stored in a dry place so they don’t harden.
Step 2: To make Peppa Pig, the ducks, and the dinosaur, create your own stencils. All you need is a printed image of what you want to make, clean cardboard, transfer paper, a pen, and a sharp exacto knife.
Step 3: Place the transfer paper between the image and the cardboard, trace the outline with a pen, and cut out all the pieces. I always use this method when making my own stencils (also for cookies), as it lets me create almost anything I like.
Assembling and Decorating the Cake
Step 1: The day before the party, assemble the cake. Prepare some icing for the crumb coating (you can use your favourite icing recipe; make sure it’s soft enough to spread easily while still holding its shape).
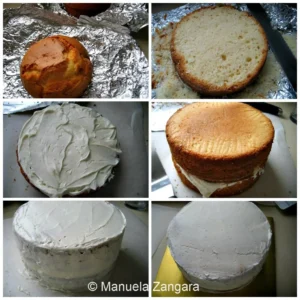
Step 2: Take the two yoghurt cakes out of the freezer and level them while still frozen using a sharp serrated knife.
Step 3: Spread a layer of icing on one cake and place the second cake on top. Choose the smoothest and flattest surface for the top; it will likely be the bottom of one of the cakes. This makes decorating easier.
Step 4: While the cakes are still firm, cover them with a thin layer of icing to create a crumb coat. Start from the top and work your way around the sides. Use a spatula to smooth the surface as evenly as possible.
Step 5: Once the cake is coated, place it in the fridge to set. This layer helps the fondant look smooth and prevents crumbs from showing through.
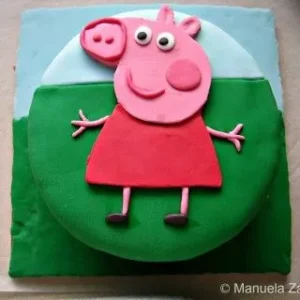
Step 6: When the icing has hardened, transfer the cake onto a cake board and secure it with a little icing so it stays in place. Roll out the light blue fondant and cover ⅓ of the cake. Then roll out the green fondant and cover the remaining ⅔. Smooth the surface and trim away any excess.
Step 7: Attach the decorations with a small amount of water. Shape Peppa Pig’s face, dress, legs, hands, feet, tail, and facial details. Use a clean garlic press to make the grass and cookie cutters for the clouds, sun, and flowers. Finish by adding some birds and a small pond with a duck.

Frequently Asked Questions
Yes, ready-made fondant works perfectly and saves a lot of time. You can colour it with gel food colouring to match the shades you need, and it rolls out smoothly when slightly warmed in your hands.
You don’t need anything fancy. A fondant smoother, rolling pin, small cutters, and a craft knife will do the job well. If you don’t have cutters, printed stencils and a careful hand work perfectly too.
Yes, a light buttercream works well. Make sure it’s smooth and not too firm, so you can spread it evenly before covering the cake with fondant. A quick chill in the fridge helps it set nicely.
Choose a brand that rolls out thinly and stays soft while you work, such as Satin Ice or Wilton. Both are easy to handle and give a smooth finish without cracking or drying too fast.
Extra Help from the Kitchen
Work in Short Sessions – Fondant can dry out or soften too quickly in warm weather. Prepare and apply decorations in stages so you can keep each colour fresh and easy to handle.
Dust Tools Lightly – A small amount of corn starch or icing sugar on your rolling pin and hands helps prevent sticking without drying out the fondant.
Use Cling Film to Shape Fondant – If you need to roll small details, cover the fondant with cling film before pressing cutters down. This gives clean edges and keeps the shapes smooth.
Keep a Small Brush Handy – Use it for dabbing water or removing any sugar dust from the surface once you’re done decorating. It gives the cake a tidy finish.

Variations and Twists
Use Chocolate Cake Instead – Replace the yoghurt cake with a chocolate sponge if your child prefers a richer flavour. The fondant colours stand out well against the darker base.
Try Cupcake Versions – Bake small cupcakes and decorate each with a fondant Peppa face or a colourful balloon topper. They’re fun to make and easy to serve at parties.
Make George’s Dinosaur Cake – Turn the same idea into a dinosaur cake inspired by George. Use green fondant, add little leaves, and shape footprints for a playful twist.
Add Edible Prints – If you’re short on time, edible image transfers are a quick decorating option. Use printed Peppa faces, clouds, or rainbow scenes for a neat finish.
Try Different Cake Flavours – Lemon or vanilla sponge pairs nicely with fondant. These lighter flavours keep the cake soft and not overly sweet.
Storage and Shelf Life
Store the finished cake in a cool, dry place away from direct sunlight. Avoid refrigerating once covered with fondant, as moisture can make the surface sticky.
If you’re preparing in advance, bake the cakes up to 2 days before decorating. Wrap each layer tightly in cling film and keep at room temperature. For longer storage, wrap the undecorated cakes well and freeze for up to 1 month. Thaw overnight in the fridge, then bring to room temperature before assembling.
Once decorated, the cake will stay fresh for about 3 days at room temperature when kept in a cake box or an airtight container.
Other Peppa Pig Party Ideas
Peppa Pig Cake
Bring the fun of Peppa Pig to your celebration with this easy Peppa Pig Cake. Simple fondant decorations, bright colours, and a soft sponge make it perfect for every birthday.
Ingredients
- 2 yoghurt cakes – baked in a 16 cm – 6.3 inches round pan (I made 1½ doses of this recipe)
- coloured fondant
- icing for crumb coating
- icing sugar / corn starch
Instructions
Preparing the Cake Base
-
Start by baking the cakes. I made two yoghurt cakes and froze them for later use.
-
Next, prepare the fondant you’ll need. Dip a toothpick into the gel colour, rub it onto the fondant, and knead until the colour is evenly blended.
Making the Decorations
-
Begin preparing the fondant decorations 3 to 4 days before the party. Keep them wrapped and stored in a dry place so they don’t harden.
-
To make Peppa Pig, the ducks, and the dinosaur, create your own stencils. All you need is a printed image of what you want to make, clean cardboard, transfer paper, a pen, and a sharp exacto knife.
-
Place the transfer paper between the image and the cardboard, trace the outline with a pen, and cut out all the pieces. I always use this method when making my own stencils (also for cookies), as it lets me create almost anything I like.
Assembling and Decorating the Cake
-
The day before the party, assemble the cake. Prepare some icing for the crumb coating (you can use your favourite icing recipe; make sure it’s soft enough to spread easily while still holding its shape).
-
Take the two yoghurt cakes out of the freezer and level them while still frozen using a sharp serrated knife.
-
Spread a layer of icing on one cake and place the second cake on top. Choose the smoothest and flattest surface for the top; it will likely be the bottom of one of the cakes. This makes decorating easier.
-
While the cakes are still firm, cover them with a thin layer of icing to create a crumb coat. Start from the top and work your way around the sides. Use a spatula to smooth the surface as evenly as possible.
-
Once the cake is coated, place it in the fridge to set. This layer helps the fondant look smooth and prevents crumbs from showing through.
-
When the icing has hardened, transfer the cake onto a cake board and secure it with a little icing so it stays in place. Roll out the light blue fondant and cover ⅓ of the cake. Then roll out the green fondant and cover the remaining ⅔. Smooth the surface and trim away any excess.
-
Attach the decorations with a small amount of water. Shape Peppa Pig’s face, dress, legs, hands, feet, tail, and facial details. Use a clean garlic press to make the grass and cookie cutters for the clouds, sun, and flowers. Finish by adding some birds and a small pond with a duck.


Also i love your cake, it’s just amazing and very cute. So as many others i am going to try and make it as well. I was wondering how you got the 2 different colours fondant background (green and blue) so nicely next to eachother as a base on the cake? Or is 1 on top of the other? I am pretty new in this whole fondant world, but i am loving it so far.
Hi! They are actually 2 separate pieces of fondant. I rolled them and then cut them straight using a ruler. Then you just put them on the cake and smooth the joint with a fondant smoother. It sounds harder than it is. Also, if there are small imperfections, you can always cover them with the rest of the decorations! 😉 Have fun and let me know how it goes!
Thanks for your help with making a Peppa Pig cake. I made mine in the number 3 (instructions in “Australian Womens’ Weekly Children’s Birthday cake book”) decorated with “Plastic Icing” which was super easy to work with and really forgiving. I used your decoration ideas and the result is excellent. Thanks again!
Wow your cake looks amazing!! Bet your daughter loved it! Just wondering what sort of icing you use to crumb coat it before the fondant icing as I’ve not heard of it before? Also, could you put jam and buttercream in the middle of the 2 cakes for more flavour? Thanks x
Hi Gemma! Thanks!! You can use buttercream to crumb coat the cake and you can fill the cake with any cream you like (buttercream, jam, Nutella, ganache…). 🙂 Hope it helps! Manu
Hi Manu! Very excited to have stumbled across your page when I was googling Peppa Pig cakes, I’m going to attempt this for my 3yo’s birthday this Friday! He has requested a chocolate cake and I love the sound of your yoghurt cake recipe and was wondering if I can add cocoa to make it chocolate or does it ruin the taste??
Thanks
Hi Fiona! Of course you can add cocoa powder to the basic recipe! I often do! 🙂 2 to 3 tbsp should be enough (though I must admit, I taste it… hahaha). Have fun decorating the cake! Don’t you just love Peppa Pig?? Happy birthday to your little boy! 🙂
Hi Manu,
Your cake looks beautiful. I am just wondering what icing recipe you used under the fondant?i am not a big fan of fondant icing and just wondering how it tastes with the icing underneath. My daughter wants a peppa pig cake and your cake looks great. Thanks
Ohhhh so sorry I missed this Kym! I hope I am still in time to answer your question. When I make fondant cakes I now use ready made icing (vanilla flavor) as I find it easier to spread uniformly. For the crumb coating you need to have a smooth surface so that the icing can “seal” your cake and no crumbs can be seen under the fondant. I use so little, that the taste is not so relevant (the quality of the fondant you use is more important as you will use much more of it and it will “cover” the taste of the icing). I hope it helps!
I can’t believe it…..that is the exact cake and accompaniments I wanted to make for my daughter’s 3rd birthday this Saturday….EXACTLY!….I was just googling some final preparation ideas! You did an amazing job with the food and cake. I am very jealous as I know mine won’t be as perfect as yours. Well done and thanks for posting this. Did you have to keep your cake in the fridge til you needed it or can you leave out (and how early did you make the cake?). We are so tight on fridge space from Christmas I am trying to figure out what I can leave out (in containers!). thanks
Hi Julie! Don’t you just love Peppa Pig?!!! 🙂 Merry Christmas to you and your family and Happy Birthday to your little one!
I usually bake the cake up to a week before and freeze it (double wrapped in aluminium foil), The day before the party, I decorate it. I level it from frozen as it is easier and doesn’t crumble as much… then I crumb coat it and when the icing is firm, I decorate it with fondant. When the cake is fully covered with fondant, I do not put it in the fridge. I keep it in a cabinet… till the next day. If you put it in the fridge, you will get condensation on the cake. You could keep it a couple of days outside the fridge, but I try to minimise the time it stays out. Hope it helps! 🙂 Let me know how it goes and have fun decorating it! I am sure it will be great! 🙂
That looks great and doesn’t look tooooooooo difficult to make.
So adorable Manu, you are so talented! Thank you for sharing in our new G+ Sweets community.
One of the nicest Peppa cakes I’ve seen, will let my DIL see this as my grandson is also obsessed with Peppa!
Perfect….looks beautiful…b’day wishes to little one.
What a perfect cake for Georgia! So cute!!!! I know she had a fantastic and fun-filled Bday!
My goodness, you are truly an artist!
i love it….absolutely adorable!
You’re killing me with those little dragons. They’d make good earrings.
gorgeous Manu, you certainly are talented!