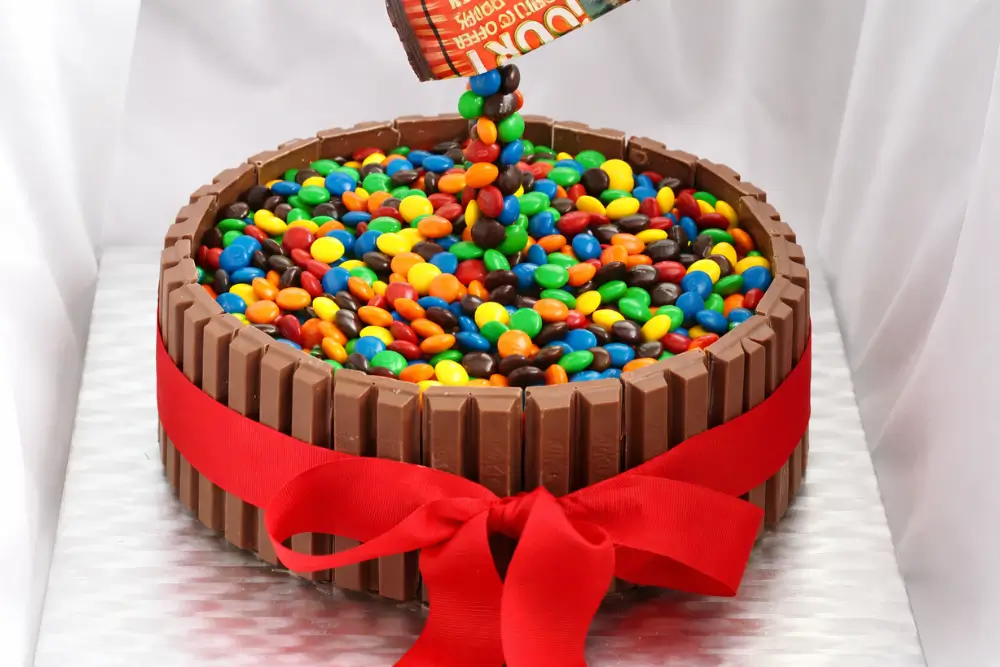
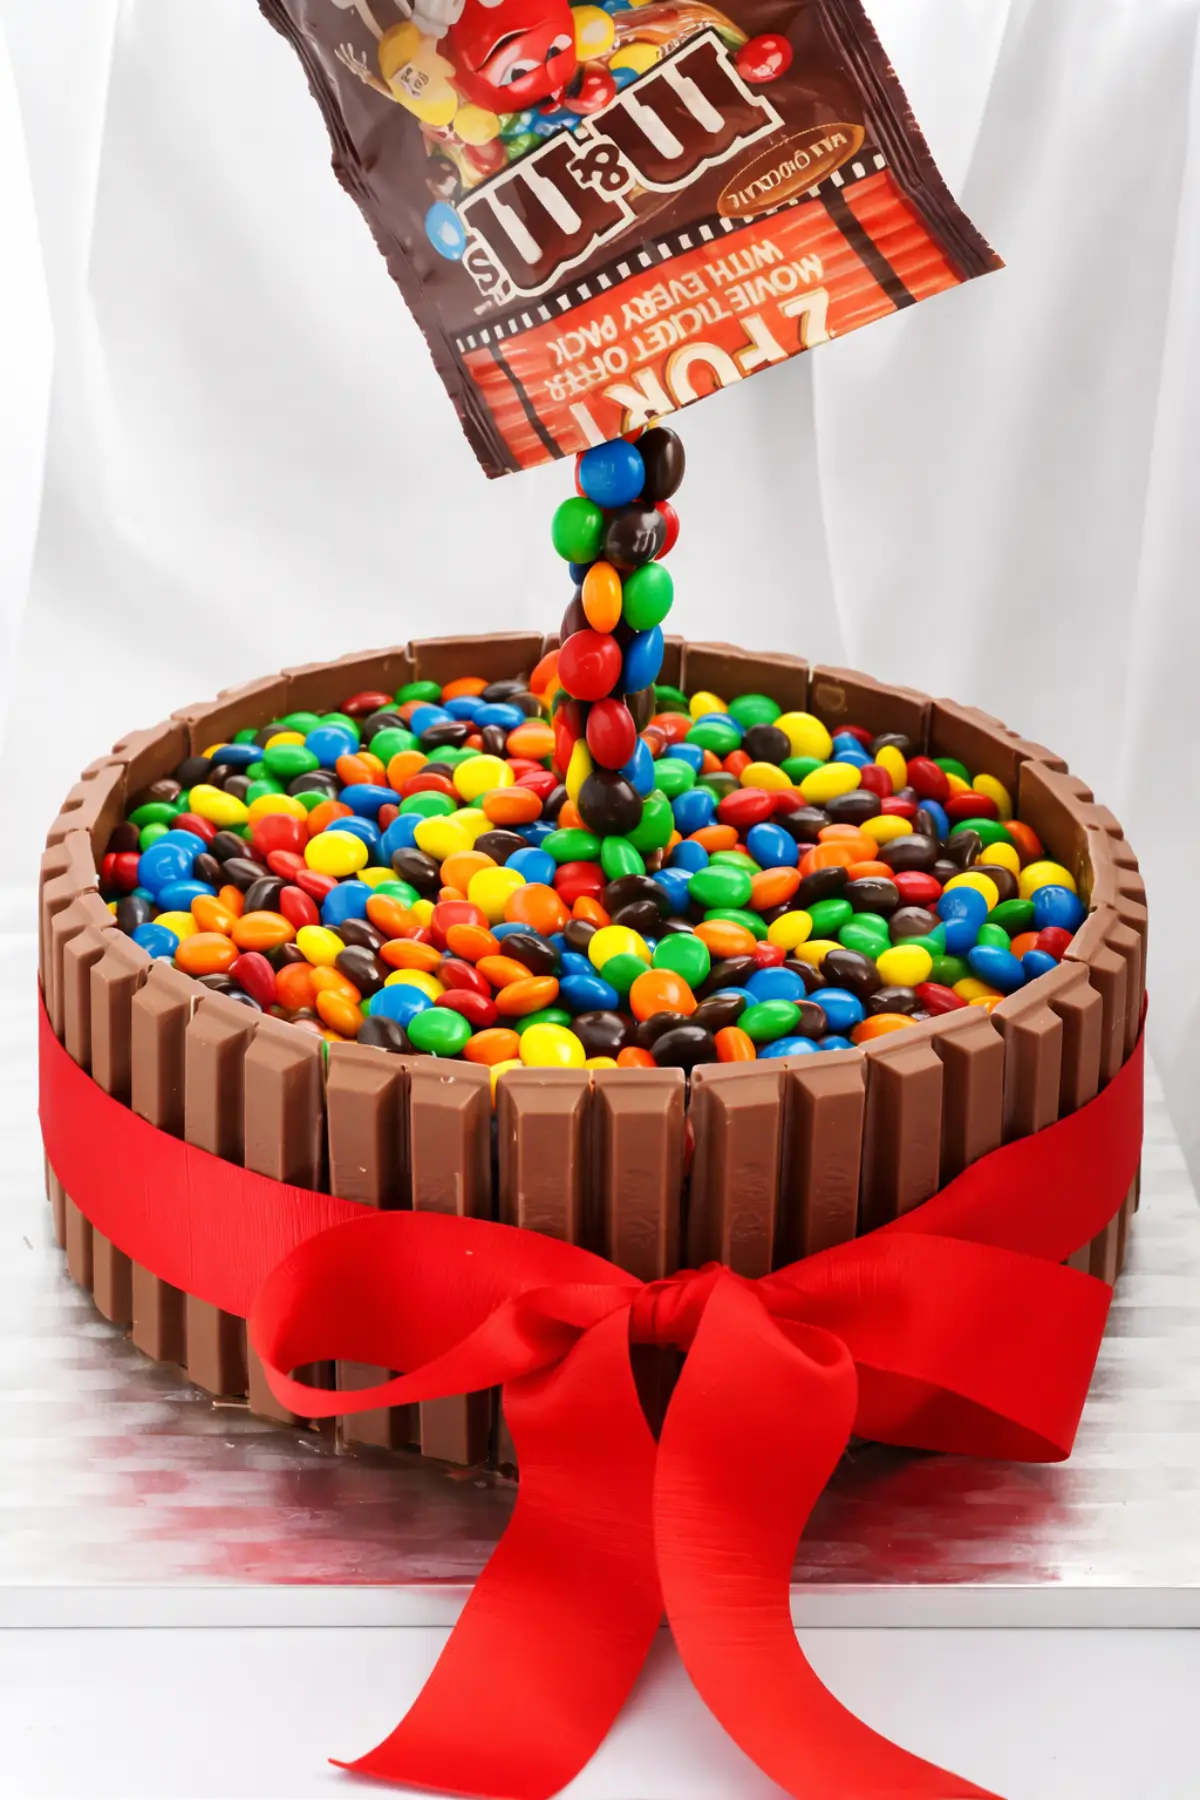
Make every birthday sweeter with a Gravity Defying M&M’s Kit Kat Cake, a chocolate creation wrapped in Kit Kats and topped with floating M&M’s, an instant favourite for birthdays and family celebrations.
I made this Gravity Defying M&M’s Kit Kat Cake for my eldest daughter’s ninth birthday. I usually make fondant cakes for my kids’ birthdays, but this time I wanted something easier to prepare. I was still recovering from surgery and didn’t have much time to plan or decorate. Even so, I wanted her cake to feel special.
For the first time, she asked for something that wasn’t a cartoon-themed cake. I’d seen a few M&M’s Kit Kat Cakes online before, but when she showed me a Gravity Defying M&M Candy Cake on YouTube, I thought it would be fun to create a simpler version.
I used my Eggless Chocolate Cake recipe as the base, and it turned out perfectly. The design came together easily and looked wonderful at the party. Everyone loved it, especially the children, who were amazed by the M&M’s appearing to float above the cake.
Reasons Bakers Love This M&M’s Kit Kat Creation
Key Ingredients for Gravity-Defying Cake
Chocolate Icing
Smooth and chocolatey, it’s thick enough to support the Kit Kats and soft enough to hold the M&M’s without sliding.
Kit Kat Bars
They create a neat chocolate wall around the cake. The crisp texture contrasts with the soft crumb.
M&M’s
Their bright colours add fun and life to the cake. They also help form the floating candy illusion.
Find the complete list with measurements in the recipe card below.
How to Make Gravity Defying M&M’s Kit Kat Cake
Cake
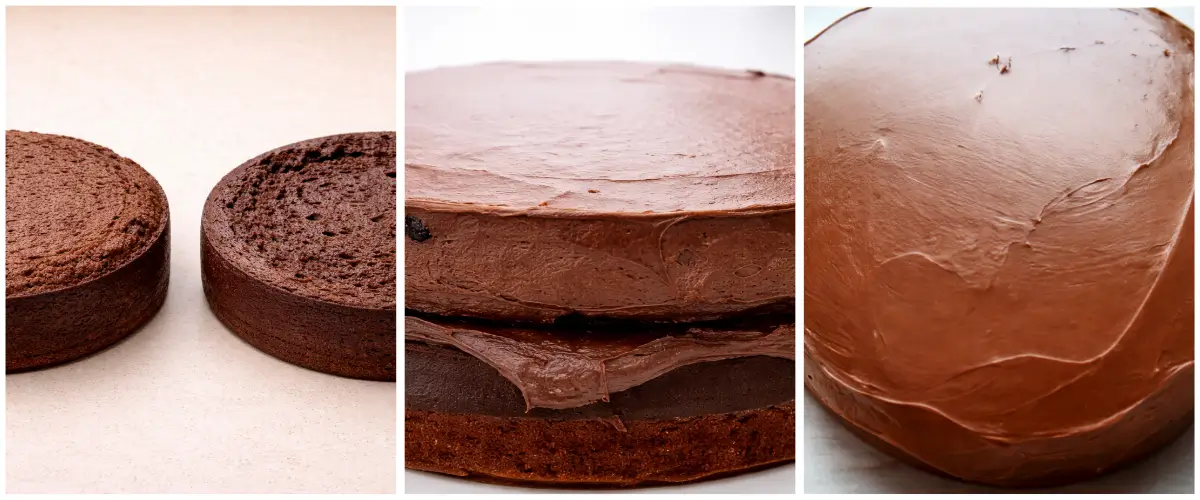
Step 1: This cake uses two chocolate layers. I used my Eggless Chocolate Cakes baked earlier and frozen.
Assembly
Step 1: Assemble the cake a day before serving. Prepare a batch of chocolate icing for the crumb coat. Use your favourite icing recipe and make sure it is slightly softer so it spreads smoothly.
Step 2: Take the cakes out of the freezer and level them while still half frozen, using a sharp serrated knife.
Step 3: Brush the tops with simple syrup to keep the cakes moist.
Step 4: Spread a layer of icing on the rough side of one cake and place the second cake on top. Choose the flattest surface for the top layer. It is usually the bottom of one of the cakes. This makes icing and decorating easier.
Step 5: Apply the crumb coat while the cakes are still slightly frozen. It is easier this way. Start from the top, then move to the sides. Use a cake spatula to smooth the surface as evenly as possible. Once the cake is covered, refrigerate it until the icing hardens.
Decoration
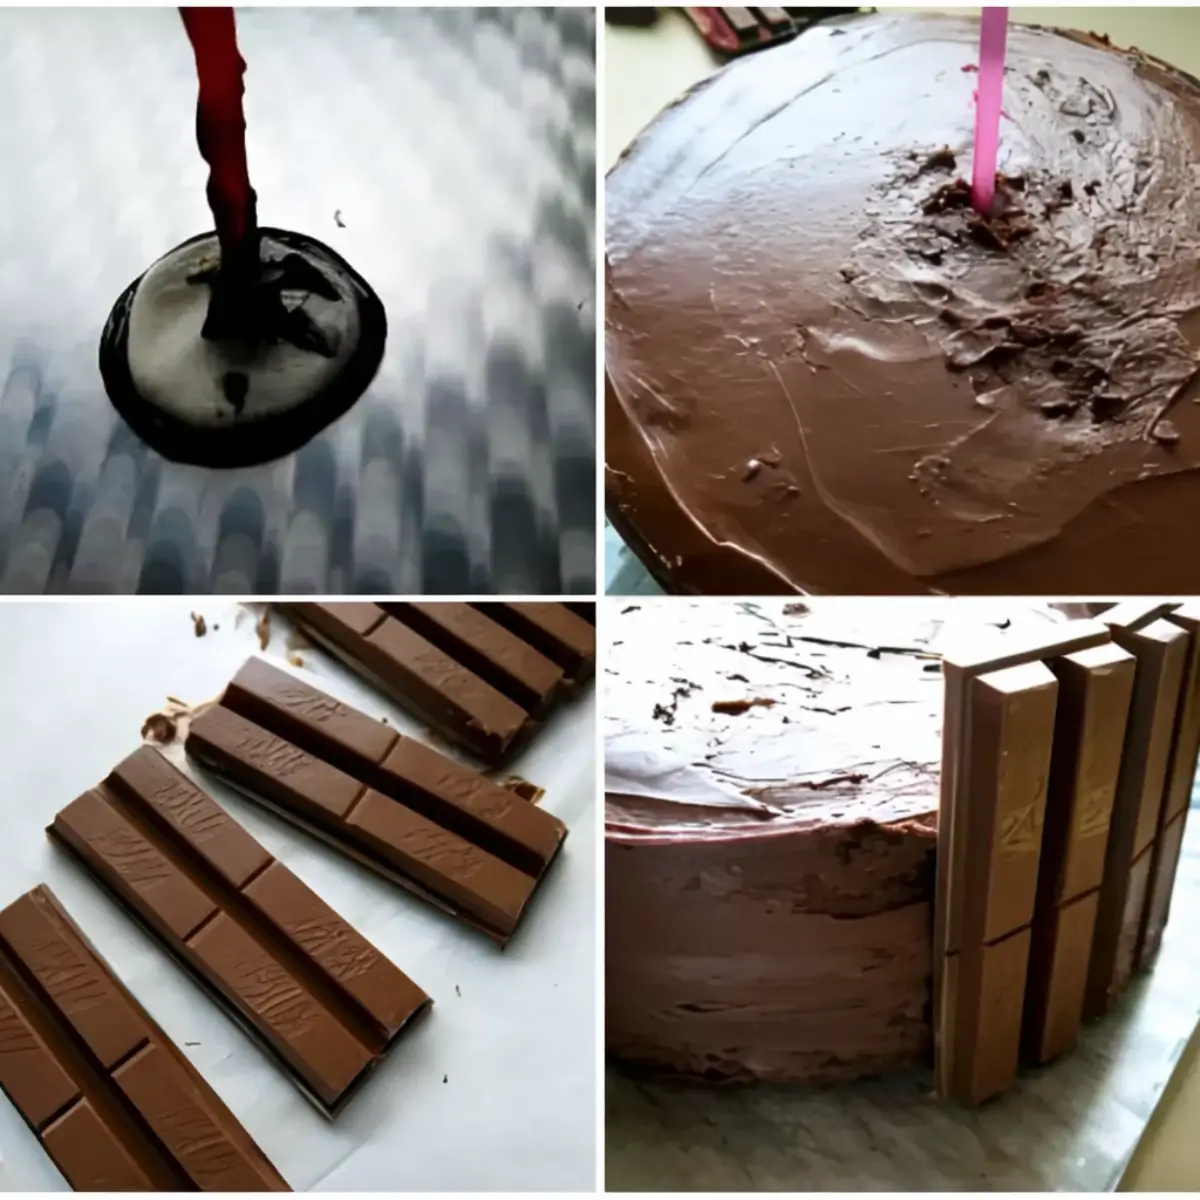
Step 1: When the icing is firm, make a hole in the centre of the cake using a skewer. Make sure it goes all the way through both cakes and is wide enough to fit the straw or balloon stick.
Step 2: Place some melted chocolate in the centre of a cake board and add a small piece of fondant on top. Insert the straw or balloon stick into the melted chocolate and let it harden.
Step 3: Carefully place the cake onto the board, fitting it through the straw or balloon stick. Check that the stick is tall enough to extend above the top of the cake.
Step 4: Using a sharp knife, cut the Kit Kat bars into twos.
Step 5: Spread a thin layer of fresh chocolate icing around the sides of the cake, then press the Kit Kat pieces onto it to stick them in place.
Step 6: Top the cake with M&M’s. Brush a little melted chocolate onto the visible part of the balloon stick and attach some M&M’s. Work slowly, letting each section harden before adding more, so they stay in place.
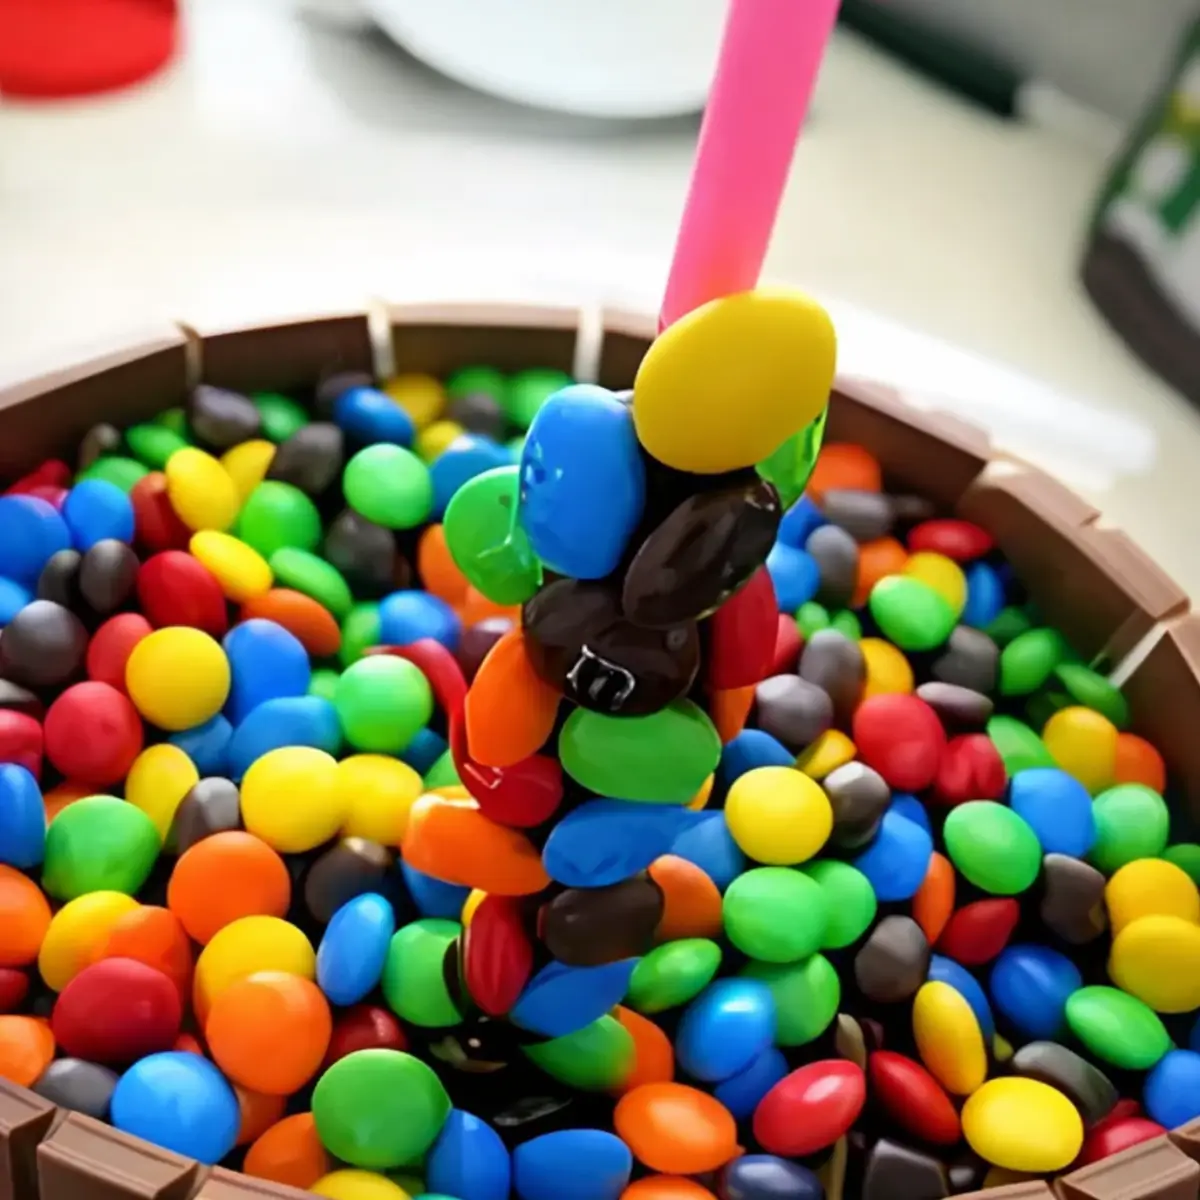
Step 7: Attach an empty M&M’s packet to the top of the stick so it looks as though the candies are falling from it. Fill the packet halfway with cotton buds or similar material to keep its shape and secure it with melted chocolate.
Step 8: Lastly, wrap a ribbon around the Kit Kat border to hold everything in place, and the cake is ready to serve.
Frequently Asked Questions
Press the Kit Kats gently into the icing while it is still soft, then tie a ribbon around the cake to hold them firmly as the icing sets.
A smooth chocolate buttercream or ganache holds the decorations securely and provides a clean surface for the Kit Kats and M&M’s.
Yes. Smarties, Maltesers, or other small chocolate-coated candies work well and give the same colourful, playful finish.
Extra Help from the Kitchen
Chill the Kit Kat Bars – Cold bars are easier to handle and less likely to crack when pressed around the cake.
Use a Measuring Cup for M&M’s – Pouring from a cup gives better control when placing candies on top and prevents them from rolling off.
Press the Ribbon While the Icing Is Soft – This helps the ribbon stick lightly to the Kit Kat bars and keeps everything in place.
Choose a Sturdy Cake Board – A solid base supports the weight of the cake and makes it safer to move once decorated.
Leave Extra Space on the Stick – Keep a small section of the straw or balloon stick exposed so you can attach the M&M’s packet securely.
Variations and Twists
Swap the Chocolate Bars – Replace Kit Kat with Crunchie, Twix, or wafer fingers for a different mix of crunch and chocolate.
Try White or Dark Chocolate Versions – Use white or dark Kit Kats for contrast, or alternate both for a marbled effect.
Use Seasonal M&M’s Colours – Match the candy colours to your celebration theme, such as pastels for Easter or red and green for Christmas.
Add a Fondant Base Layer – Roll a thin layer of fondant under the cake for a neater finish and easier transfer to the board.
Storage and Shelf Life
Store the decorated cake in an airtight container at room temperature for up to 2 days. If the weather is warm, keep it in the fridge for up to 4 days. Bring it to room temperature before serving so the icing softens slightly.
To freeze, wrap the undecorated cake tightly in cling film and foil. Freeze for up to 1 month. Thaw overnight in the fridge and decorate once it returns to room temperature.
Try These Celebration Cakes Next
Gravity Defying M&M’s Kit Kat Cake Recipe
Ingredients
- 2 Eggless Chocolate Cakes – baked in 1 × 23 cm – 9-inch tins
- chocolate icing
- simple syrup – made with 2 tbsp caster sugar and 2 tbsp warm water
- melted chocolate
- fondant
- M&M’s
- Kit Kat bars
- 2 straws or 1 balloon stick
- 1 empty M&M’s packet
Instructions
Cake
- This cake uses two chocolate layers. I used my Eggless Chocolate Cakes baked earlier and frozen.
Assembly
- Assemble the cake a day before serving. Prepare a batch of chocolate icing for the crumb coat. Use your favourite icing recipe and make sure it is slightly softer so it spreads smoothly.
- Take the cakes out of the freezer and level them while still half frozen, using a sharp serrated knife.
- Brush the tops with simple syrup to keep the cakes moist.
- Spread a layer of icing on the rough side of one cake and place the second cake on top. Choose the flattest surface for the top layer. It is usually the bottom of one of the cakes. This makes icing and decorating easier.
- Apply the crumb coat while the cakes are still slightly frozen. It is easier this way. Start from the top, then move to the sides. Use a cake spatula to smooth the surface as evenly as possible. Once the cake is covered, refrigerate it until the icing hardens.
Decoration
- When the icing is firm, make a hole in the centre of the cake using a skewer. Make sure it goes all the way through both cakes and is wide enough to fit the straw or balloon stick.
- Place some melted chocolate in the centre of a cake board and add a small piece of fondant on top. Insert the straw or balloon stick into the melted chocolate and let it harden.
- Carefully place the cake onto the board, fitting it through the straw or balloon stick. Check that the stick is tall enough to extend above the top of the cake.
- Using a sharp knife, cut the Kit Kat bars into twos.
- Spread a thin layer of fresh chocolate icing around the sides of the cake, then press the Kit Kat pieces onto it to stick them in place.
- Top the cake with M&M’s. Brush a little melted chocolate onto the visible part of the balloon stick and attach some M&M’s. Work slowly, letting each section harden before adding more, so they stay in place.
- Attach an empty M&M’s packet to the top of the stick so it looks as though the candies are falling from it. Fill the packet halfway with cotton buds or similar material to keep its shape and secure it with melted chocolate.
- Lastly, wrap a ribbon around the Kit Kat border to hold everything in place and the cake is ready to serve.


Hi Rachel Griffin here I saw your cake and I was waiting to know can you can make me a birthday cake for me please reply on messsanger thank you so much bye