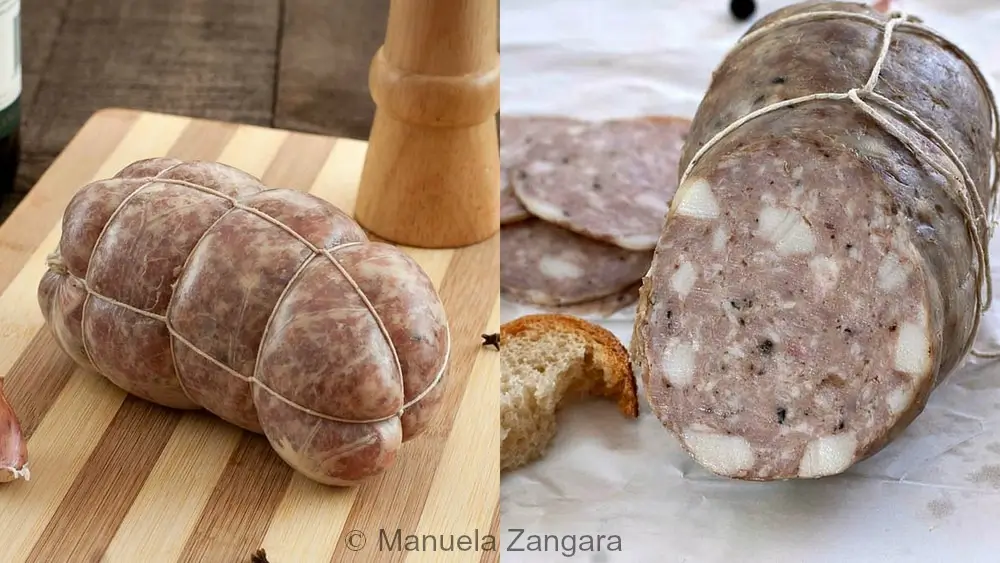
Tender, flavourful, and delicately seasoned, Salame Cotto fits beautifully on grazing boards, in sandwiches, or simply enjoyed as slices on the board.
For the January–February 2013 Daring Cooks’ Challenge, Carol, one of our talented non-blogging members, and Jenni, one of our bloggers who writes The Gingered Whisk, invited us to make homemade sausage and cured or dried meats in celebration of the release of Salumi: The Craft of Italian Dry Curing by Michael Ruhlman and Brian Polcyn. The two-month challenge gave us plenty of time to experiment in our own kitchens and explore the world of Salumi.
Wow! When I first read that this month’s theme was salumi, I felt genuinely excited. I grew up eating some of the best salumi in the world, from Prosciutto di Parma and San Daniele to Culatello, Speck, Salami, Mortadella, Pancetta, Coppa, and Guanciale. Italians really know how to make salumi.
A Taste of Home
When I first moved to Australia, I was shocked to discover that, due to quarantine regulations, most of these favourites could not be imported. After a few months, the ban on prosciutto was lifted, and we could finally buy Italian prosciutto again. Sorry, guys, nothing personal, but Australian prosciutto does not taste the same. Unfortunately, the restrictions stayed in place for the remaining items.
Some Italian migrants have created decent substitutes for mortadella, salami, guanciale, lard, and speck, but nobody seems to get pancetta right. I wanted to try making my own salami, but it is summer down here, and I have nowhere to cure meat in this heat. I will try it later on.
I often make Italian sausage at home, so that did not feel like much of a challenge. I needed something cooked rather than cured. Then a childhood memory came back to me.
My parents and I used to drive to a small village in the Monferrato area of Piedmont to buy local meat and salumi. The butcher there made incredible salami. He prepared his regular cured salami and a Northern Italian speciality called salame cotto. I loved it as a child and always looked forward to it.
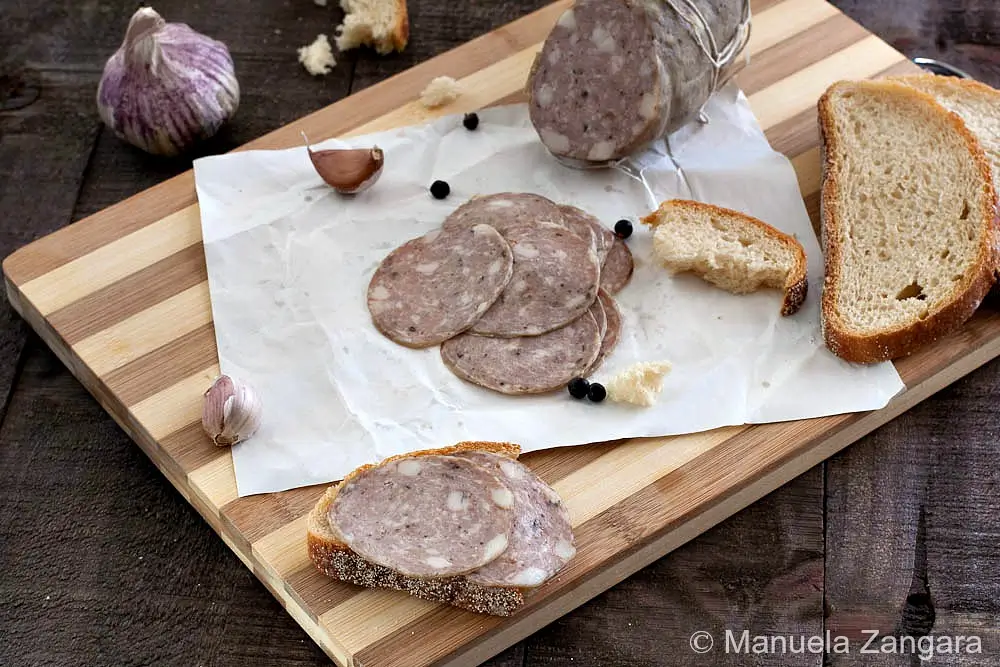
I decided to try making my own version at home and was surprised by how simple it was. It tasted exactly as I remembered, perhaps even better since it contains no preservatives. You eat it like any other salami, sliced thin and served cold. It is wonderful with crusty bread and a glass of red wine.
Enjoy, and feel free to explore the other salumi recipes and the many variations my fellow Daring Cooks created.
What is Salame Cotto?
Salame cotto means “cooked salami” in Italian. It’s made from seasoned pork that is cooked during production instead of being left to cure raw, which gives it a soft texture and a mild flavour. It’s especially linked to northern Italy, particularly Piedmont, where it has a long tradition.
Because it’s cooked, it tastes gentler than stronger cured salami and feels easier to enjoy in everyday ways. It works well in sandwiches, on an antipasto plate, or simply sliced on its own.
Why We Love Homemade Salami
- Works well for simple snacks when paired with focaccia, pickled vegetables, or marinated peppers.
- Makes a generous batch that can feed guests or stretch across several meals.
- Gives home cooks an approachable way to enjoy salumi without dealing with curing conditions.
Key Ingredients for Salame Cotto
Pork Scotch Fillet
Gives the salami a lean, clean taste with a firm bite. Choose a piece with light, even marbling, as it blends well during mixing and keeps the texture consistent.
Pork Rashers
Provide the necessary fat for moisture and softness. Keeping part of the rashers chopped adds small, visible pieces throughout, which is typical of cooked salami. Pick rashers with fresh, white fat for the best flavour.
Spices and Aromatics
Nutmeg, whole peppercorns, ground pepper, garlic powder, juniper berries, and clove powder create the warm, traditional seasoning profile Salame Cotto is known for.
Find the complete list with measurements in the recipe card below.
How to Make Salame Cotto
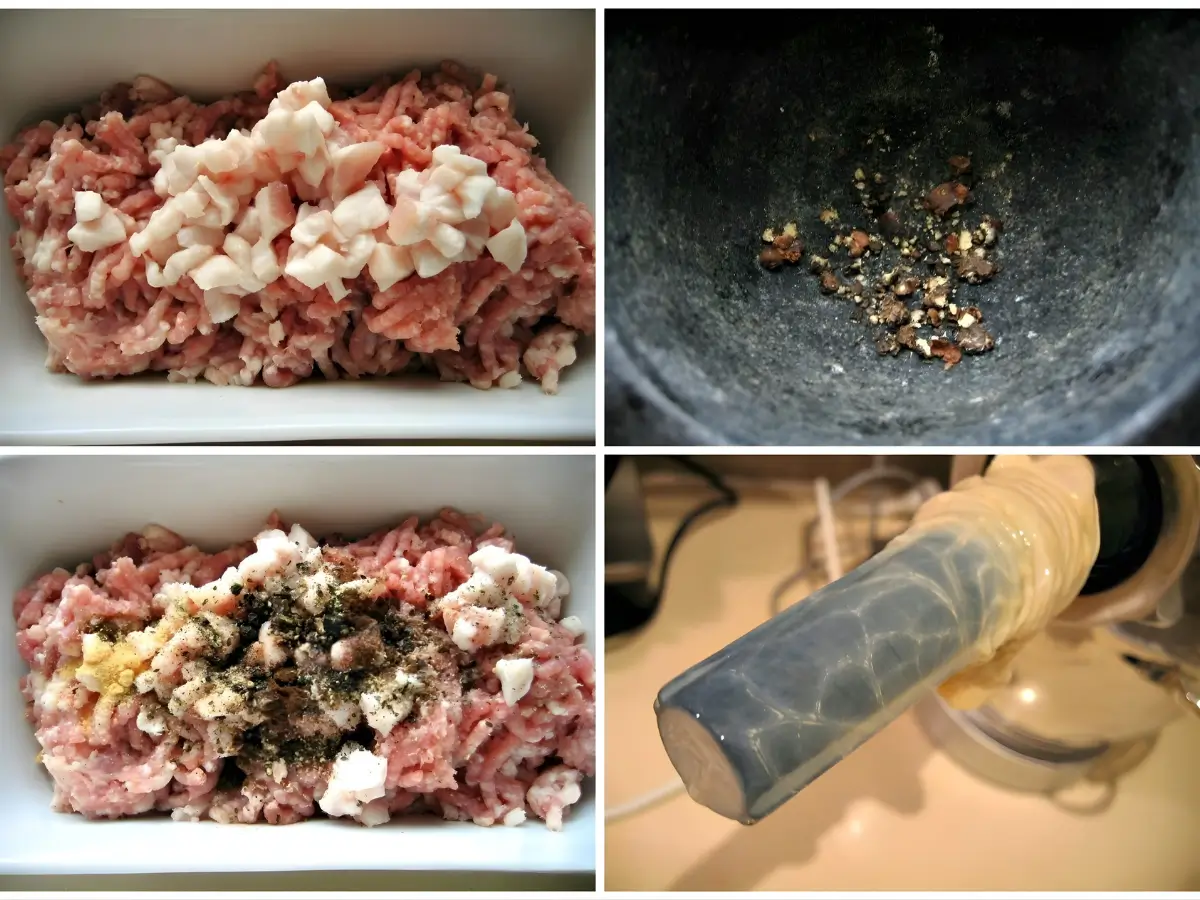
Step 1: Roughly chop the scotch fillet and the rashers.
Step 2: Grind the scotch fillet and ⅓ of the rashers using a 0.5 cm – 0.2 inch diameter grinder.
Step 3: Cut the remaining ⅔ of the rashers into 1.3 cm – ½ inch pieces.
Step 4: Mix the ground meat and the chopped rashers in a bowl. Add the salt, red wine, nutmeg, peppercorns, ground pepper, garlic powder, juniper berries, and clove powder, then knead well.
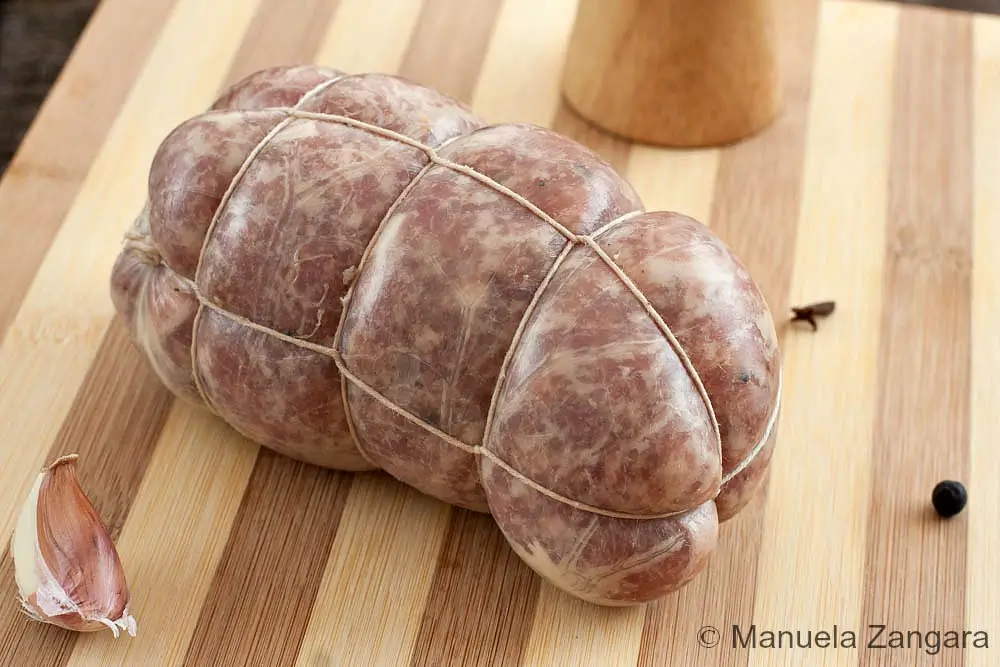
Step 5: Stuff the salami mixture into the casing and tie it off with a bubble knot.
Step 6: Tie the salami with butcher’s twine. Watch this video tutorial on how to tie salami with butcher’s twine for clear guidance.
Step 7: Let it rest, uncovered, at 20° to 25°C – 68°F to 77°F for 24 hours.
Step 8: The following day, use a clean needle to prick holes all over the salami, especially where air pockets may form.
Step 9: Wrap it in baking paper and place it in a pot. Cover it with cold water and set it over the heat. When it begins to boil, reduce the heat to medium-low and let it simmer, uncovered, for 1 hour. The salami is cooked when it reaches an internal temperature of 80°C – 176°F.
Note: Cooking usually takes about 1 hour per kg – 2.2 lbs., so a 2 kg – 4.4 lbs. salami will need roughly 2 hours. Timing may vary depending on the thickness of your salami.
Step 10: When cooked, let it cool completely in the cooking water.
Step 11: Drain it, pat it dry, and refrigerate it for at least 24 hours before slicing.

Step 12: Enjoy it with crusty bread and a glass of red wine.
Frequently Asked Questions
Use a digital thermometer and check the internal temperature at the thickest part. For a meat mixture like this, aim for 71 °C – 160 °F (typical safe temperature for ground pork or formed meat) before removing from heat and letting rest.
Yes. You can replace up to about ⅓ of the pork with lean beef, as long as the fat ratio stays balanced to prevent a dry texture.
Yes. Slice it first, separate slices with baking paper, and freeze in an airtight container. Thaw in the fridge before serving.
Yes. You can add extra cracked pepper or a few more juniper berries for a stronger taste. Increase the seasoning gradually so the spices stay balanced with the pork.
Extra Help from the Kitchen
Mix Until the Meat Turns Sticky – Keep kneading until the mixture thickens and feels slightly tacky. This indicates the proteins have bound properly, which improves the slice once cooked.
Check Casing Size Before Stuffing – Match the width of the casing to the quantity of meat. Overfilled casing can split during simmering, while an oversized casing can trap air.
Choose a Pot That Fits Snugly – Select a pot that allows the salami to stay fully submerged without excessive movement during simmering, which protects its shape.
Let the Wrapped Salami Sit Flat – When resting it for 24 hours, keep it on a flat surface to avoid bending, which helps maintain an even cylindrical shape.
Slice with a Long, Thin Blade – Use a sharp carving knife or slicing knife rather than a chef’s knife. The thinner blade reduces drag and creates neater slices.
Variations and Twists
Add a Light Smoke Layer – Cold-smoke the stuffed salami for a few hours before simmering to introduce a gentle smoky note that complements the spice mix.
Include Some Lean Beef – Replace up to ⅓ of the pork with lean beef for a deeper savoury profile often found in cooked salumi.
Use a Larger Collagen Casing – Switch to a wider collagen casing if you prefer a firmer cylindrical shape and more uniform slices.
Increase the Fat Content – Add 50–100 g – 1.7–3.5 oz extra fat trimmings when mixing to create a slightly softer texture once cooked.
Introduce Mild Sweetness – Add 5–10 g – 1–2 tsp sugar or dextrose to the spice mix for a gentle sweet note that balances the aromatics.
Ways to Serve Salame Cotto
Sandwiches and Wraps – Layer thin slices with crusty bread, soft rolls, or simple flatbreads. Add pickled vegetables or a light spread for contrast.
Charcuterie Boards – Arrange alongside cheeses, olives, nuts, and fresh fruit. Thin slices sit well with mild cheeses and marinated vegetables.
Picnic Plates – Pack slices with focaccia, salads, and grilled vegetables for an easy outdoor meal.
Breakfast or Brunch – Add to warm toast, omelettes, or savoury muffins for a quick protein boost.
Light Appetisers – Roll slices with soft cheese or serve with breadsticks for a simple starter.
Pasta and Rice Dishes – Cut into small cubes and mix into warm pasta or risotti for extra flavour.
Storage and Shelf Life
Store Salame Cotto in the fridge, wrapped tightly in aluminium foil or placed in an airtight container, for up to 1 week.
For longer storage, freeze it in thin slices separated with baking paper and pack the slices into a freezer-safe container for up to 2 months.
Thaw in the fridge until fully chilled before serving, and slice only what you need to keep the texture at its best.
Homemade Sausage Dishes to Try
Salame Cotto Recipe
Tender, flavourful, and delicately seasoned, Salame Cotto fits beautifully on grazing boards, in sandwiches, or simply enjoyed as slices on the board
Ingredients
- 700 g – 1.5 lbs. pork scotch fillet
- 300 g – 0.7 lbs. pork rashers
- 25 g – 0.9 oz. salt
- 50 ml – 1.7 oz. red wine
- ¼ tsp nutmeg
- 20 peppercorns
- 2 g – 0.07 oz. ground pepper
- ¼ tsp garlic powder
- 2 juniper berries – crushed
- ¼ tsp clove powder
- salami casing – soaked in tepid water for at least 20 minutes and rinsed
Instructions
-
Roughly chop the scotch fillet and the rashers.
-
Grind the scotch fillet and ⅓ of the rashers using a 0.5 cm – 0.2 inch diameter grinder.
-
Cut the remaining ⅔ of the rashers into 1.3 cm – ½ inch pieces.
-
Mix the ground meat and the chopped rashers in a bowl. Add the salt, red wine, nutmeg, peppercorns, ground pepper, garlic powder, juniper berries, and clove powder, then knead well.
-
Stuff the salami mixture into the casing and tie it off with a bubble knot.
-
Tie the salami with butcher’s twine. Watch this video tutorial on how to tie salami with butcher’s twine for clear guidance.
-
Let it rest, uncovered, at 20° to 25°C – 68°F to 77°F for 24 hours.
-
The following day, use a clean needle to prick holes all over the salami, especially where air pockets may form.
-
Wrap it in baking paper and place it in a pot. Cover it with cold water and set it over the heat. When it begins to boil, reduce the heat to medium-low and let it simmer, uncovered, for 1 hour. The salami is cooked when it reaches an internal temperature of 80°C – 176°F.
Note: Cooking usually takes about 1 hour per kg – 2.2 lbs., so a 2 kg – 4.4 lbs. salami will need roughly 2 hours. Timing may vary depending on the thickness of your salami.
-
When cooked, let it cool completely in the cooking water.
-
Drain it, pat it dry, and refrigerate it for at least 24 hours before slicing.
-
Enjoy it with crusty bread and a glass of red wine.
Recipe Notes
Store in the fridge for up to 1 week, wrapped tightly in aluminium foil or kept in an airtight container.


Dear Manu, …great website. I have been looking for a good recipe for Salame Cotto for several years, for it was a favorite of mine when growing u in NYC in a northern Italian family (Friulano). We ate “cold cuts” every weekend, and always when we had company, …and salame cotto was always our favorite. I purchased 2.5 kg of “pork belly” today to make Japanese Chashu to be used in Shoyu Ramen, and have about 1 kg “rashers” left over that I will use to make salame cotto, …and the pork belly skin that I will use to make cotechino (another family favorite). Thank you for sharing your recipes.
Ciao Richard! So nice to meet you! I have actually recently visited Friule and I will be posting about it on the blog in the next few weeks. Lovely region! I love salame cotto and I cannot find it here in Australia. I really hope you like the recipe. Let me know!!
Sorry. Don’t like the colors.
Think need nitrite for more red me hog meat.
Yes, with nitrate it would look prettier, I agree. Though the taste is not at all affected. 🙂
If we can all get over wanting to eat red meats, we will reduce our risk of cancer.
Congrats Manuela, it looks perfect to me. Must try it! Thank you.
Love this! And love that it does not require a cellar! Have to try making it.
So totally impressed! This looks delicious!
I can’t wait to try this! I just got a meat grinder and sausage stuffer for Christmas so this is right up my alley.
Fabulous effort and I love your post and pictures. I am so glad you enjoyed the challenge – Well Done!
My husbands family comes from Camagna Monferrato and we were just there in September 2012. This is a gorgeous area of Italy. In saying that my husband really enjoys cooked salami but I never thought of making it. Yours looks absolutely amazing. I am about to make your soffincini for lunch but soon I will have to try the cooked salami.
You have encouraged me to give salami making a try. Our warm weather makes it difficult to attempt air drying. Great photos!
your Salami is amazing, i wish i can taste some.
I bookmark the recipe… for sure its on my to do list now.
Oh wow!! Your salame cotto looks utterly fantastic! I wish I could have some! I am so glad you were excited about this challenge, you did a great job! I would love to see your Italian sausages, too! 🙂
WOW your cooked salami looks so professional and your photography is superb. A fabulous result bravo to you. Cheers from Audax in Sydney Australia.