Flaky, buttery Homemade Croissants fresh from your own oven bring crisp edges and soft layers to the table. Roll, fold, bake, and enjoy them warm.

In a celebration of past Daring Cooks and Daring Bakers challenges, Lisa challenged everyone to search through the Daring Kitchen archives and pick any challenge. The real difficulty was choosing which recipe to try.
I was extremely happy with this challenge, especially since it came during my daughter’s spring holidays. Having extra time made it easier to cook and take photos without relying only on weekends. Since participants could choose between the Daring Cooks and the Daring Bakers challenges, my decision was immediate.
Growing up in Italy made travelling around Europe quite easy. My parents love Paris, and we usually visited at least once a year, even if only for a few days. Because of this, French food became part of my upbringing, leaving me with many food-related memories tied to France.
Living far away now, French cuisine is what I miss most, possibly even more than Italian cooking, which I still prepare regularly at home. Making homemade puff pastry and croissants had been on my list for a long time, so I chose these projects for the holidays.
I am sharing what I consider the perfect recipe for croissants. I didn’t use the recipe from the Daring Bakers challenge, even though it looked great, since I already had a few recipes bookmarked. The first attempt was a complete disaster. The dough split, and warm weather combined with trying to finish everything in one day didn’t help.
Giving up wasn’t an option. I started again and allowed two full days, which can easily be extended to three if time is limited or temperatures are high. I also changed recipes and chose Pierre Hermé’s version.
Before starting, I researched extensively and asked several French foodie friends for advice. Jamie of Life’s a Feast, Jill of Mad About Macarons, Tandy of Lavender and Lime, Caterina of Il Mondo di Ci, Elena, and Aurora all gave the same answer. French croissants don’t contain eggs.
This mattered because Italian cornetti, which are similar, include eggs. This creates a softer, more brioche-style dough rather than the flaky croissants au beurre I wanted.
This croissant recipe was a success. They turned out with flaky layers, airy and buttery inside, and crisp on the outside. The interior pulls apart cleanly, the way a proper croissant should.

The flavour matched what you’d find in Paris and surpassed anything available near me. Give this recipe a try. Don’t be discouraged by the time required. The result is worth it. Enjoy!
Reasons to Bake Croissants at Home
- Croissants work equally well plain or paired with sweet or savoury sides.
- Finished result feels closer to a classic French bakery style than most home versions.
- Fluffy and airy, with a light crumb that doesn’t feel doughy when eaten
Key Ingredients for Homemade Croissants
Butter
Use unsalted butter with a higher fat content, preferably European-style, for better lamination and texture. Salted butter has a firmer, more brittle texture when cold, which can crack during rolling, while higher-fat butter stays pliable and rolls smoothly with the dough.
Yeast
Yeast helps the dough rise slowly, giving the croissants time to develop flavour without puffing up too fast. Both instant and active dry yeast work well, as long as it’s fresh and properly activated.
Flour
Flour gives the dough enough strength to hold all the butter layer while staying easy to roll. Regular all-purpose flour is a good choice since it stretches without fighting back too much.
Milk Powder
Milk powder adds a light dairy flavour and improves browning while keeping the dough dry and easy to handle.
Find the complete list with measurements in the recipe card below.
How to Make Croissants
Dough Preparation
Step 1: Sift the flour into the bowl of a stand mixer fitted with a hook attachment. Add the salt, 110 g sugar – 9 tablespoons, milk powder, milk, and the 53 g – 3 ¾ tablespoons of soft butter.
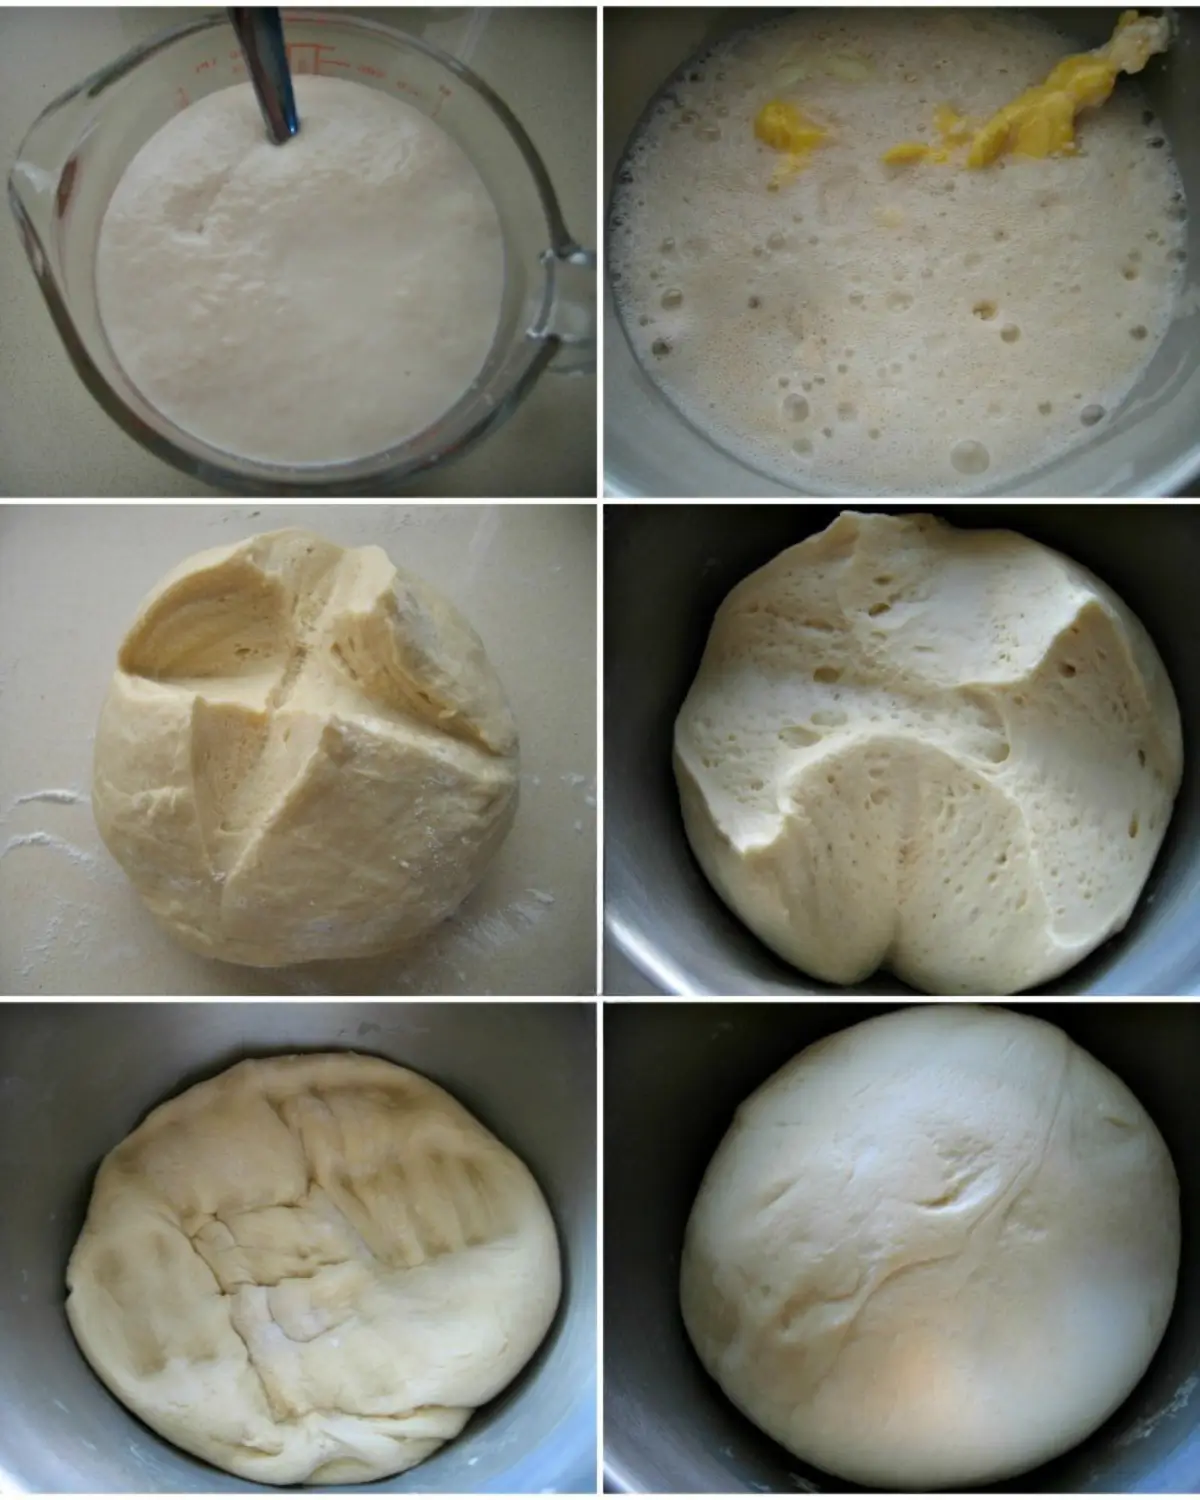
Step 2: Dissolve the yeast in half of the water, making sure it is lukewarm, and add the 2 teaspoons of sugar. Set aside to activate. When frothy, add it to the bowl with the rest of the ingredients.
Step 3: Knead the dough only until the ingredients are just combined. Do not overwork it, as you do not want to develop the gluten too much. Add the remaining water as needed to obtain a smooth dough.
Step 4: Shape the dough into a ball and place it in a bowl. Cover with cling wrap and let it rise for 1 to 1 ½ hours, or until doubled in size.
Step 5: Punch down the dough, pressing it with your fist to return it to its initial size. Cover with cling wrap again and refrigerate for 1 hour to 1 hour and 15 minutes.
Step 6: Punch the dough down once more to its initial size.
Step 7: At this point, either continue with the recipe or store the dough in the refrigerator until the next day. In both cases, chill the dough in the freezer for 30 minutes.
Preparing the Beurrage
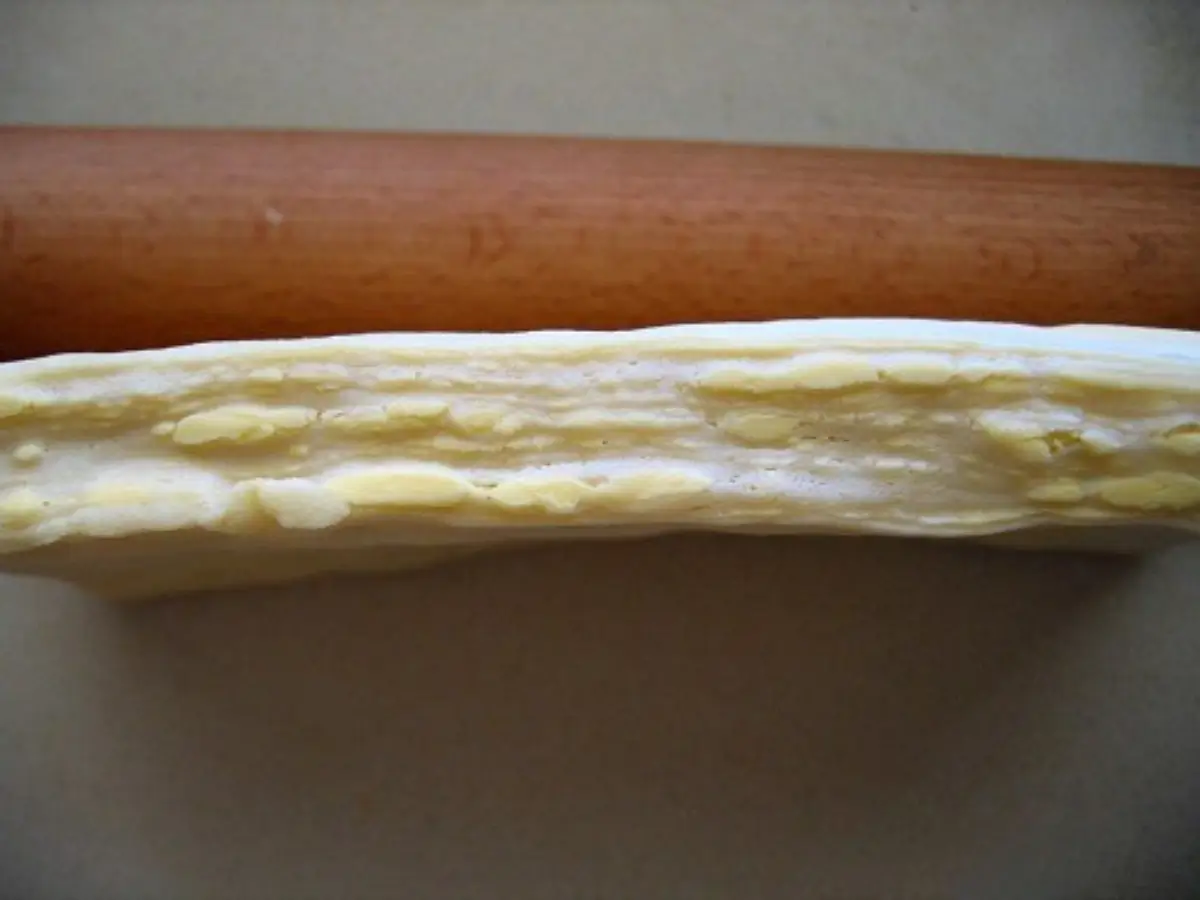
Step 1: Remove the dough from the fridge and roll it into a long rectangle using a rolling pin. Cover with cling wrap and return it to the fridge while preparing the butter.
Step 2: Take 2 sheets of baking paper and measure them against the rolled-out dough. Prepare 2 paper rectangles, each measuring 2 ⅔ of the length of the dough.
Step 3: Fold each sheet of baking paper in half, then fold 2.5 cm – 1 inch inward on the three open edges, starting with the two sides, to form a sealed butter packet.
Step 4: Divide the butter into 2 equal portions and place them inside the paper packets. Close the packets and roll the butter from the outside until it fills them evenly.
Step 5: Return the butter packets to the fridge to firm up completely. Both the butter and the dough must be very cold before continuing to prevent leakage during lamination.
Laminating the Dough
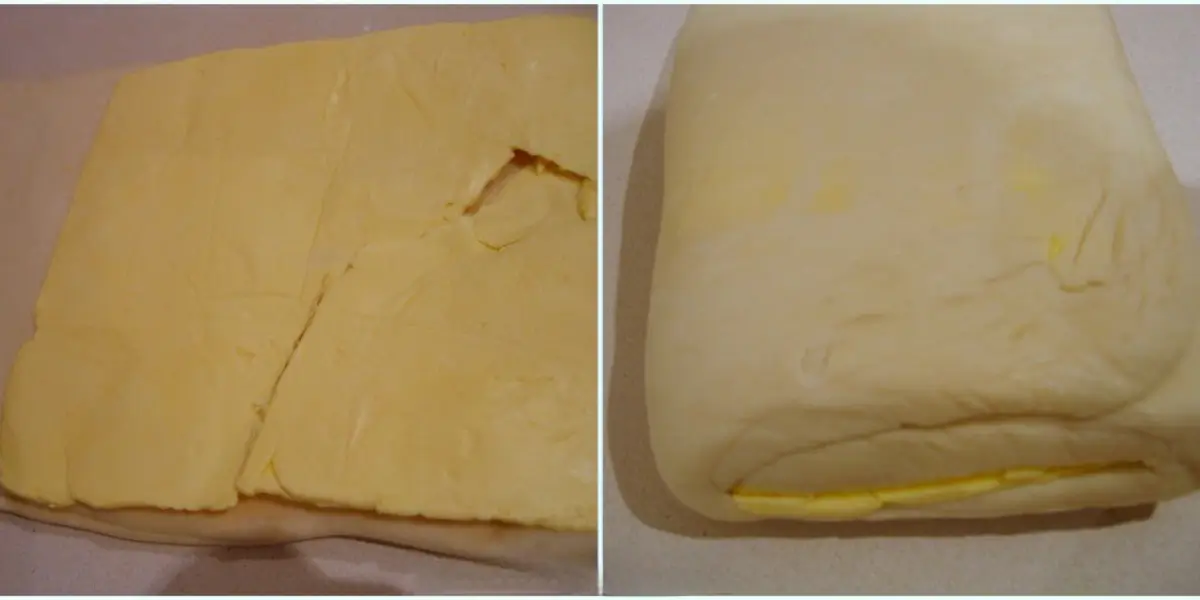
Step 1: Once the butter has firmed up again, remove the paper from only one butter packet. Take the cold dough out of the fridge and position the rectangle of butter over the lower two-thirds of the dough.
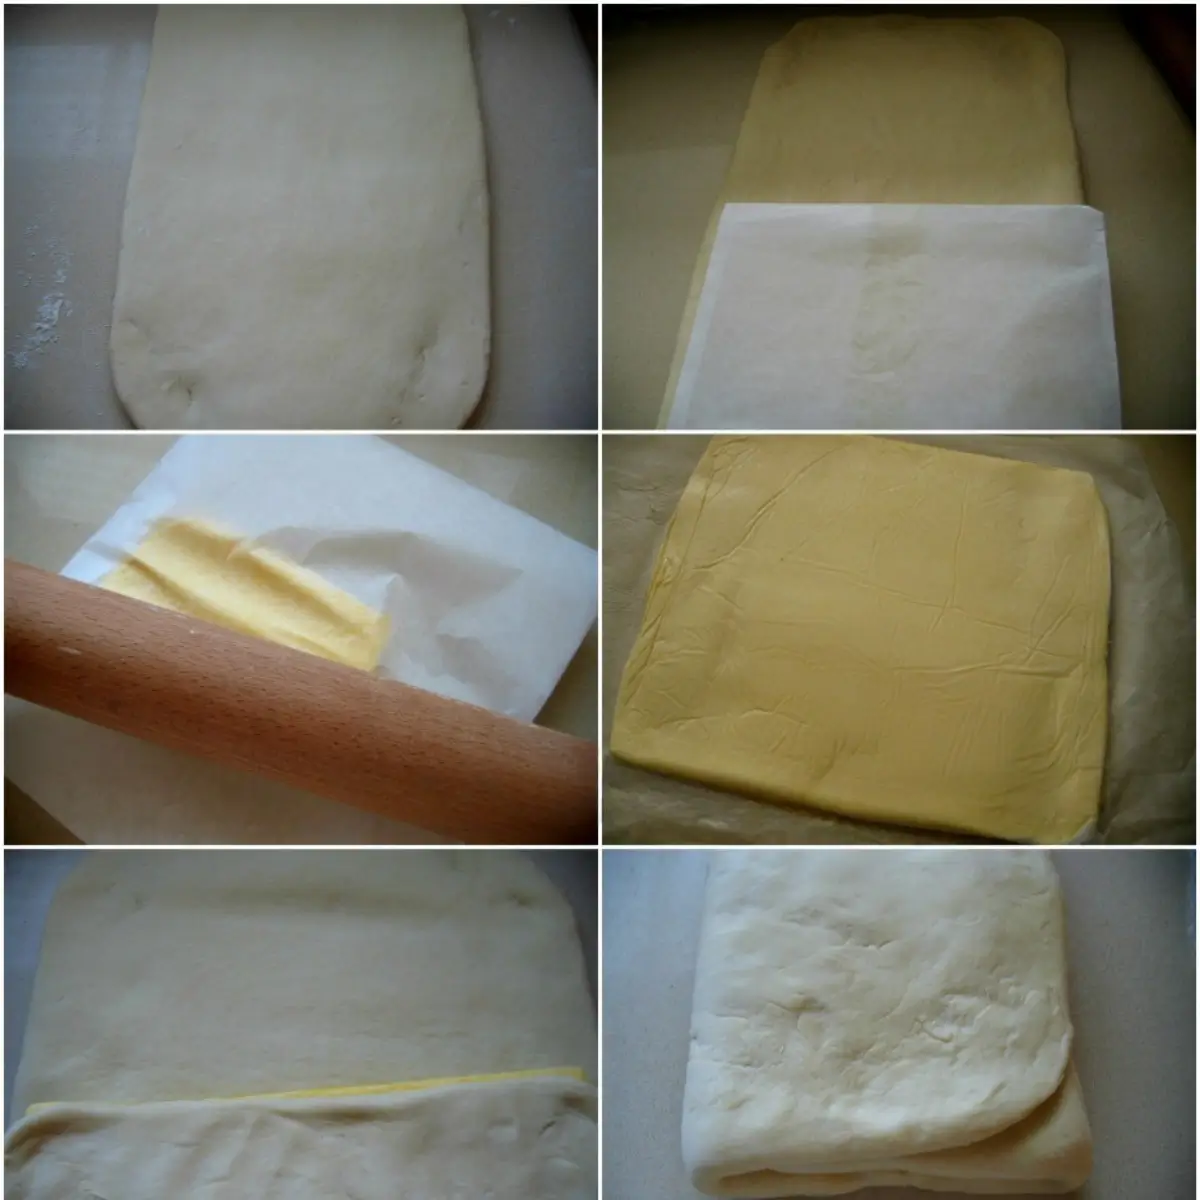
Step 2: Fold the bottom third of the dough up over the butter, then fold the top third down over itself, forming a simple three-fold. You should now see 3 layers.
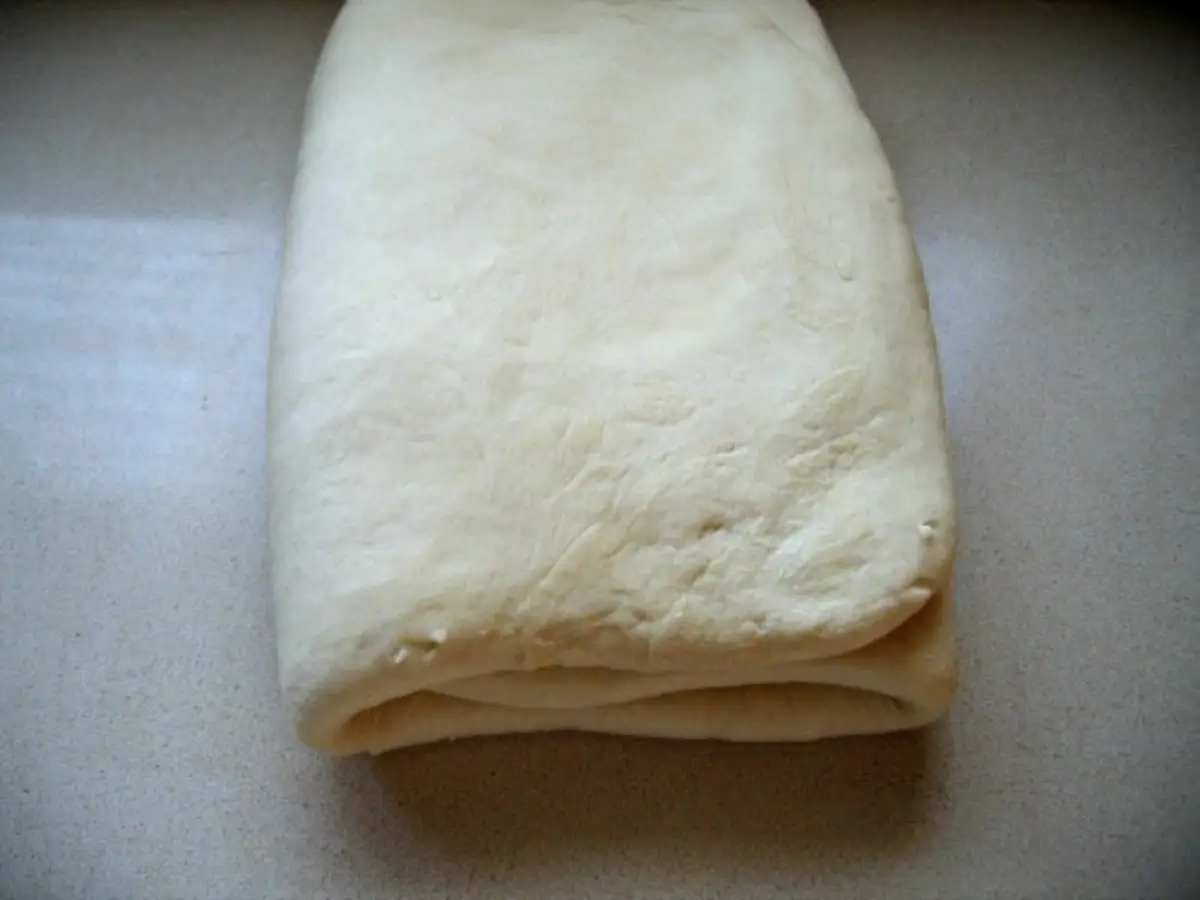
Step 3: Roll the dough out again into a long rectangle and repeat the same three-fold, without adding any more butter.
Step 4: Cover the dough with cling wrap and place it in the freezer for 30 minutes, then transfer it to the fridge for 1 hour.
Step 5: Roll the dough out again into a long rectangle of the same size. Repeat the three-folds, first using the remaining butter and then once more without butter.
Step 6: Flour the work surface as needed and brush away excess flour before each fold.
Step 7: At this stage, you should have completed 4 single turns in total. This includes one turn with butter, one without butter, a resting period, then one turn with the second butter packet, and a final turn without butter.
Step 8: Cover the dough and refrigerate overnight. This resting time makes shaping easier and allows the butter to firm up properly.
Shaping and Baking
Step 1: The next day, roll the dough out into a 2.5 mm – 0.1 inch thick slab. If it begins to warm up, return it to the fridge to cool.
Step 2: Divide the dough into 3 portions and work with one at a time, keeping the remaining dough refrigerated.
Step 3: Cut triangles measuring 18 cm – 7 inches tall and 10 cm – 4 inches wide. Make a small slit in the centre of the base of each triangle.
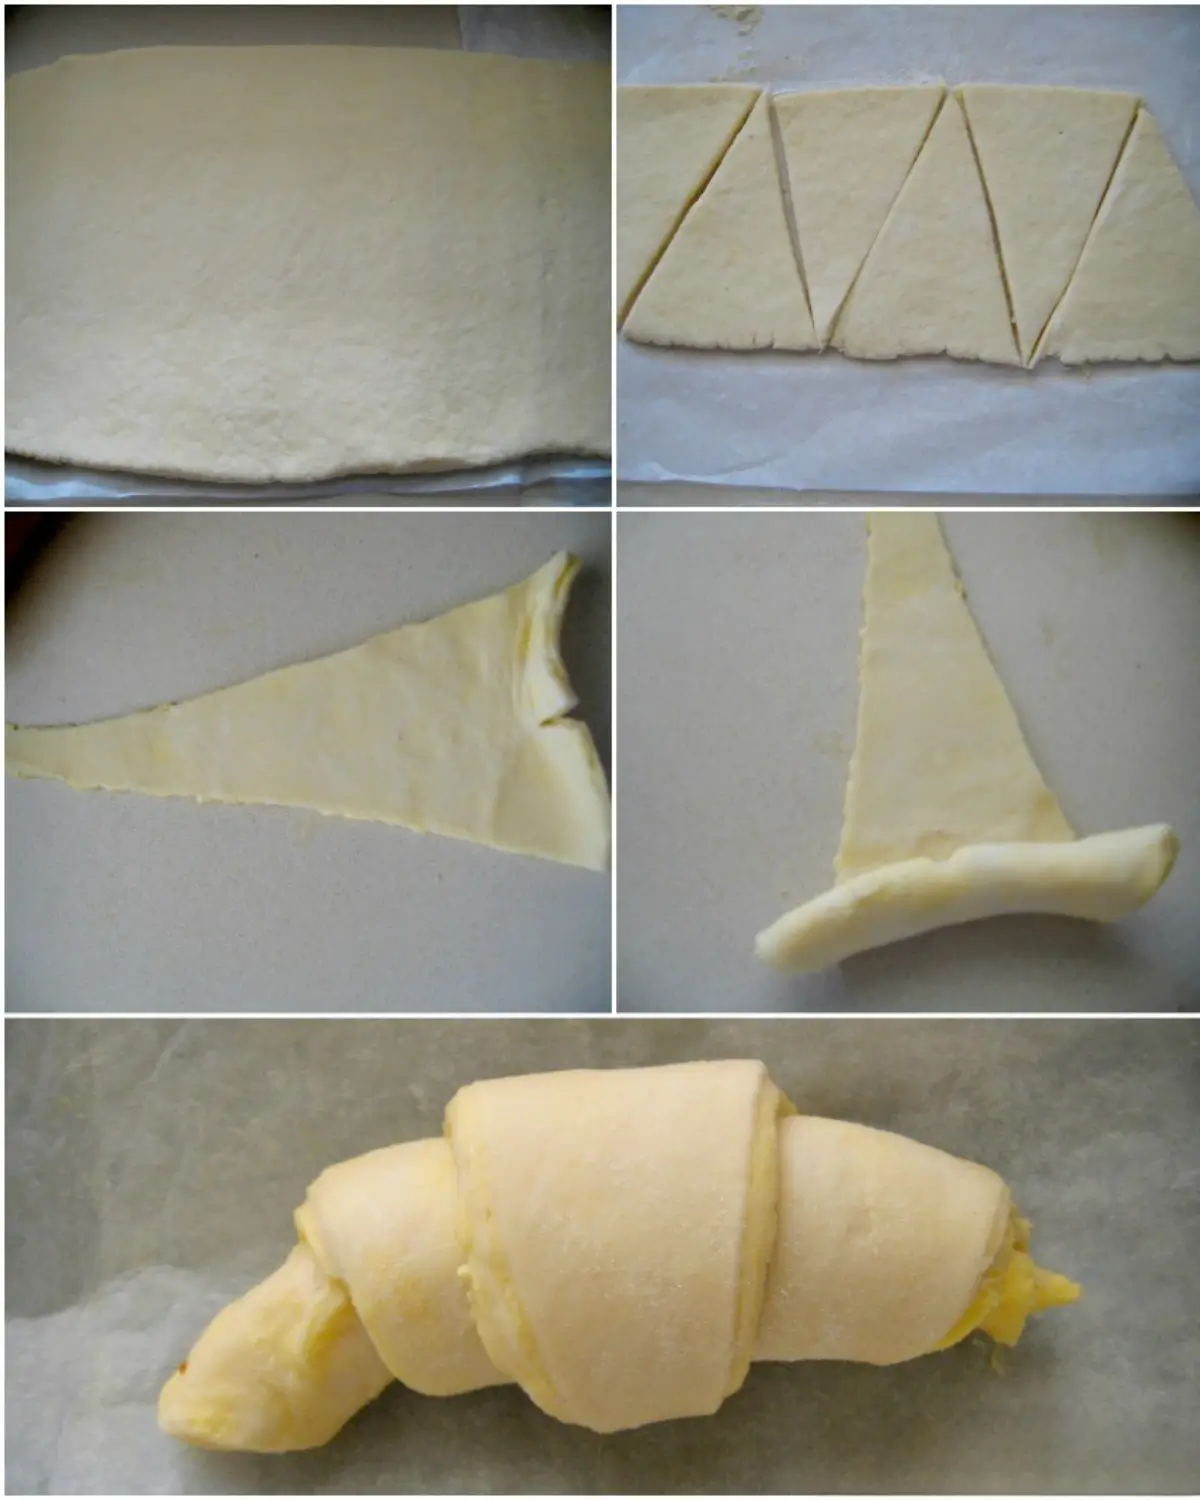
Step 4: Roll each triangle from the base, gently pulling to elongate it slightly. Curve into croissants and place on a parchment-lined baking tray, leaving 5 cm – 2 inches between each one.
Step 5: Leave the shaped croissants to rise at room temperature for 1 ½ to 2 hours, loosely covered with cling wrap.
Step 6: Repeat with the remaining dough.
Step 7: Once the croissants have risen, brush them with the egg wash using a pastry brush.
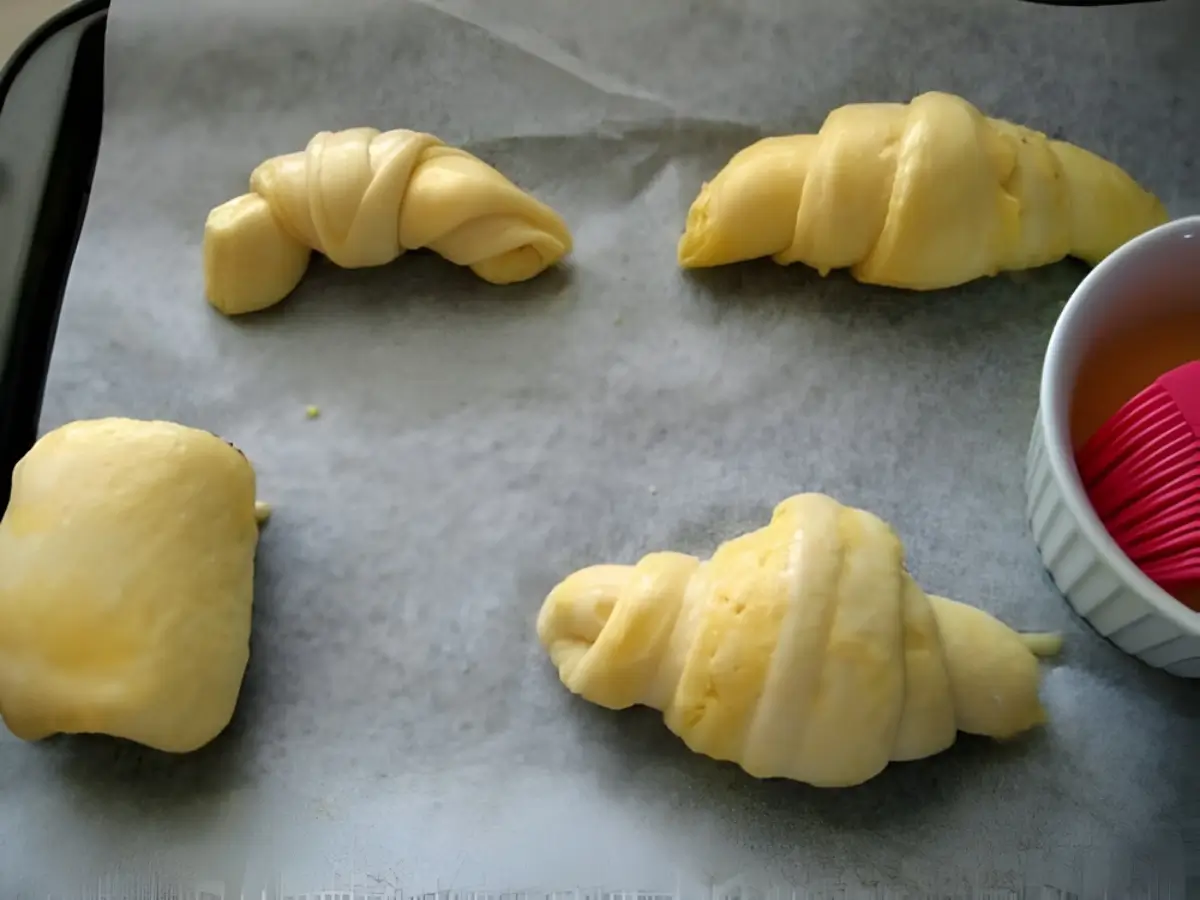
Step 8: Bake for 20 minutes in an oven preheated to 220°C – 430°F, lowering the temperature to 190°C – 375°F immediately after placing the croissants in the oven.
Note: The croissants will appear dark once baked, but the full baking time is essential for a soft and airy interior.
Step 9: Allow the croissants to cool for at least 10 minutes before serving.

Frequently Asked Questions
Yes. Regular unsalted butter works fine, but it softens faster, so chilling becomes more important during rolling.
Lightly press the side of a croissant with your fingertip. The dough should feel airy and slowly bounce back, leaving a faint dent. If it springs back straight away, it needs more time. If it stays flat, it’s over-proofed.
Yes. Dissolve it properly in lukewarm water with sugar first, and make sure it becomes foamy before adding it to the dough.
No. The dough can be mixed by hand using a bowl and spoon, then gently brought together without kneading too much. The key is stopping once the dough comes together, not working it like bread dough.
Gather the scraps gently without kneading and press them together lightly. Let the dough rest in the fridge before shaping it into a simple roll or small croissant. It won’t look as neat as the main batch, but it still tastes good.
Extra Help from the Kitchen
Check Dough Hydration Early – After initial mixing, the dough should feel supple and slightly tacky but not sticky. If it feels tight or dry, add a teaspoon or two of water before the first rise to avoid cracking during rolling.
Square the Dough Before Each Turn – Trim and straighten edges lightly with a bench scraper before folding to keep layers aligned and avoid uneven lift during baking.
Match Dough and Butter Consistency – Before the laminating process, press a finger lightly into both dough and butter. They should feel similar in firmness so the butter spreads evenly instead of shattering or squeezing out.
Avoid Sealed Edges – Use a sharp knife or pizza cutter and a clean ruler to cut the dough cleanly. Neat edges help the laminated layers expand freely during baking.
Variations and Twists
Chocolate Pain au Chocolat – Place dark chocolate batons at the base of each triangle before rolling and shaping. Bake following the same method and timing, allowing the chocolate to melt into the layers without leaking.
Almond-Filled Croissants – Slice baked croissants open, fill with almond cream, and top with sliced almonds. Bake briefly until warmed through and lightly toasted.
Ham and Cheese Croissants – Add thin slices of ham and cheese to the dough before rolling and shaping, keeping the filling light so the layers can rise properly.
Pain Aux Raisins Style – Roll the dough into a wide rectangle, spread a thin layer of custard, scatter raisins evenly, then roll into a log, slice, proof, and bake until puffed and golden.
Croissant Sandwich – Slice baked croissants once cooled and fill with eggs, cheese, or cured meats. Serve warm without rebaking the pastry.
Storage and Shelf Life
Store baked croissants at room temperature on the counter in a paper bag or a container lined with kitchen paper for up to 24 hours.
Refrigeration isn’t recommended, as it dries out the layers and speeds up staling. For longer storage, freeze fully cooled croissants in an airtight container or freezer bag for up to 2 months.
Thaw at room temperature, then reheat in a preheated oven at 180°C – 350°F for 5–7 minutes until warmed through and lightly crisp again. Avoid microwaving, as it softens the pastry and flattens the layers.
More Homemade Baking Ideas
Croissants Recipe
Flaky, buttery Homemade Croissants fresh from your own oven bring crisp edges and soft layers to the table. Roll, fold, bake, and enjoy them warm.
Ingredients
For the Dough
- 750 g – 6 cups all-purpose flour
- 14 g – 2 packets yeast
- 110 g + 2 tsp sugar
- 70 g – 5 tbsp milk
- 18 g – 1 tbsp salt
- 53 g – 3 ¾ tbsp butter – at room temperature
- 23 g – 1 ½ tbsp milk powder
- 300 g – 1 ¼ cups water
For the Beurrage
- 490 g – 4 ⅓ sticks butter – divided into two, at room temperature
For the Egg Wash
- 2 eggs
- 1 egg yolk
- 1 pinch salt
Instructions
Dough Preparation
-
Sift the flour into the bowl of a stand mixer fitted with a hook attachment. Add the salt, 110 g sugar – 9 tablespoons, milk powder, milk, and the 53 g – 3 ¾ tablespoons of soft butter.
-
Dissolve the yeast in half of the water, making sure it is lukewarm, and add the 2 teaspoons of sugar. Set aside to activate. When frothy, add it to the bowl with the rest of the ingredients.
-
Knead the dough only until the ingredients are just combined. Do not overwork it, as you do not want to develop the gluten too much. Add the remaining water as needed to obtain a smooth dough.
-
Shape the dough into a ball and place it in a bowl. Cover with cling wrap and let it rise for 1 to 1 ½ hours, or until doubled in size.
-
Punch down the dough, pressing it with your fist to return it to its initial size. Cover with cling wrap again and refrigerate for 1 hour to 1 hour and 15 minutes.
-
Punch the dough down once more to its initial size.
-
At this point, either continue with the recipe or store the dough in the refrigerator until the next day. In both cases, chill the dough in the freezer for 30 minutes.
Preparing the Beurrage
-
Remove the dough from the fridge and roll it into a long rectangle using a rolling pin. Cover with cling wrap and return it to the fridge while preparing the butter.
-
Take 2 sheets of baking paper and measure them against the rolled-out dough. Prepare 2 paper rectangles, each measuring 2 ⅔ of the length of the dough.
-
Fold each sheet of baking paper in half, then fold 2.5 cm – 1 inch inward on the three open edges, starting with the two sides, to form a sealed butter packet.
-
Divide the butter into 2 equal portions and place them inside the paper packets. Close the packets and roll the butter from the outside until it fills them evenly.
-
Return the butter packets to the fridge to firm up completely. Both the butter and the dough must be very cold before continuing to prevent leakage during lamination.
Laminating the Dough
-
Once the butter has firmed up again, remove the paper from only one butter packet. Take the cold dough out of the fridge and position the rectangle of butter over the lower two-thirds of the dough.
-
Fold the bottom third of the dough up over the butter, then fold the top third down over itself, forming a simple three-fold. You should now see 3 layers.
-
Roll the dough out again into a long rectangle and repeat the same three-fold, without adding any more butter.
-
Cover the dough with cling wrap and place it in the freezer for 30 minutes, then transfer it to the fridge for 1 hour.
-
Roll the dough out again into a long rectangle of the same size. Repeat the three-folds, first using the remaining butter and then once more without butter.
-
Flour the work surface as needed and brush away excess flour before each fold.
-
At this stage, you should have completed 4 single turns in total. This includes one turn with butter, one without butter, a resting period, then one turn with the second butter packet, and a final turn without butter.
-
Cover the dough and refrigerate overnight. This resting time makes shaping easier and allows the butter to firm up properly.
Shaping and Baking
-
The next day, roll the dough out into a 2.5 mm – 0.1 inch thick slab. If it begins to warm up, return it to the fridge to cool.
-
Divide the dough into 3 portions and work with one at a time, keeping the remaining dough refrigerated.
-
Cut triangles measuring 18 cm – 7 inches tall and 10 cm – 4 inches wide. Make a small slit in the centre of the base of each triangle.
-
Roll each triangle from the base, gently pulling to elongate it slightly. Curve into croissants and place on a parchment-lined baking tray, leaving 5 cm – 2 inches between each one.
-
Leave the shaped croissants to rise at room temperature for 1 ½ to 2 hours, loosely covered with cling wrap.
-
Repeat with the remaining dough.
-
Once the croissants have risen, brush them with the egg wash using a pastry brush.
-
Bake for 20 minutes in an oven preheated to 220°C – 430°F, lowering the temperature to 190°C – 375°F immediately after placing the croissants in the oven.
Note: The croissants will appear dark once baked, but the full baking time is essential for a soft and airy interior.
-
Allow the croissants to cool for at least 10 minutes before serving.
Recipe Notes
Since croissants take time to prepare, it’s best to make the full batch. The shaped croissants can be frozen before they rise by wrapping them individually in plastic wrap and storing them in a zip-top bag. When ready to bake, take them out the night before, let them come back to room temperature, then allow them to rise and bake following the instructions above.
You can also bake the full batch the same day. Once completely cooled, freeze the croissants. To serve, take them straight from the freezer and reheat in a preheated oven at 190°C – 375°F for about 5 minutes.


Thank you for this! They turned out wonderfully delicious, but I felt thY there was too much butter in the beurrage. It melteed out of my rolls and pooled arou.d the tools in the pan. I had to drain the pan because there was so much!
G’day and absolutely gorgeous, true!
LOVE your photo! very inspiring and congrats on completing the challenge too!
Cheers! Joanne
Viewed as part of The Daring Kitchen Oct Challenge
They look beautiful – your photography as always is superb and really shows us how flaky your pastry is. Great choice, and wonderful execution! What’s next – Pierre Hermé macarons? 🙂
How wonderfully clever you are! They looks so authentic. I wouldn’t dare try croissants.
they look yummy!
They look perfect! Crispy and soft inside.
They look amazing! Well done, and thanks for the link love 🙂
I have been wanting to try to make croissants for years now! Yes, it’s always the “time thing”! Yours look absolutely perfect, Manu! Fabulous job!!
Looks like a lot of work but got to love a fresh croisant