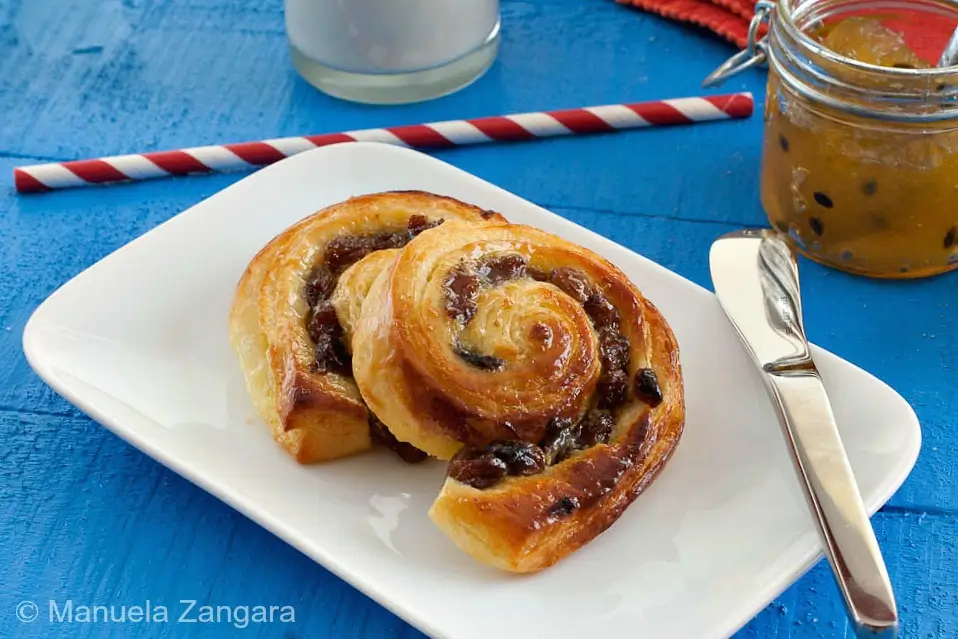
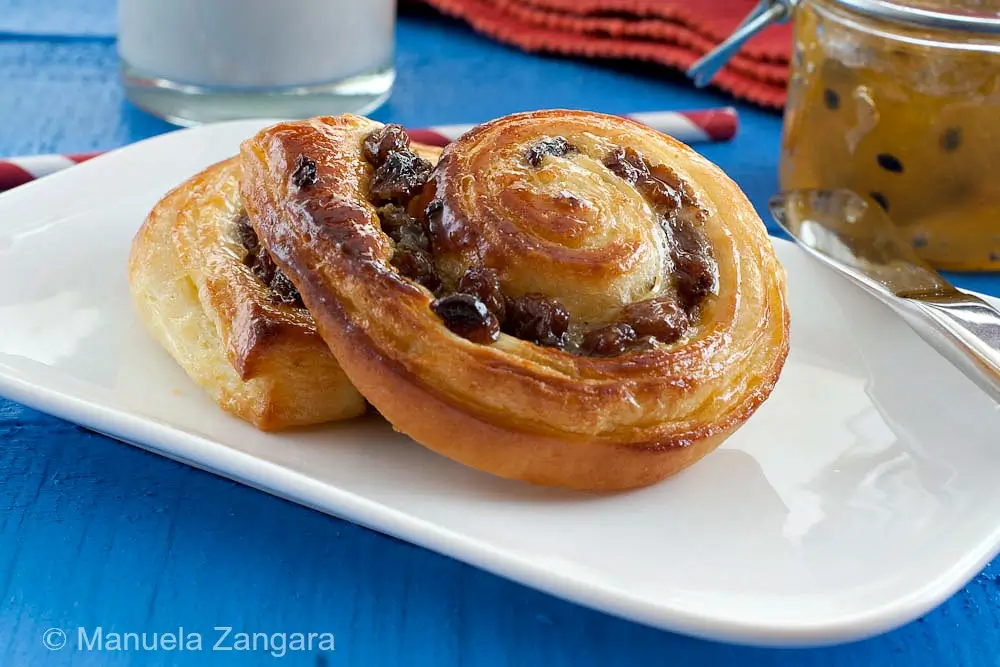
Flaky layers wrapped around creamy vanilla filling and plump raisins make Pain Aux Raisins a pastry you remember. It brings the scent, comfort, and sweetness of a real bakery tray fresh from the oven.
Remember a few months ago when I shared the recipe for the perfect French croissants? Today I am back with another French breakfast classic, pain aux raisins.
During my frequent Parisian visits as a child, I always chose pain au chocolat for breakfast. My parents picked pain aux raisins. I used to avoid the combination of flaky dough and raisins. It often makes me smile when I think about how tastes change over the years. There were so many things I did not enjoy as a child that I love now, and so many others I craved back then and no longer reach for. So strange how that happens.
When we visited French Polynesia last August, we had some incredible croissants, pain au chocolat, and pain aux raisins.
The pain aux raisins quickly became the highlight of my daily breakfast at the Hilton in Moorea, together with their Firi Firi. They were the best I had ever tasted, even better than the ones my parents used to buy in Paris. Flaky yet soft, filled with plenty of pastry cream.
To be honest, I had never realised pain aux raisins was supposed to contain pastry cream. The ones from my childhood must have been on the dry side. In Moorea, I finally tasted them soft and slightly crunchy, and they won me over completely.
Since croissants, pain au chocolat, and pain aux raisins all start from the same dough. I made these spirals while working on a batch of croissants at home. They soon became my favourite of the lot. The filling plays a big role here. The pastry cream keeps the centre soft and creamy while the outside stays crisp. It makes you reach for another one straight away.
If you can spare a few minutes, make the glaze as well. It does not change the flavour. The glossy finish makes the pastries look worthy of a Parisian or even a Polynesian pâtisserie.
Make a full batch of dough and prepare croissants and pain aux raisins together. You can also bake a full tray of pains aux raisins and freeze some for later. You will thank me. Enjoy!
What is Pain Aux Raisins?
Pain aux raisins is a classic French pastry made from croissant dough rolled with pastry cream and raisins, then shaped into spirals and baked until golden. The name comes from French and means “bread with raisins.” It refers to a spiral pastry rather than a traditional loaf.
The pastry has a soft, flaky texture from the laminated dough and a creamy, lightly sweet filling with raisins tucked between the layers. It’s often enjoyed for breakfast or as a bakery treat with coffee.
What Makes Pain Aux Raisins Worth Baking
- Flaky layers form as the dough rises and create a light crunch that feels satisfying with each bite.
- Pastries hold their shape well on a serving plate and are easy to bring to gatherings or picnics.
- Light sweetness suits anyone who prefers less sugary breakfasts and enjoys a more delicate start to the day.
Key Ingredients for Pain Aux Raisins
Croissant Dough
Creates the delicate layers that rise in the oven and give the pastry its light texture. Choose strong white flour for a steady lift and a clean, buttery finish.
Crème Pâtissière
Gives a smooth, creamy centre that sets softly inside the spirals. I use my homemade crème pâtissière because it gives a fuller flavour and a richer vanilla taste.
Raisins
Soaked until tender so they settle well into the pastry cream. Pick plump raisins with natural sweetness for a rounder flavour in each slice.
Butter for Beurrage
Used at room temperature to fill the baking-paper packets, then chilled until firm before folding them into the dough. This helps the butter spread evenly at first and supports clean layers during lamination.
Find the complete list with measurements in the recipe card below.
How to Make Pain Aux Raisins
Dough
Step 1: Sift the flour into the bowl of an electric mixer fitted with a hook attachment. Add the salt, 110 g – 4 oz sugar, milk powder, milk, and 53 g – 3 ¾ tablespoons soft butter.
Step 2: Dissolve the yeast in half of the lukewarm water with the 2 teaspoons of sugar, and set it aside to activate. When frothy, add it to the ingredients in the bowl.
Step 3: Knead only until the dough comes together (avoid overworking it, as this affects the gluten). Add the remaining water, as needed, to obtain a smooth dough.
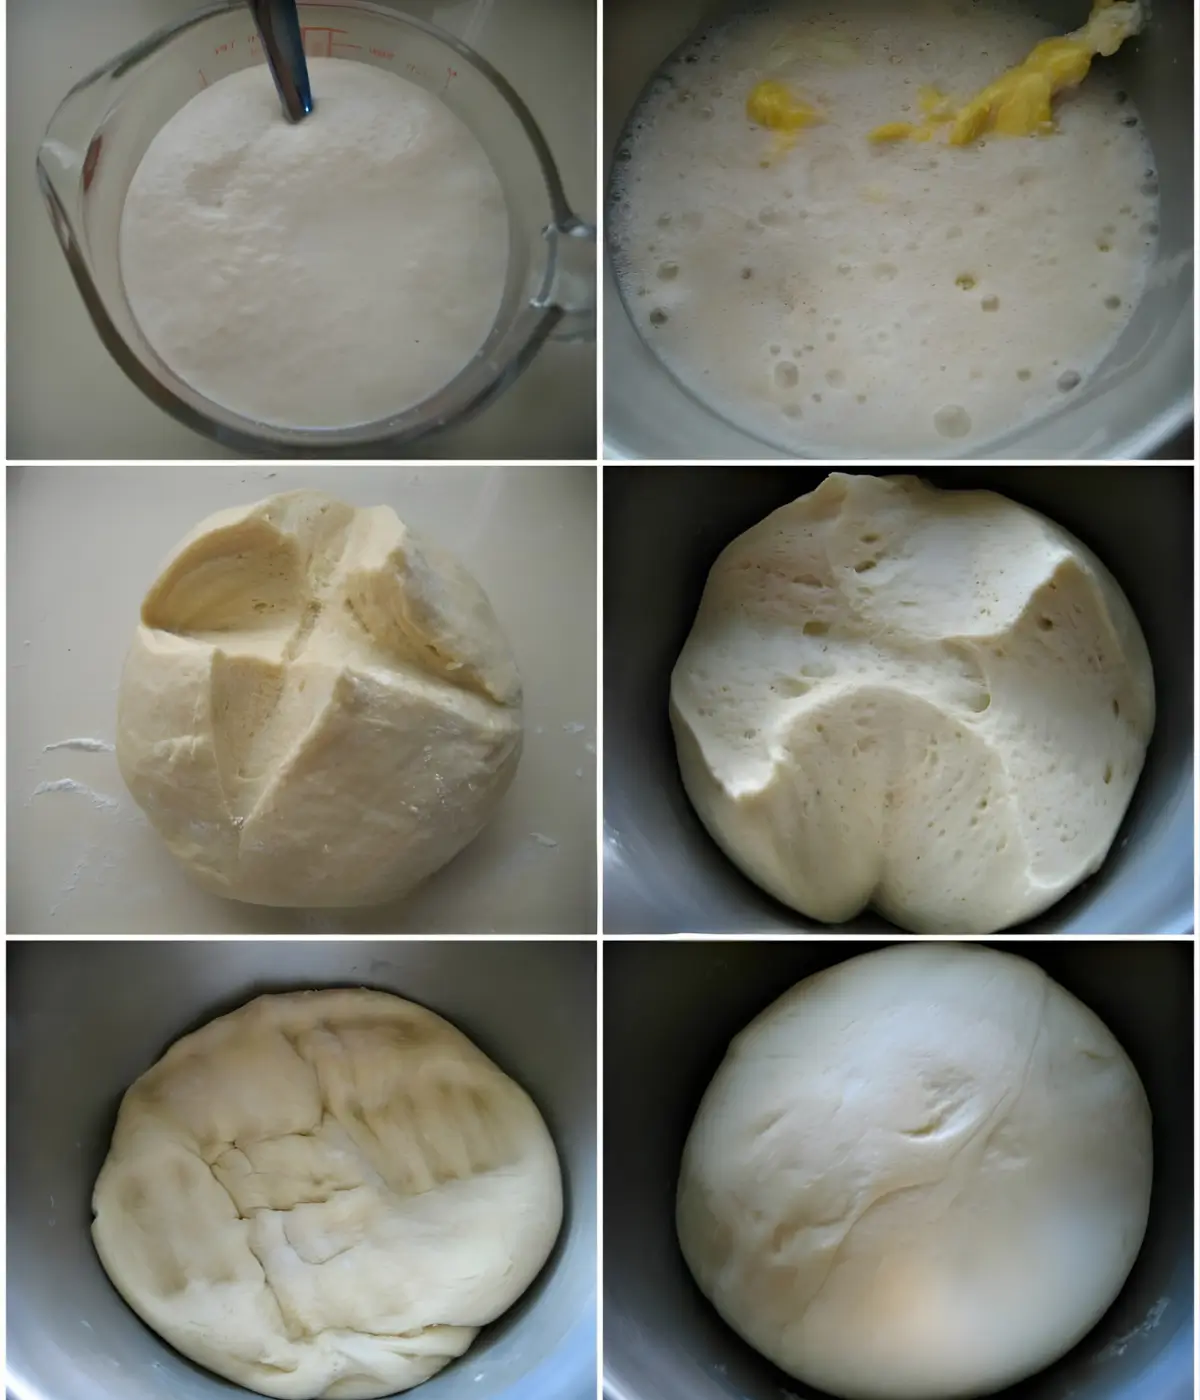
Step 4: Shape the dough into a ball, cover the bowl with cling wrap, and let it rise for 1 to 1 ½ hours or until doubled in size.
Step 5: Punch down the dough with your fist to bring it back to its initial size. Cover it again with cling wrap, and refrigerate it for 1 hour to 1 hour and 15 minutes.
Step 6: Punch it down once more to its initial size.
Step 7: At this point, you can continue with the recipe or store the dough in the fridge overnight. In both cases, chill the dough in the freezer for 30 minutes first.
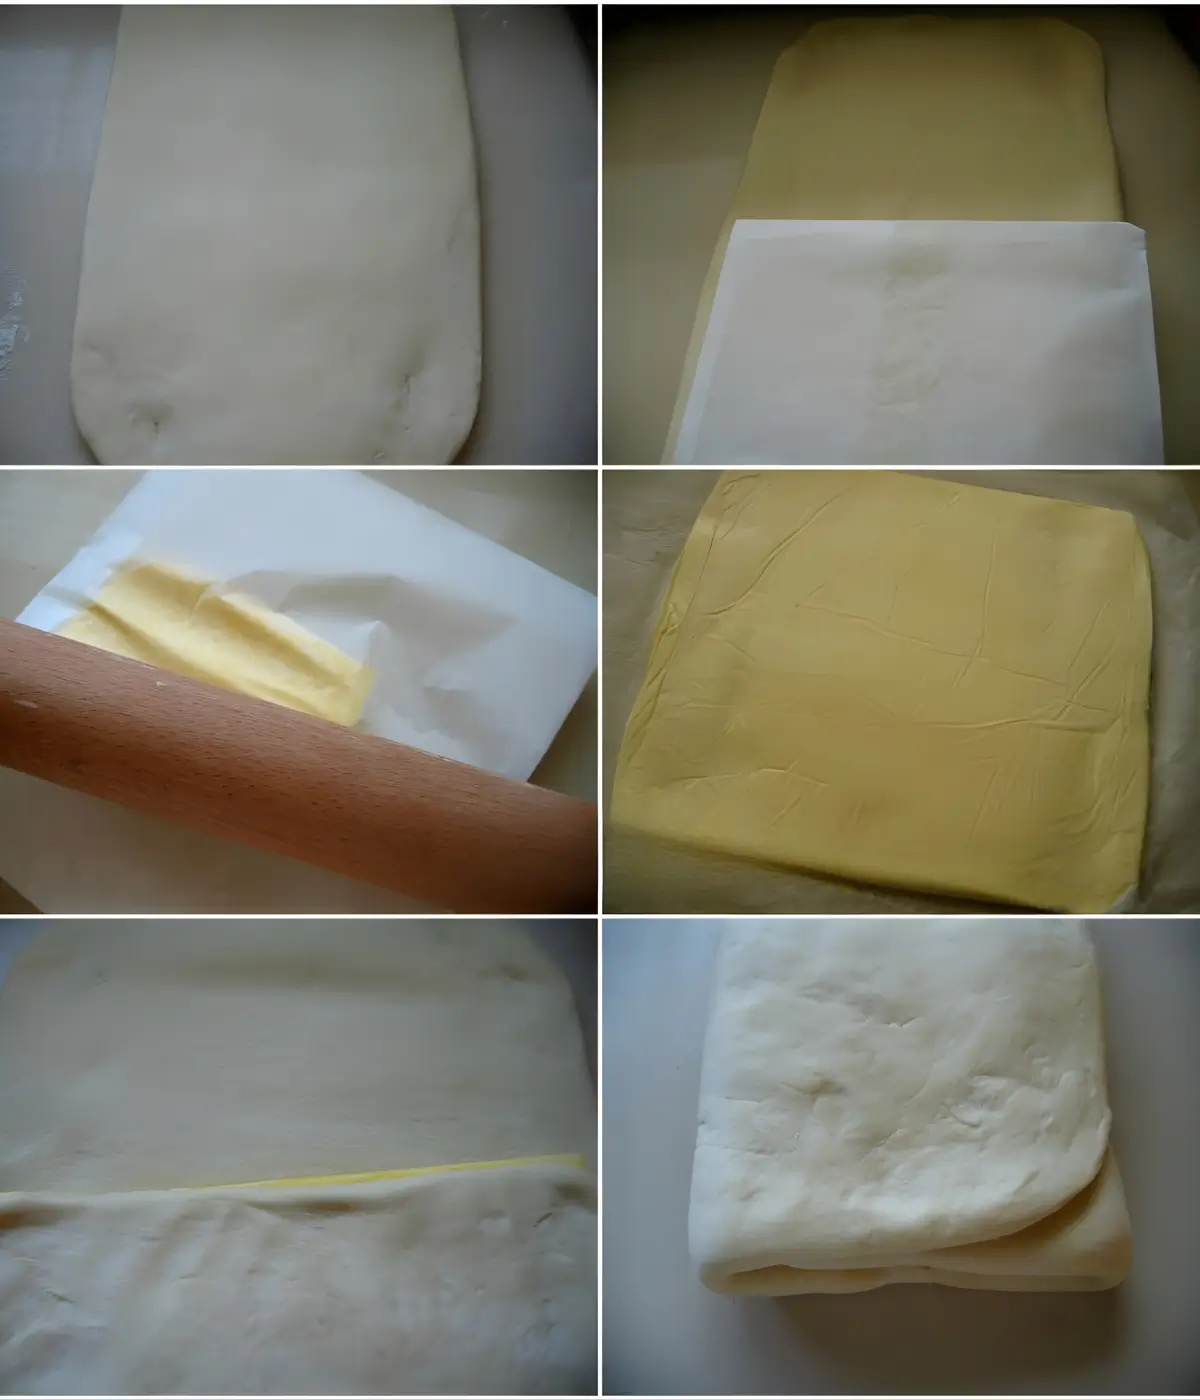
Step 8: When ready to continue, remove the dough from the fridge, roll it into a long rectangle, cover it with cling wrap, and return it to the fridge while you prepare the butter for the beurrage.
Step 9: Cut two pieces of baking paper and measure them against the rolled dough. Make two paper rectangles, each two-thirds the size of the dough. Fold the edges to create packets that will hold the butter securely.
Step 10: Divide your butter into 2 equal pieces, and put them into the 2 open paper packets. Close the paper packets and roll them from the outside until the butter fills the packets completely. Once the packets are evenly rolled, put them back in the fridge to firm up again. Make sure that both your rolled butter and rolled dough are very cold before proceeding, or the butter will leak and your pains aux raisins will not turn out properly.
Note: The original recipe calls for butter from the fridge, but I used room-temperature butter, and it worked just as well.
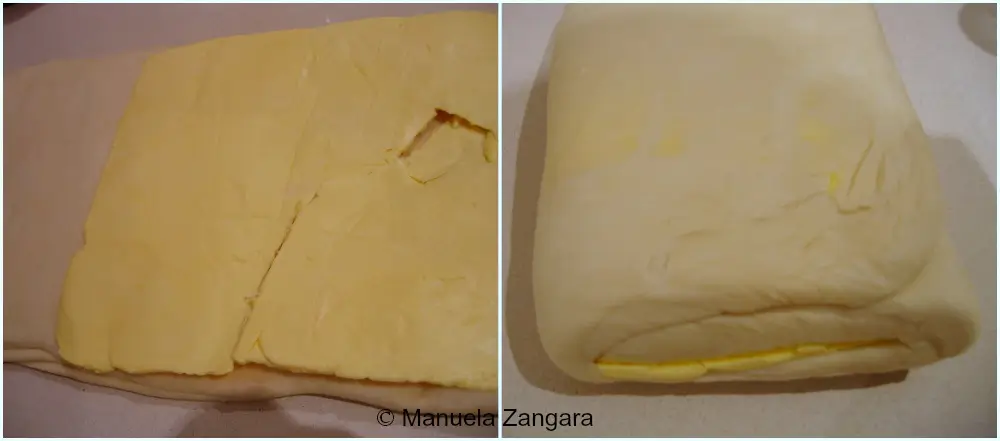
Step 11: When the butter has firmed up, remove the paper from one packet. Take the chilled dough out of the fridge and place the butter on the lower two-thirds of the dough. Fold the bottom third up over the butter, and then fold the top third down over the centre to create three layers.
Step 12: Roll the dough into a long rectangle again, and repeat the same simple three-fold turn, this time without adding more butter.
Step 13: Cover the folded dough with cling wrap, place it in the freezer for 30 minutes, and then refrigerate it for 1 hour.
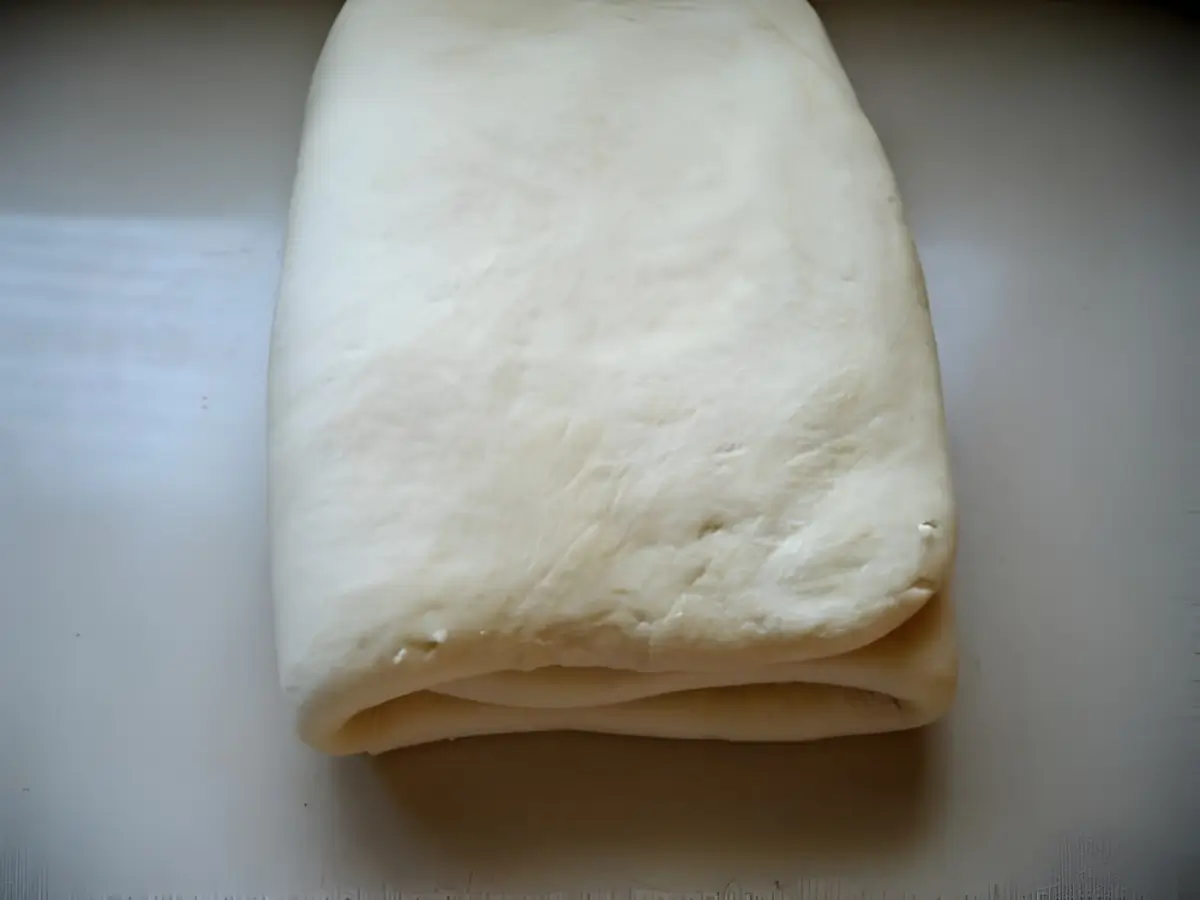
Step 14: Roll out the dough again into a long rectangle approximately the same size as before, and repeat the same simple three-fold turns, the first one with the remaining butter and the next one without. At this stage, the dough should look smooth and evenly layered, similar to the reference photo. Flour your work surface regularly, and brush away any excess flour before folding.
Step 15: You should now have completed 4 single turns in total, one with butter, one without, a rest period, then one with the second portion of butter, and one last turn without.
Step 16: The dough is now ready, though it is best to leave it in the fridge overnight. Resting makes shaping the pain aux raisins easier and helps the butter firm up again, so it will not leak during rolling.
Shaping
Step 1: The next day, divide the dough into 3 pieces and roll each piece into 2.5 mm – 0.1 inch thick sheets. If the dough starts to warm up, place it back in the fridge to cool. It is easier to work with one piece at a time while keeping the rest covered in the fridge.
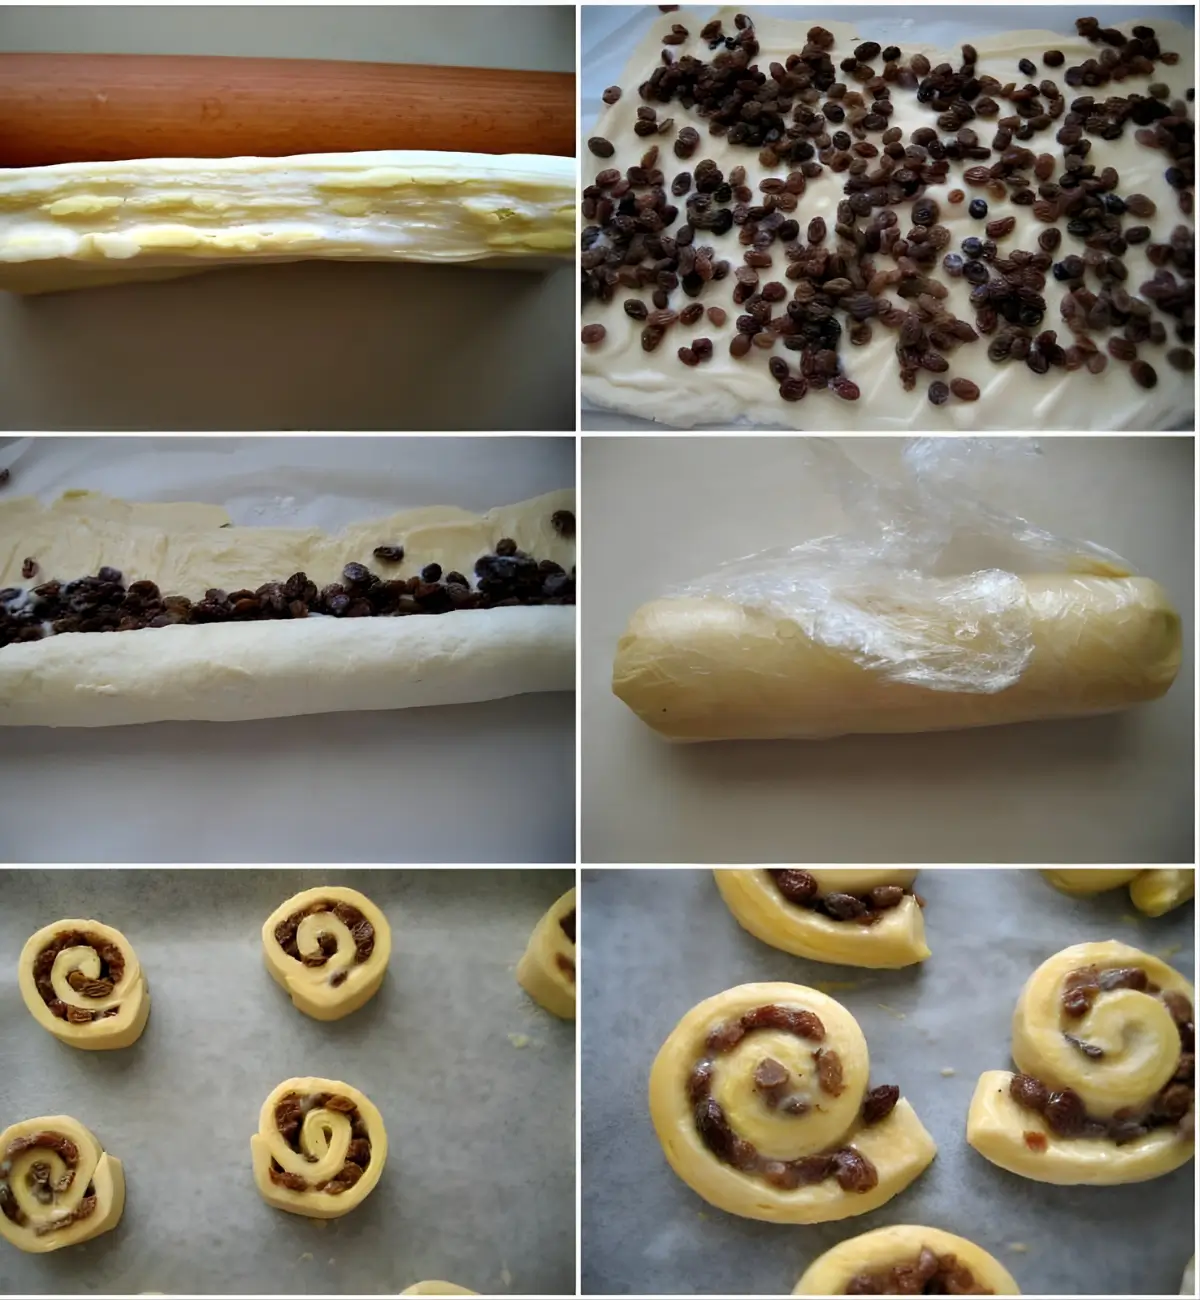
Step 2: Drain, rinse, and dry the raisins.
Step 3: Spread ⅓ of the pastry cream over one rolled dough rectangle and sprinkle ⅓ of the raisins on top.
Step 4: Roll the dough from the larger edge, as if making a Swiss roll.
Step 5: Wrap the filled roll with cling wrap and place it in the freezer for 10 to 15 minutes. Repeat the process with the remaining dough.
Step 6: When the rolls have firmed up, cut them into neat 2.5 cm – 1-inch slices using a sharp knife.
Step 7: Place the slices on a baking tray lined with baking paper, leaving 5 cm – 2 inches of space between them.
Step 8: Let them rise for 1½ to 2 hours at room temperature. Loosely cover them with cling wrap so the surface does not dry out.
Step 9: Once the pains aux raisins have risen, brush them with the egg wash.
Step 10: Bake for 15 to 20 minutes, depending on their size, or until golden brown, in an oven preheated to 220°C – 430°F and then lowered to 190°C – 375°F immediately after placing them inside.
Glazing
Step 1: In a small saucepan, bring 1 cup of sugar and 1 cup of water to a boil to make a syrup.
Step 2: Once the pains aux raisins have baked, brush them with the syrup and return them to the oven for another 2 minutes to make them glossy.
Step 3: Let them cool for at least 10 minutes before eating.
Frequently Asked Questions
Chill the filled rolls in the freezer for 10–15 minutes before cutting. Use a sharp knife and slice in one clean motion to keep the layers intact.
Yes. Sultanas work very well and keep their shape when baked. Currants are smaller but behave similarly and hold moisture without affecting the pastry layers.
Yes. You can reduce the sugar slightly without altering the texture. The spirals rely on the custard for softness, so the structure remains stable with a small reduction.
Yes. Prepare it in advance, cover the surface with cling film, and keep it chilled. Bring it back to a smooth consistency with a whisk before spreading it onto the dough.
Extra Help from the Kitchen
Weigh Ingredients Carefully – Use a digital scale to keep the dough consistent from start to finish, as laminated dough reacts quickly to extra flour or liquid and becomes harder to roll once the ratios shift.
Work on a Cool Surface – Roll the dough on a stone or marble bench to keep the butter firm and prevent smearing, which helps the layers stay defined when the pastries bake.
Chill the Knife Before Cutting – Cool the knife in the fridge for a few minutes so it glides through the spirals without dragging the pastry cream or pressing the layers together.
Rotate the Dough While Rolling – Turn the dough as you roll so the rectangle stays even and the thickness remains uniform, which helps the spirals bake at the same rate.
Avoid Overfilling – Too much pastry cream or too many raisins make the spirals slip during rising, so stick to thin, even layers.
Variations and Twists
Add Orange Zest – Mix 1 teaspoon finely grated orange zest into the pastry cream to give a light citrus note that complements the raisins.
Add Cinnamon – Sprinkle a small amount of cinnamon or cinnamon sugar over the pastry cream before rolling for a gentle spice layer that works well with the custard.
Use Sultanas Instead of Raisins – Replace the raisins with sultanas for a lighter dried fruit that blends smoothly with the pastry cream filling.
Pain au Raisin with Puff Pastry – Spread the pastry cream and raisins over ready-rolled puff pastry, then roll, slice, and bake until golden. The pastries rise less than the croissant-dough method but still offer a light, pleasant texture.
Storage and Shelf Life
Store pain aux raisins at room temperature in an airtight container for up to 2 days. Keep them in a cool spot away from sunlight and moisture.
Freeze the baked pastries once they have cooled completely. Wrap them well in aluminium foil, place them in a sealed container, and keep them frozen for up to 2 months.
Thaw the pastries briefly at room temperature before warming. Reheat baked pastries in the oven at 190°C – 375°F for about 5 minutes to refresh the layers without drying them.
Other Breakfast Treats to Add to Your Table
Pain Aux Raisins Recipe
Flaky layers wrapped around creamy vanilla filling and plump raisins make Pain Aux Raisins a pastry you remember. It brings the scent, comfort, and sweetness of a real bakery tray fresh from the oven.
Ingredients
DOUGH
For the Dough
- 750 g – 6 cups all-purpose flour
- 14 g – 2 packets active dry yeast
- 110 g – 4 oz + 2 tsp sugar
- 70 g – 5 tbsp milk
- 18 g – 1 tbsp + ½ tsp salt
- 53 g – 3 ¾ tbsp butter – at room temperature
- 23 g – 2 tbsp milk powder
- 300 g – 1 ¼ cups water
For the Beurrage
- 490 g – 4 ⅓ sticks butter – divided in two, at room temperature
For the Egg Wash
- 2 eggs
- 1 egg yolk
- 1 pinch salt
FILLING
- 1 L – 4 cups crème pâtissière – made with 1 L – 4 cups milk
- raisins – softened in warm water
GLAZE
- 1 cup sugar
- 1 cup water
Instructions
Dough
-
Sift the flour into the bowl of an electric mixer fitted with a hook attachment. Add the salt, 110 g – 4 oz sugar, milk powder, milk, and 53 g – 3 ¾ tablespoons soft butter.
-
Dissolve the yeast in half of the lukewarm water with the 2 teaspoons of sugar, and set it aside to activate. When frothy, add it to the ingredients in the bowl.
-
Knead only until the dough comes together (avoid overworking it, as this affects the gluten). Add the remaining water, as needed, to obtain a smooth dough.
-
Shape the dough into a ball, cover the bowl with cling wrap, and let it rise for 1 to 1 ½ hours or until doubled in size.
-
Punch down the dough with your fist to bring it back to its initial size. Cover it again with cling wrap, and refrigerate it for 1 hour to 1 hour and 15 minutes.
-
Punch it down once more to its initial size.
-
At this point, you can continue with the recipe or store the dough in the fridge overnight. In both cases, chill the dough in the freezer for 30 minutes first.
-
When ready to continue, remove the dough from the fridge, roll it into a long rectangle, cover it with cling wrap, and return it to the fridge while you prepare the butter for the beurrage.
-
Cut two pieces of baking paper and measure them against the rolled dough. Make two paper rectangles, each two-thirds the size of the dough. Fold the edges to create packets that will hold the butter securely.
-
Divide your butter into 2 equal pieces, and put them into the 2 open paper packets. Close the paper packets and roll them from the outside until the butter fills the packets completely. Once the packets are evenly rolled, put them back in the fridge to firm up again. Make sure that both your rolled butter and rolled dough are very cold before proceeding, or the butter will leak and your pains aux raisins will not turn out properly.
Note: The original recipe calls for butter from the fridge, but I used room-temperature butter, and it worked just as well.
-
When the butter has firmed up, remove the paper from one packet. Take the chilled dough out of the fridge and place the butter on the lower two-thirds of the dough. Fold the bottom third up over the butter, and then fold the top third down over the centre to create three layers.
-
Roll the dough into a long rectangle again, and repeat the same simple three-fold turn, this time without adding more butter.
-
Cover the folded dough with cling wrap, place it in the freezer for 30 minutes, and then refrigerate it for 1 hour.
-
Roll out the dough again into a long rectangle approximately the same size as before, and repeat the same simple three-fold turns, the first one with the remaining butter and the next one without. At this stage, the dough should look smooth and evenly layered, similar to the reference photo. Flour your work surface regularly, and brush away any excess flour before folding.
-
You should now have completed 4 single turns in total, one with butter, one without, a rest period, then one with the second portion of butter, and one last turn without.
-
The dough is now ready, though it is best to leave it in the fridge overnight. Resting makes shaping the pain aux raisins easier and helps the butter firm up again, so it will not leak during rolling.
Shaping
-
The next day, divide the dough into 3 pieces and roll each piece into 2.5 mm – 0.1 inch thick sheets. If the dough starts to warm up, place it back in the fridge to cool. It is easier to work with one piece at a time while keeping the rest covered in the fridge.
-
Drain, rinse, and dry the raisins.
-
Spread ⅓ of the pastry cream over one rolled dough rectangle and sprinkle ⅓ of the raisins on top.
-
Roll the dough from the larger edge, as if making a Swiss roll.
-
Wrap the filled roll with cling wrap and place it in the freezer for 10 to 15 minutes. Repeat the process with the remaining dough.
-
When the rolls have firmed up, cut them into neat 2.5 cm – 1-inch slices using a sharp knife.
-
Place the slices on a baking tray lined with baking paper, leaving 5 cm – 2 inches of space between them.
-
Let them rise for 1½ to 2 hours at room temperature. Loosely cover them with cling wrap so the surface does not dry out.
-
Once the pains aux raisins have risen, brush them with the egg wash.
-
Bake for 15 to 20 minutes, depending on their size, or until golden brown, in an oven preheated to 220°C – 430°F and then lowered to 190°C – 375°F immediately after placing them inside.
Glazing
-
In a small saucepan, bring 1 cup of sugar and 1 cup of water to a boil to make a syrup.
-
Once the pains aux raisins have baked, brush them with the syrup and return them to the oven for another 2 minutes to make them glossy.
-
Let them cool for at least 10 minutes before eating.
Recipe Notes
As making pains aux raisins takes time, preparing the full batch makes planning easier. Let the baked pastries cool completely before wrapping them well in foil and freezing them. When you want to serve them, take them straight from the freezer and warm them in a pre-heated oven at 190°C – 375°F for about 5 minutes until crisp again.


super content d’avoir trouve ton site !!! excited about trying to make this recipe today.
I have a few questions about ingredients.
1) Do you use active dry, rapid rise or instant yeast?
2) For the milk powder, is that nonfat dried milk?
3) Are you using butter that is 82% butterfat or “European-style” butter?
Hi Janet. I always use active dry yeast. For this recipe, I’d recommend a higher fat content. I use full cream/full fat dried milk powder. Also, I am not sure about the 2 kinds of butter you mention, as both in Europe and in Australia, we only have “normal” butter. The one I use is 83.6% butterfat. I hope it helps. 🙂
Hi Manu
Thank you for the recipe. When you write yeast, is it dry or “alive” yeast?
Best
Signe
Hej Signe! I always use dry active yeast (in powder), as that’s what I usually find at the supermarket here in Australia. Happy baking and let me know how you like these Pains aux raisins. 🙂 Knus!
I am not sure if you still check this…but when you say use only half the water I don’t see where I am supposed to use the other half….??
Hi Kathy! Thanks for letting me know! I will fix the recipe immediately. The original idea is that it make take a little less than 300 grams of water and to add it slowly while kneading. That’s why I said to dissolve the yeast in half the water – I will fox the rest. 🙂 However, I made this recipe a few times and 300 grams has always worked for me. 🙂 Enjoy!
Question: can I make the crème pâtisserie a day in advance, or must it be done immediately before?
You can definitely make it the day before and keep it in the fridge. Make sure you cover it with cling wrap when it’s still warm, so you don’t get the skin on the top. 🙂
Hello, this looks delicious! Do you use salted or unsalted butter ? Thanks.
Hi Miriam. I always used unsalted butter. 🙂
Thank you so much for sharing your recipe and for the step by step instructions. I made them today. You made something complex into something simple. I am in New Zealand by the way and want to go to Tahiti.
Thanks! I am so glad you liked my recipe and you found it helpful! 🙂 You will LOVE Tahiti! I would love to go back one day!
Manuela, I love your new recipes. I read your blog and was so excited. I just came across it and now I am reading it like crazy. I love to make all my own breads. Thanks for such a wonderful blog.
Awww thank you so much Bea!!! 🙂
Oh boy, I wish I had one of those right now! I also wish I hadn’t just decided to settle on olives and chevre for dinner.
These look amazing. I wish I lived near you. I would simply bring over some coffee and enjoy what you baked! 🙂
Manuela, this looks mouthwateringly good!