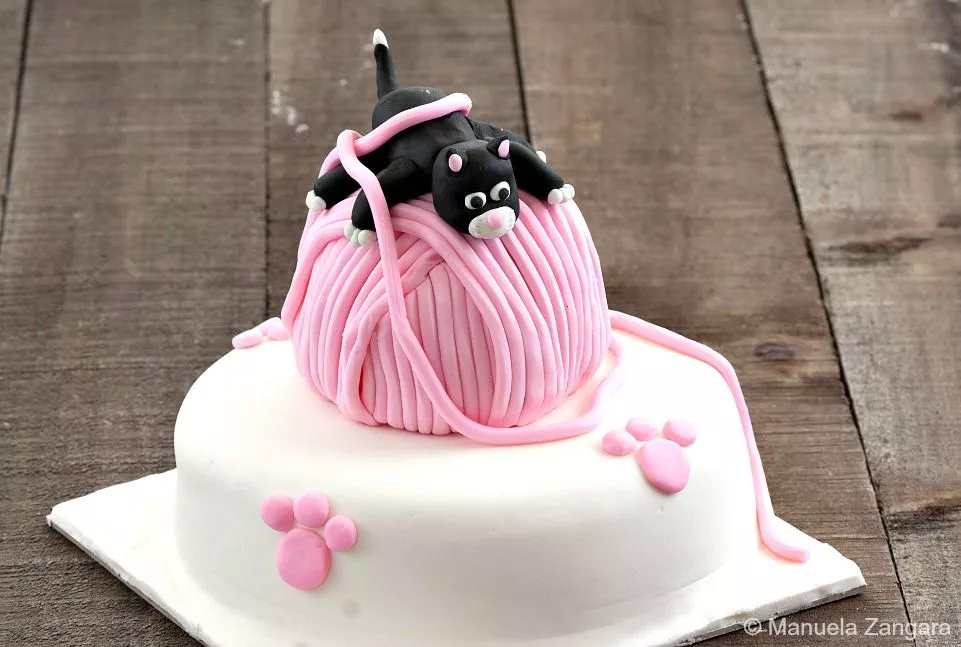
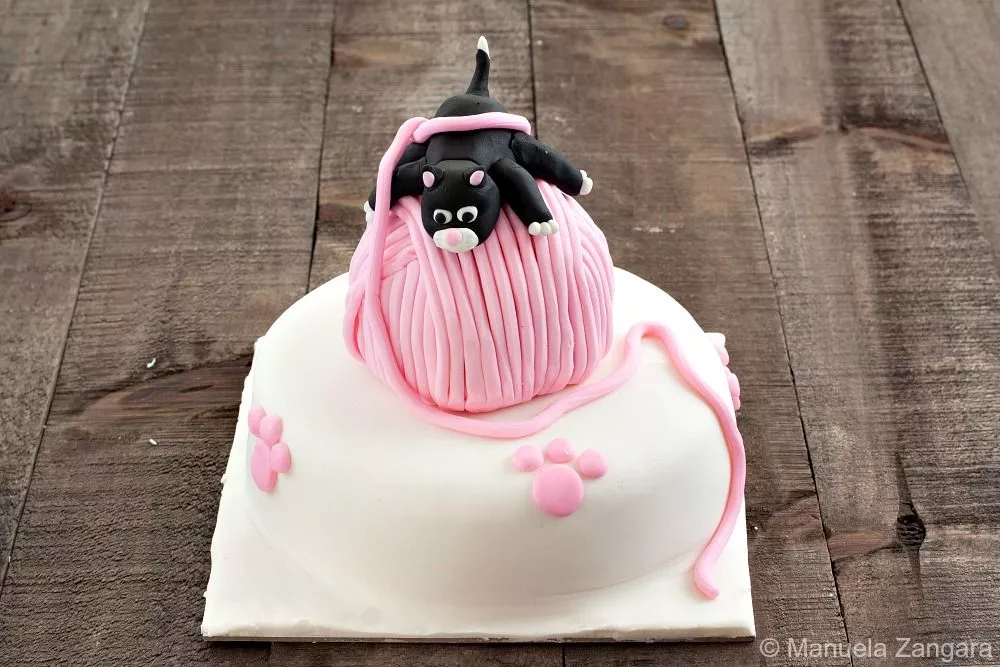
Delight every cat lover at your next celebration with this Playful Kitten Cake, a soft, sweet, and wonderfully detailed fondant creation that’s almost too cute to slice.
My youngest daughter has always loved animals, especially cats. So, when it was time to plan Georgia’s 5th Birthday, she asked for a Kitty Cat party to match her favourite theme. I had seen a few Playful Kitten Cakes online and decided to give one a go, as it suited the occasion perfectly.
To my surprise, the process was easier and quicker than I expected. The only part that took a little patience was the wool ball, as it needs many fondant strings to cover it, and my sugarcraft gun is quite small. Everything else came together smoothly, and I managed to finish sooner than I thought.
I especially love the extra piece of wool that the kitten gets tangled in, such a playful detail, and very much like my little Georgia.
Why This Playful Kitten Cake Is Perfect for Birthdays
- Keeps well at room temperature, so it can sit proudly on the party table for hours.
- Brings a cheerful, playful theme to the birthday table with colours as sweet as the cake itself.
- Pairs perfectly with classic flavours such as vanilla, lemon, or chocolate sponge.
Key Ingredients for Playful Kitten Cake
Yogurt Cake Base
Soft, moist, and sturdy enough to hold the fondant decorations without breaking apart. I used my Yogurt Cake recipe for this one, as it keeps a tender crumb even after freezing, which makes assembly much easier.
Fondant
Used for the yarn ball, kitten, and small decorative accents. A pliable fondant rolls smoothly and shapes neatly for clean results.
Icing for Crumb Coating
Creates an even surface under the fondant and traps crumbs so the outer layer stays smooth. A light, spreadable icing also helps the fondant stick properly to the cake without tearing or sliding.
Find the complete list with measurements in the recipe card below.
How to Make Playful Kitten Cake
Making the Yarn Ball
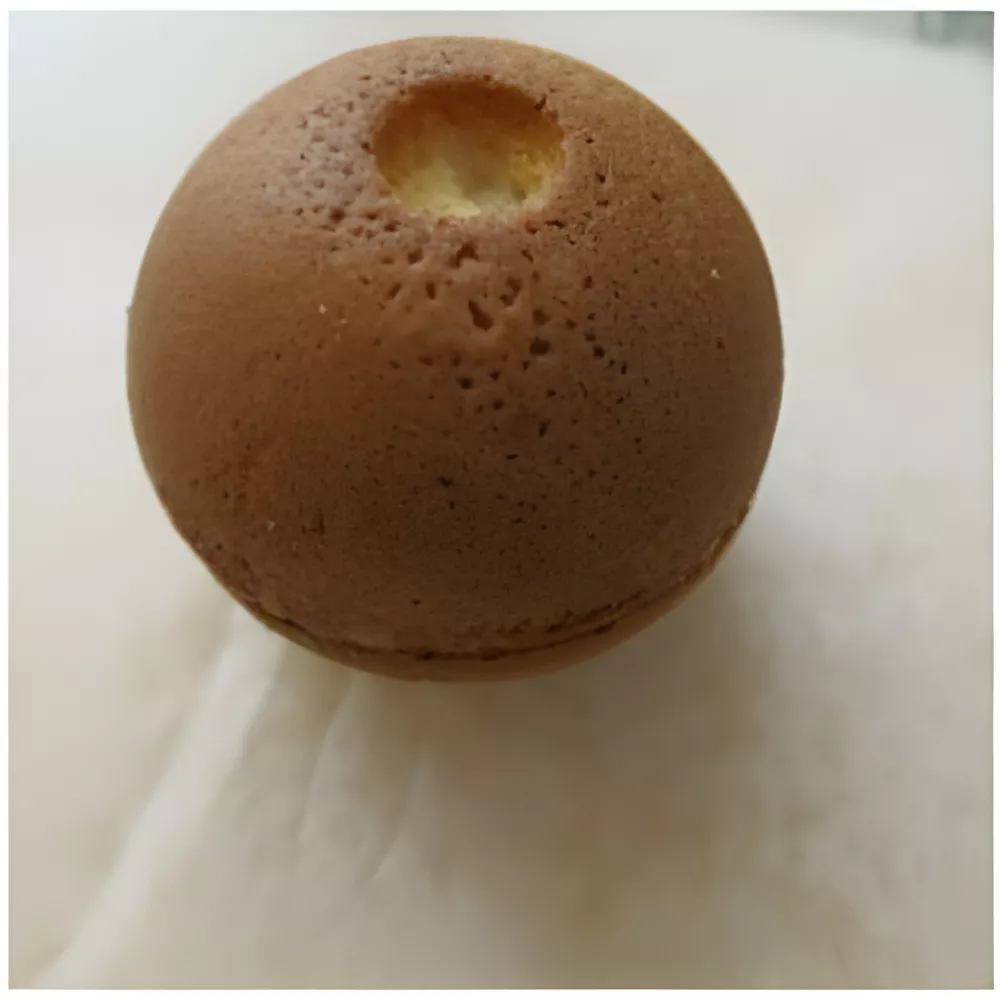
Step 1: Bake the yogurt cakes in advance and freeze them until needed.
Step 2: Begin with the yarn of wool. Level and sandwich the two half-spherical cakes to form a ball. Cover it with a thin layer of vanilla icing and refrigerate to harden slightly.
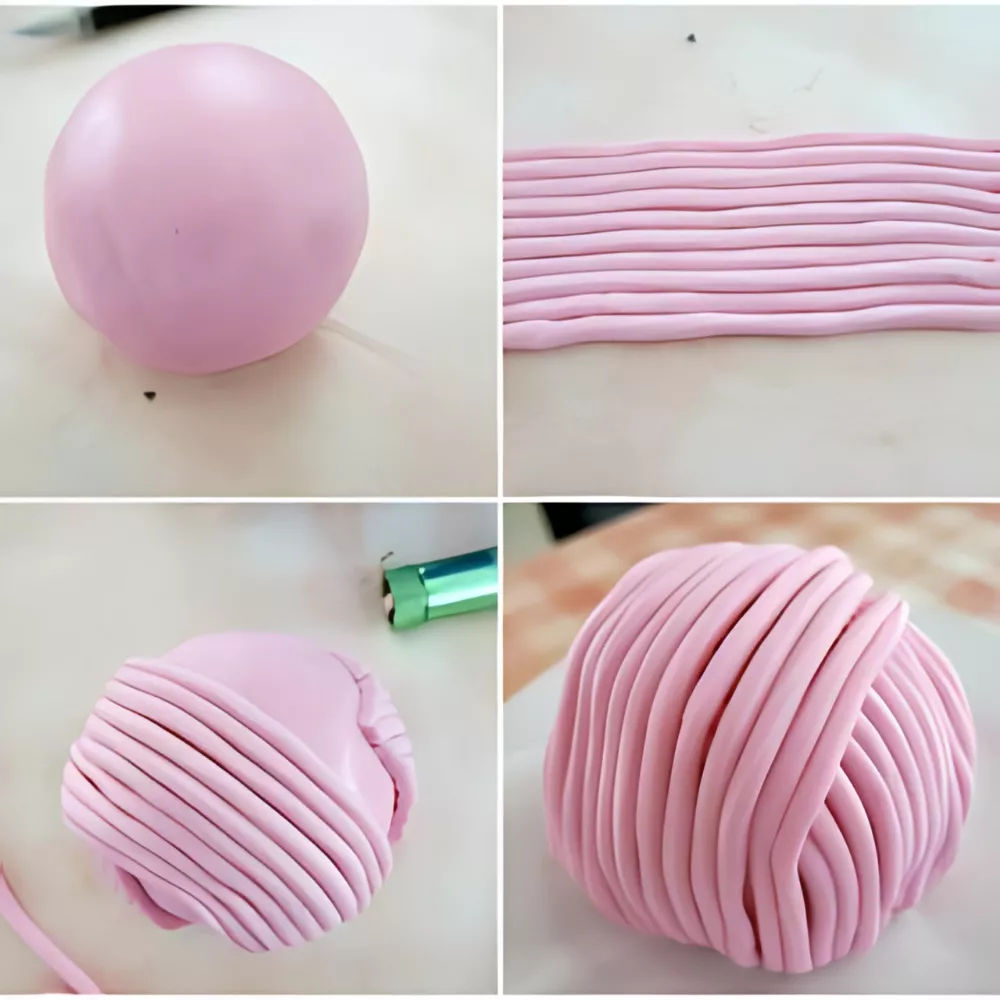
Step 3: Roll out pink fondant and cover the cake ball. Don’t worry about making it perfectly smooth, as it will be covered by the fondant strings later.
Step 4: Load a sugarcraft gun with fondant and use the medium round disc. Push out long fondant strings and lay them close together. Trim one end into a small triangle, as shown in the photos. Brush edible glue on one side of the cake ball and attach the triangle end. Repeat on the opposite side.
Step 5: Make more fondant strings with the sugarcraft gun. Brush the ball with edible glue and lay the strings across it. Repeat in the opposite direction until the entire ball is covered. Let it firm up slightly. Keep any leftover fondant to make extra strings later.
Shaping the Kitten
Step 1: To make the kitten, roll some fondant into a teardrop shape for the body. Roll a ball for the head, four little sausages for the legs, and a thinner one for the tail. Stick them all together with edible glue, then make two small triangles for the ears.
Step 2: Roll three tiny white fondant balls for each leg to form the paws and attach them with glue. For the eyes, roll a small white ball and add a smaller black ball on top.
Step 3: For the mouth, roll a small white fondant ball, flatten it, and use an X-Acto knife to make thin whisker cuts. Use a little pink fondant for the inside of the ears and the nose.
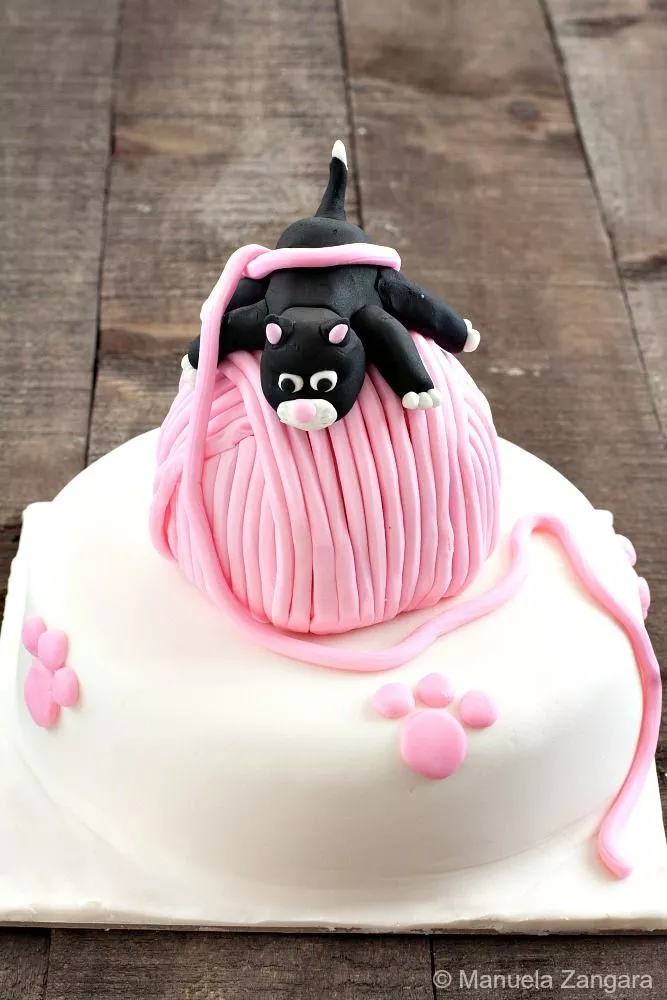
Step 4: Once the kitten is fully assembled, leave it to dry completely. When firm, stick it on top of the yarn of wool with some edible glue and set aside until needed.
Assembling the Cake
Step 1: The day before the party, prepare the base cake. Make icing for crumb coating (use your preferred recipe, but keep it slightly soft so it spreads easily). Remove the round yogurt cake from the freezer and level it with a sharp serrated knife while still frozen.
Step 2: Place some icing in the centre of the cake board and position the cake (smooth side up). Cover the top and sides with a thin crumb coat, smoothing with a spatula. Chill to harden.
Note: You can also crumb coat the cake before transferring it to the board. This helps the fondant sit smoothly and prevents crumbs from showing through.
Decorating and Finishing
Step 1: Once the icing has set, roll out the white fondant and cover both the cake and the cake board. Smooth with a fondant smoother and trim off the excess. Let it dry for a couple of hours.
Step 2: Attach the yarn ball to the top of the cake with edible glue. Roll out small fondant circles for the paw prints and stick them onto the cake.
Step 3: Finish with an extra fondant string that wraps around the kitten and drapes down one side of the cake.
Frequently Asked Questions
Yes. Bake and freeze the Yogurt Cakes up to a month ahead. Wrap them well and defrost overnight while still covered. Make the kitten and yarn a day or two before the party so they have time to dry.
It helps create even fondant strings, but you can roll thin ropes by hand. Keep the fondant covered between batches so it doesn’t dry out.
Yes, as long as it’s smooth and easy to spread. Chill the cake briefly after coating to firm it up before covering with fondant.
Use a pliable fondant for covering and a slightly firmer one for shaping figures. Add a little Tylose powder if your fondant feels too soft.
Extra Help from the Kitchen
Keep the Fondant Soft – Knead the fondant well before rolling so it stays smooth and doesn’t crack. If it feels dry, warm it in your hands or add a little shortening to restore elasticity.
Support the Yarn Ball – Insert a short wooden skewer through the centre into the base cake to keep the fondant ball steady, especially when moving the cake.
Use a Small Brush for Glue – Apply edible glue lightly with a fine brush to avoid streaks or shiny patches on the fondant.
Test Colour Before Mixing Large Batches – Food gel darkens as it rests, so test a small piece first before tinting all your fondant.
Keep Surfaces Clean – Wipe your tools and work surface before rolling fondant to prevent dust or colour transfer.
Variations and Twists
Make a Chocolate Base – Use a chocolate sponge instead of the Yogurt Cake. Bake in the same pans and follow the same steps for levelling, icing, and decorating. The darker base gives a lovely contrast to the pastel fondant.
Create a Different Animal Theme – Shape the fondant into a puppy, bunny, or bear using the same method. Adjust the ears, paws, and nose shapes to match the chosen animal.
Try Different Fondant Colours – Replace the pink yarn with other shades such as lilac, mint, or pale blue. Colour small portions of fondant at a time to avoid waste and drying.
Use Buttercream with Fondant Details – Cover the cake in smooth buttercream instead of fondant, then add the fondant yarn ball and kitten decorations on top. Keep the cake refrigerated in warm weather to preserve the details.
Storage and Shelf Life
Store the finished Playful Kitten Cake in a cool, dry place away from direct sunlight and humidity. Keep it under a cake dome or inside a cardboard cake box at room temperature. Avoid refrigerating once covered in fondant, as moisture can soften the surface and cause colours to run.
The decorated cake will keep well for about 3 days at room temperature. Leftover slices can be stored in an airtight container for 2–3 days or wrapped tightly and frozen for up to a month.
Adorable Themed Cakes to Try at Home
Playful Kitten Cake Recipe
Delight every cat lover at your next celebration with this Playful Kitten Cake, a soft, sweet, and wonderfully detailed fondant creation that’s almost too cute to slice.
Ingredients
- 1½ yogurt cakes*
- Coloured fondant – white, pink, black
- Edible glue
- Icing – for crumb coating
- Icing sugar or corn starch – for dusting
Instructions
Making the Yarn Ball
-
Bake the yogurt cakes in advance and freeze them until needed.
-
Begin with the yarn of wool. Level and sandwich the two half-spherical cakes to form a ball. Cover it with a thin layer of vanilla icing and refrigerate to harden slightly.
-
Roll out pink fondant and cover the cake ball. Don’t worry about making it perfectly smooth, as it will be covered by the fondant strings later.
-
Load a sugarcraft gun with fondant and use the medium round disc. Push out long fondant strings and lay them close together. Trim one end into a small triangle, as shown in the photos. Brush edible glue on one side of the cake ball and attach the triangle end. Repeat on the opposite side.
-
Make more fondant strings with the sugarcraft gun. Brush the ball with edible glue and lay the strings across it. Repeat in the opposite direction until the entire ball is covered. Let it firm up slightly. Keep any leftover fondant to make extra strings later.
Shaping the Kitten
-
To make the kitten, roll some fondant into a teardrop shape for the body. Roll a ball for the head, four little sausages for the legs, and a thinner one for the tail. Stick them all together with edible glue, then make two small triangles for the ears.
-
Roll three tiny white fondant balls for each leg to form the paws and attach them with glue. For the eyes, roll a small white ball and add a smaller black ball on top.
-
For the mouth, roll a small white fondant ball, flatten it, and use an X-Acto knife to make thin whisker cuts. Use a little pink fondant for the inside of the ears and the nose.
-
Once the kitten is fully assembled, leave it to dry completely. When firm, stick it on top of the yarn of wool with some edible glue and set aside until needed.
Assembling the Cake
-
The day before the party, prepare the base cake. Make icing for crumb coating (use your preferred recipe, but keep it slightly soft so it spreads easily). Remove the round yogurt cake from the freezer and level it with a sharp serrated knife while still frozen.
-
Place some icing in the centre of the cake board and position the cake (smooth side up). Cover the top and sides with a thin crumb coat, smoothing with a spatula. Chill to harden.
Note: You can also crumb coat the cake before transferring it to the board. This helps the fondant sit smoothly and prevents crumbs from showing through.
Decorating and Finishing
-
Once the icing has set, roll out the white fondant and cover both the cake and the cake board. Smooth with a fondant smoother and trim off the excess. Let it dry for a couple of hours.
-
Attach the yarn ball to the top of the cake with edible glue. Roll out small fondant circles for the paw prints and stick them onto the cake.
-
Finish with an extra fondant string that wraps around the kitten and drapes down one side of the cake.
Recipe Notes
*Baked in one 18 cm – 7 inches deep round pan and two 6 cm – 2.5 inches half-sphere pans; one cake may be enough.


This is too cute for words. I wish I had a mother who could make a cake like that! 🙂
*GASP* No way!! I can’t believe you made this!! As I sadly lack talent in the baking area, I have such admiration for creations that people come up with! This is GORGEOUS! Your daughter must have been THRILLED! I would be thrilled if someone made this for ME!!!