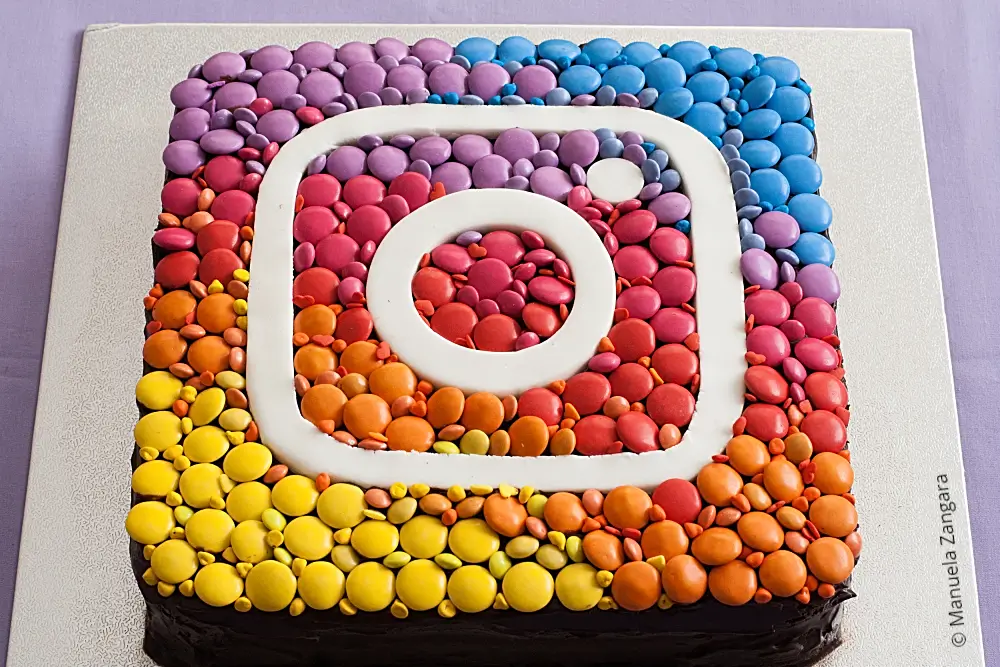
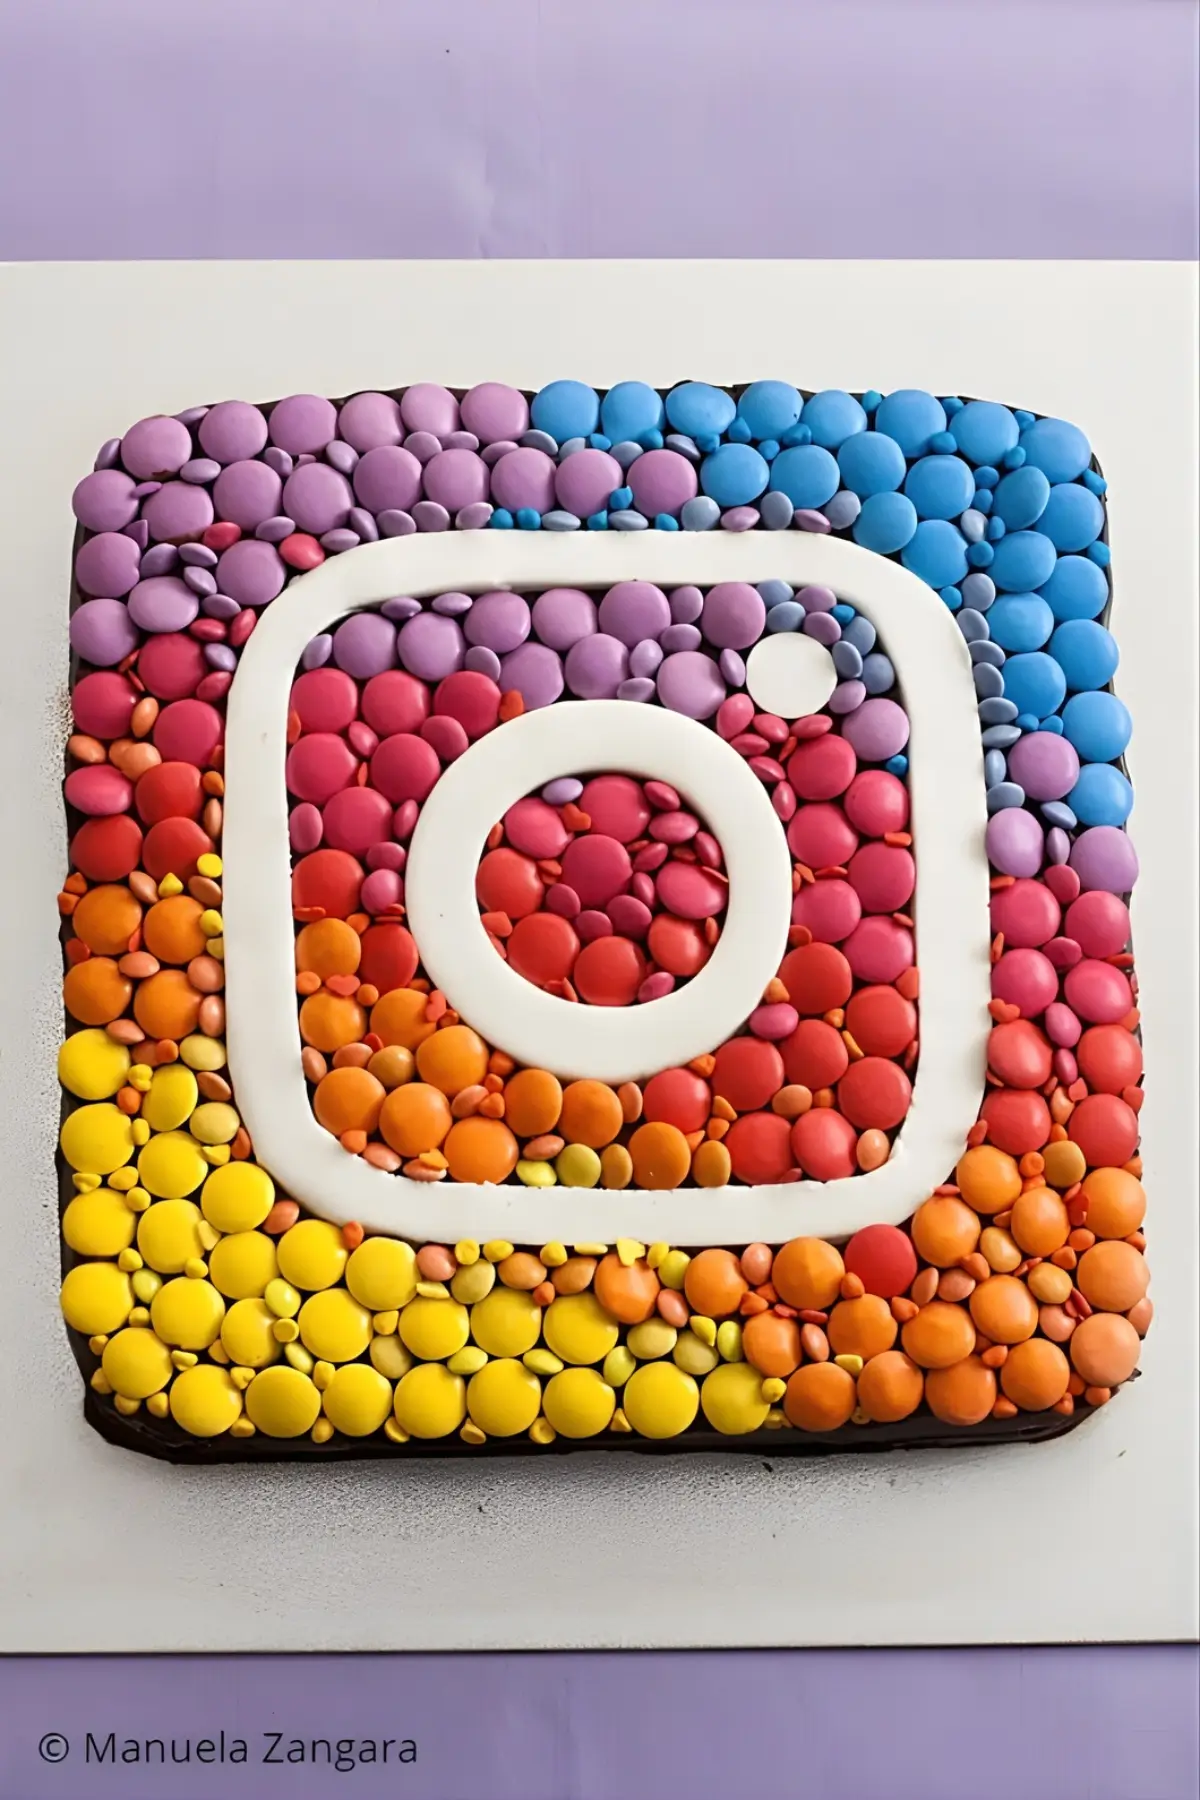
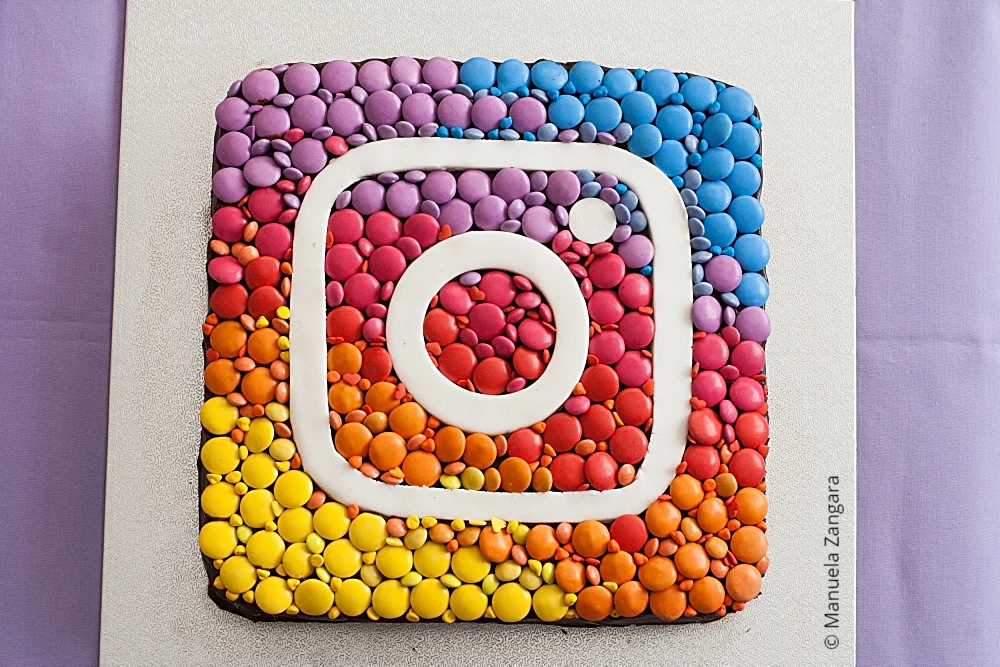
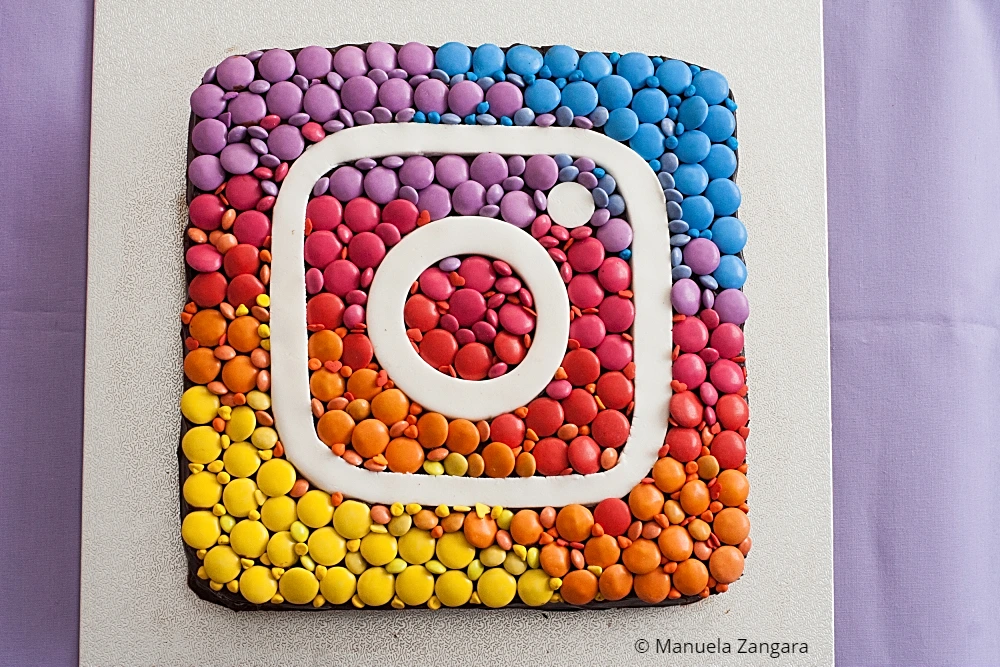
Thick brownie layers, smooth chocolate ganache, and colourful toppings give Instagram Cake a rich chocolate hit made for birthdays and busy party tables.
My youngest daughter recently turned 9, and I made this Instagram Cake for her birthday party. Needless to say, she loved it.
My little one is a chocoholic and a real “brownie monster”, so this cake felt like an obvious choice. It is essentially a double brownie, covered in chocolate ganache and topped with coloured chocolates.
Besides the taste, what I really appreciated was how easy it was to make. If you follow me on Instagram, you may know that we have just returned from travelling around Japan. We got home the day before my daughter’s birthday, yet I was still able to put this cake together without much effort.
The brownie layers can be made in advance and frozen, which is exactly what I did. The fondant decoration works best when prepared the day before, as it needs time to dry so it can be moved easily onto the cake.
On the day of the party, all I had left to do was assemble and decorate. The most time-consuming part was sorting the chocolate Smarties by colour, so I would recommend doing that ahead of time.
All in all, it is one of the easiest cakes I have ever made, and I think it looks pretty good too. Don’t you love it when you can get maximum results with minimal effort?
Why Make Instagram Cake for Your Next Party
- Bakes into dense, fudgy brownie layers that stay firm enough to stack while keeping a soft centre once sliced.
- Pairs easily with a scoop of ice cream, a spoon of whipped cream, or a handful of fresh berries.
- Holds up well at room temperature during serving, so slices stay neat and appealing on the table.
Key Ingredients for Instagram Cake
Dark Chocolate
Dark chocolate gives the brownies and ganache their rich cocoa taste and slightly bitter edge, which keeps the cake from tasting too sweet. A good-quality chocolate with around 60–70% cocoa works well and melts smoothly.
Butter
Butter adds richness and helps the brownies bake up dense rather than cakey. Unsalted butter is a good choice here, especially when working with dark chocolate, as it keeps the flavours balanced.
Cocoa Powder
Cocoa powder deepens the chocolate flavour and gives the brownies a darker colour. Natural cocoa powder works well, while Dutch-processed cocoa can be used for a slightly smoother taste.
Heavy Cream
Heavy cream is used to make the ganache smooth and spreadable, setting neatly over the chilled brownies. Full-fat cream gives the most reliable texture and finish.
Find the complete list with measurements in the recipe card below.
How to Make Instagram Cake
Brownie Cakes
Step 1: Put the butter and chocolate into a bowl and melt them in the microwave using short intervals. Start with 30 seconds, mix well, then microwave again for 20 seconds, or until fully melted. Mix and set aside to cool slightly.
Step 2: Sift the flour and cocoa powder together, then set aside.

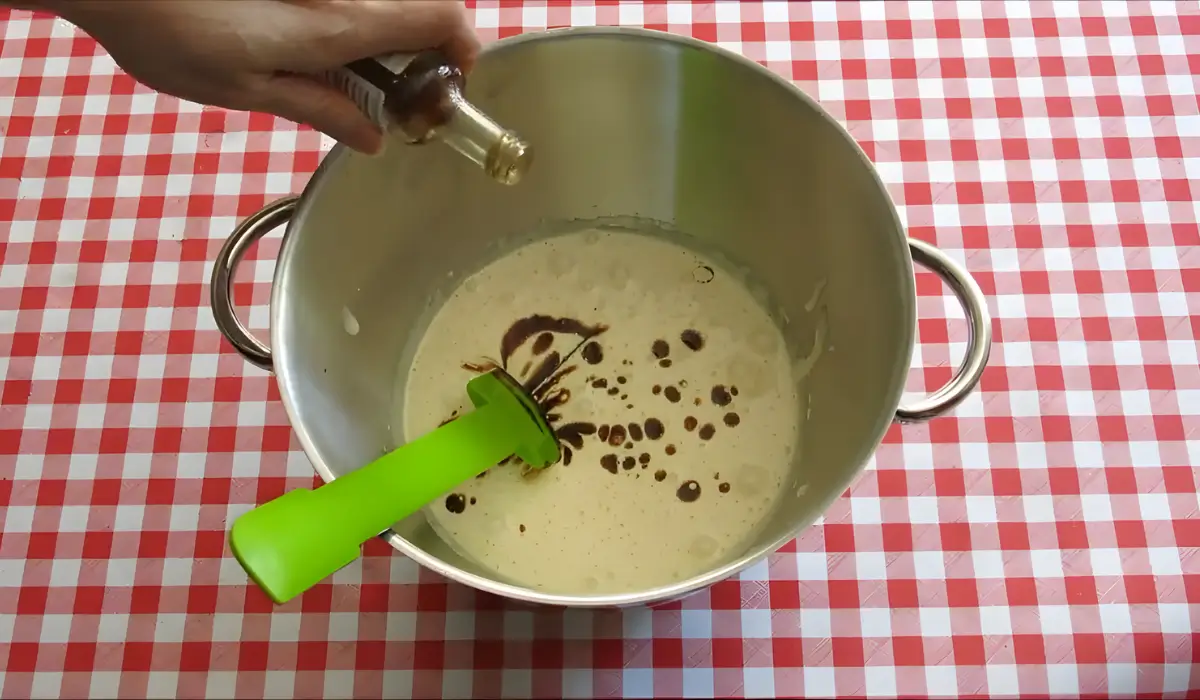
Step 3: Put the eggs and sugar into a bowl and beat with an electric mixer until almost doubled in size and very light and fluffy, at least 7 minutes. Add the vanilla extract and mix briefly to combine.
Step 4: Pour the chocolate mixture into the egg mixture and gently fold together using large, round figure-of-eight movements.
Step 5: Re-sift the flour and cocoa mixture evenly over the chocolate mixture and fold together, again using the figure-of-eight action.
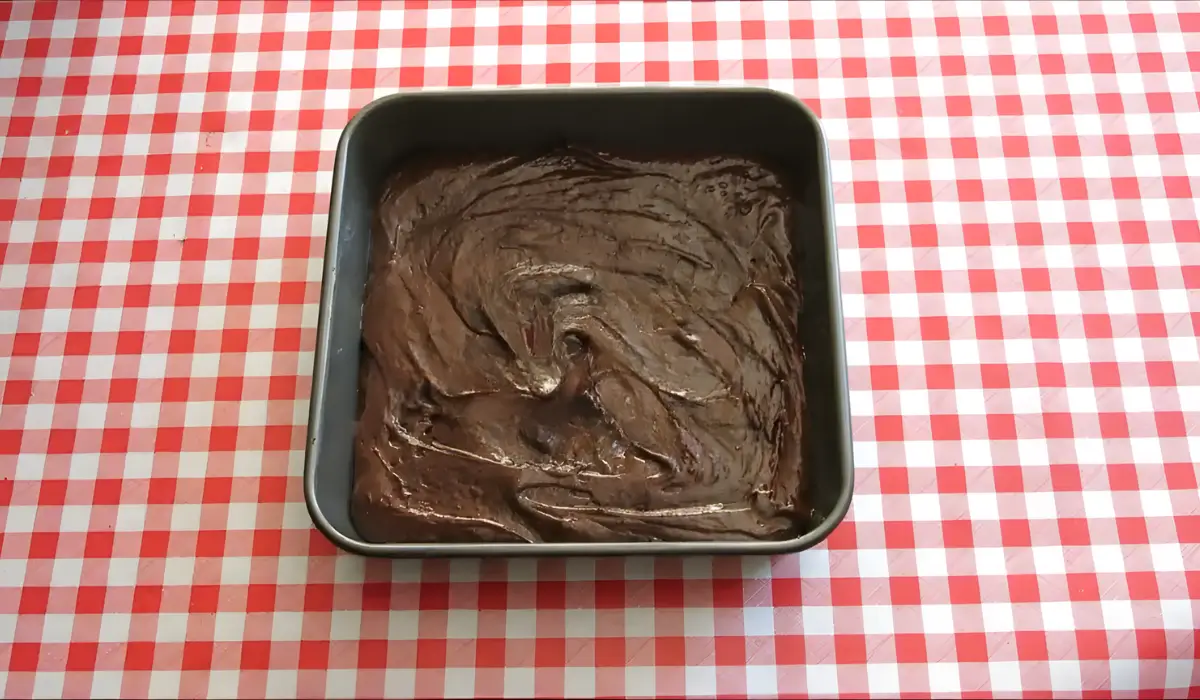
Step 6: Pour the mixture into 2 brownie tins sprayed with cooking spray and lined on the base with baking paper.
Step 7: Bake in a preheated oven at 160°C – 320°F for 20–25 minutes. The top should look slightly flaky, and the centre should spring back lightly when touched. Leave to cool completely in the tins.
Step 8: Once cold, wrap each brownie individually in aluminum foil and freeze. Working with frozen brownies makes trimming much easier.
Fondant Decoration
Step 1: Print your Instagram template, making sure it is scaled to the size of your brownie. Cut out the white outline from the template.
Step 2: Sprinkle cornflour onto your bench and roll out the fondant until thick. Place the template over the fondant and use an exacto knife to cut around it. Use circle cutters to cut the two circles of the Instagram logo, then set them aside.
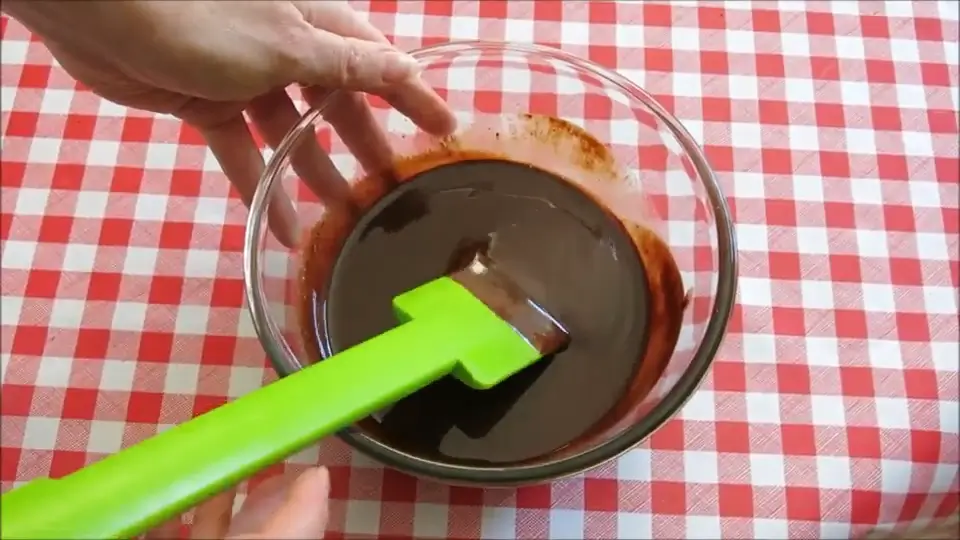
Chocolate Ganache
Step 1: Heat the cream until hot but not boiling.
Step 2: Pour the hot cream over the chocolate chunks and leave to sit, without stirring, for 5 minutes. Then mix until smooth.
Assembling
Step 1: Remove the brownie cakes from the freezer.
Note: If the cakes have straight corners, use a sharp knife to round off the edges so they take the shape of the Instagram logo.
Step 2: Set the top brownie aside. Spread a small amount of ganache onto a cake board and place the base brownie layer on top. Use an offset spatula to spread the ganache evenly over the base layer, then place the top brownie layer on top.
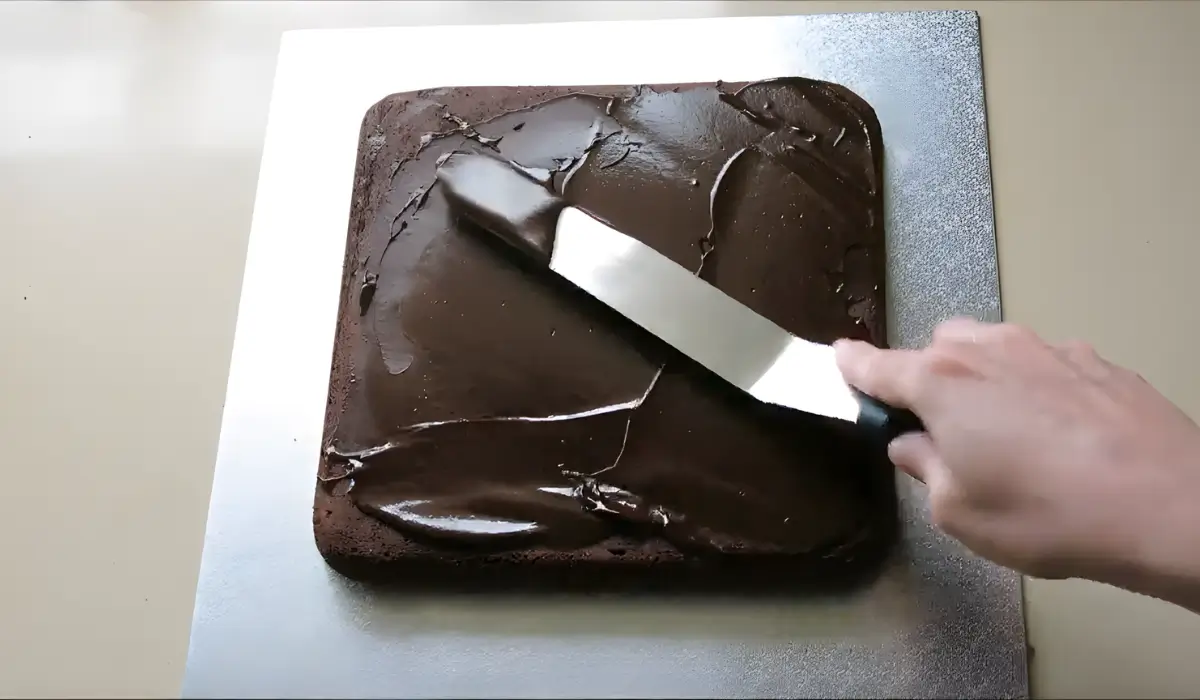
Step 3: Cover the top and sides of the brownie with ganache. Set aside and work quickly, as the frozen brownies will help the ganache set.
Step 4: Place the fondant over the brownie.
Step 5: Arrange the candies over the brownie top, dividing them by colour.
Step 6: Serve.
Frequently Asked Questions
Milk chocolate can be used, but the result will be sweeter and softer. Dark chocolate gives a more balanced flavour and a firmer ganache.
Work with well-chilled brownie layers and slightly thickened ganache, then spread it in smooth, even strokes using an offset spatula. Decorating once the ganache has set a little helps keep the finish neat.
Yes. Mini chocolate buttons, chopped chocolate bars, or sugar-coated chocolates work well and keep the same playful look.
Chopped walnuts, pecans, chocolate chips, or small chocolate chunks can be folded into the batter to add texture without affecting how the cake bakes or stacks.
Extra Help from the Kitchen
Use Straight-Sided Tins – Choose square tins with straight sides to help the brownies bake evenly and make trimming cleaner when shaping the cake.
Line Tins Well – Leave overhanging baking paper on two sides so the brownies can be lifted out easily without cracking.
Cool Chocolate Slightly – Allow the melted chocolate to cool a little before folding it into the eggs to avoid affecting the batter structure.
Re-Sift Dry Ingredients – Sift the flour and cocoa directly over the batter to distribute them evenly and prevent dense patches.
Warm the Spatula – Warm the offset spatula briefly before spreading the ganache to achieve a smoother finish.
Variations and Twists
Add Fresh Berries and Ganache Finish – Scatter fresh strawberries, raspberries, or blueberries over the brownie layers before covering with ganache, then add a few berries on top once the ganache has set.
Box-Mix Shortcut – Replace the scratch brownie batter with a combination of boxed chocolate cake mix and boxed brownie mix, then finish with homemade ganache. This shortens preparation time while keeping the same layered look and chocolate finish.
Add Espresso Powder to the Batter – Stir 1–2 teaspoons of instant espresso powder into the brownie batter before baking to deepen the chocolate flavour.
Nut or Chocolate Chip Addition – Fold chopped walnuts, pecans, or chocolate chips into the brownie batter before baking.
Mini Individual Brownie Cakes – Bake the batter in small individual tins or mini bundt moulds instead of large pans, then top each with ganache. Individual portions make serving easier and work well for parties or dessert tables.
Storage and Shelf Life
Store the assembled Instagram Cake in the refrigerator, covered, for up to 3–4 days. The brownie layers can be wrapped tightly in aluminum foil and frozen for up to 1 month before assembly.
Thaw frozen brownies overnight in the refrigerator, then assemble and decorate as directed. For the best texture and flavour, bring the cake to room temperature before serving.
More Fun Birthday Cake Ideas
Instagram Cake Recipe
Thick brownie layers, smooth chocolate ganache, and colourful toppings give Instagram Cake a rich chocolate hit made for birthdays and busy party tables.
Ingredients
Brownie Cake
- 250 g – 1 cup butter
- 270 g – 9.5 oz dark chocolate
- 120 g – 1 cup all-purpose flour
- 50 g – ½ cup cocoa powder
- 4 eggs
- 360 g – 1½ cups caster sugar
- 2 tsp vanilla extract
Chocolate Ganache
- 300 g – 10.5 oz dark chocolate
- 150 ml – ⅔ cup heavy cream
Decoration
- white fondant
- coloured Smarties
- mini coloured Smarties
- sugar hearts
- small coloured chocolates
Instructions
Brownie Cakes
-
Put the butter and chocolate into a bowl and melt them in the microwave using short intervals. Start with 30 seconds, mix well, then microwave again for 20 seconds, or until fully melted. Mix and set aside to cool slightly.
-
Sift the flour and cocoa powder together, then set aside.
-
Put the eggs and sugar into a bowl and beat with an electric mixer until almost doubled in size and very light and fluffy, at least 7 minutes. Add the vanilla extract and mix briefly to combine.
-
Pour the chocolate mixture into the egg mixture and gently fold together using large, round figure-of-eight movements.
-
Re-sift the flour and cocoa mixture evenly over the chocolate mixture and fold together, again using the figure-of-eight action.
-
Pour the mixture into 2 brownie tins sprayed with cooking spray and lined on the base with baking paper.
-
Bake in a preheated oven at 160°C – 320°F for 20–25 minutes. The top should look slightly flaky, and the centre should spring back lightly when touched. Leave to cool completely in the tins.
-
Once cold, wrap each brownie individually in aluminum foil and freeze. Working with frozen brownies makes trimming much easier.
Fondant Decoration
-
Print your Instagram template, making sure it is scaled to the size of your brownie. Cut out the white outline from the template.
-
Sprinkle cornflour onto your bench and roll out the fondant until thick. Place the template over the fondant and use an exacto knife to cut around it. Use circle cutters to cut the two circles of the Instagram logo, then set them aside.
Chocolate Ganache
-
Heat the cream until hot but not boiling.
-
Pour the hot cream over the chocolate chunks and leave to sit, without stirring, for 5 minutes. Then mix until smooth.
Assembling
-
Remove the brownie cakes from the freezer.
Note: If the cakes have straight corners, use a sharp knife to round off the edges so they take the shape of the Instagram logo.
-
Set the top brownie aside. Spread a small amount of ganache onto a cake board and place the base brownie layer on top. Use an offset spatula to spread the ganache evenly over the base layer, then place the top brownie layer on top.
-
Cover the top and sides of the brownie with ganache. Set aside and work quickly, as the frozen brownies will help the ganache set.
-
Place the fondant over the brownie.
-
Arrange the candies over the brownie top, dividing them by colour.
-
Serve.
Recipe Notes
Prepare the fondant decoration the day before so it has enough time to dry and can be placed on the cake without deforming.


wow its amazing work by you. I Really Appreciate by making this cake..
https://www.twohandsbar.com.au/