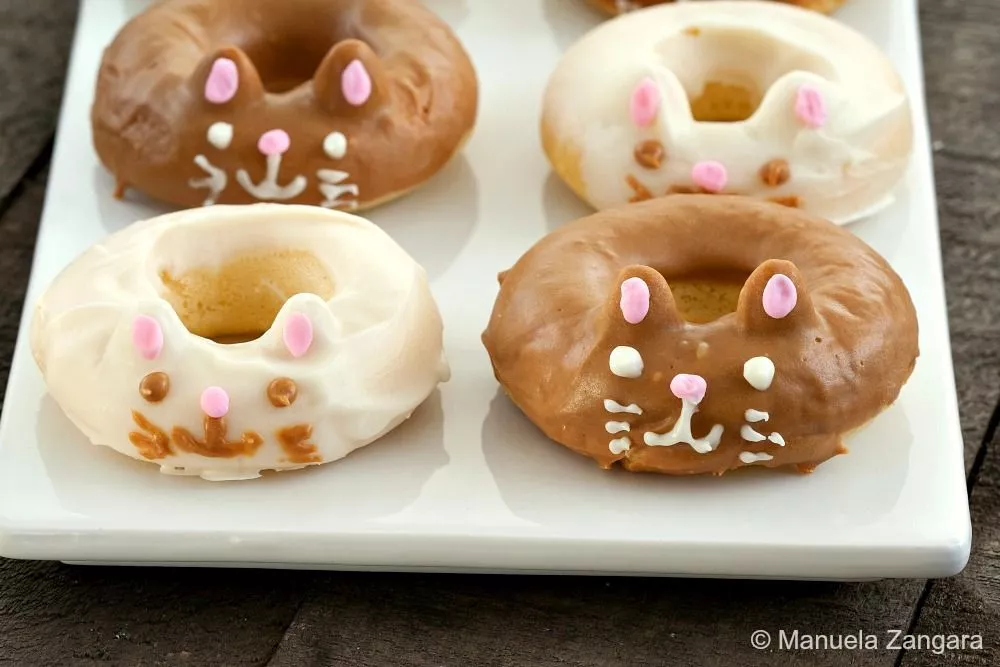
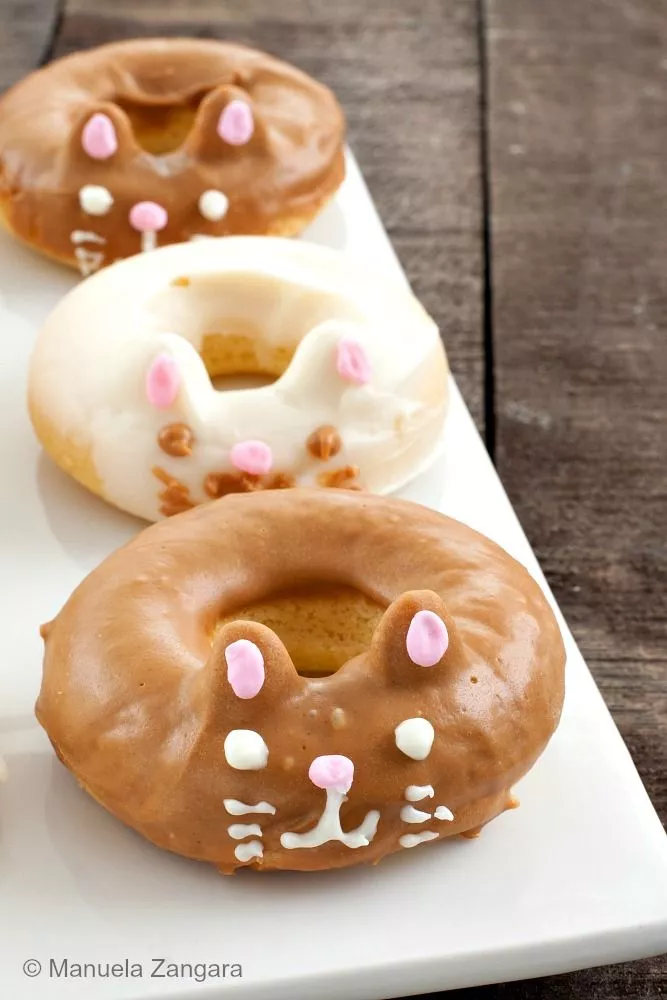
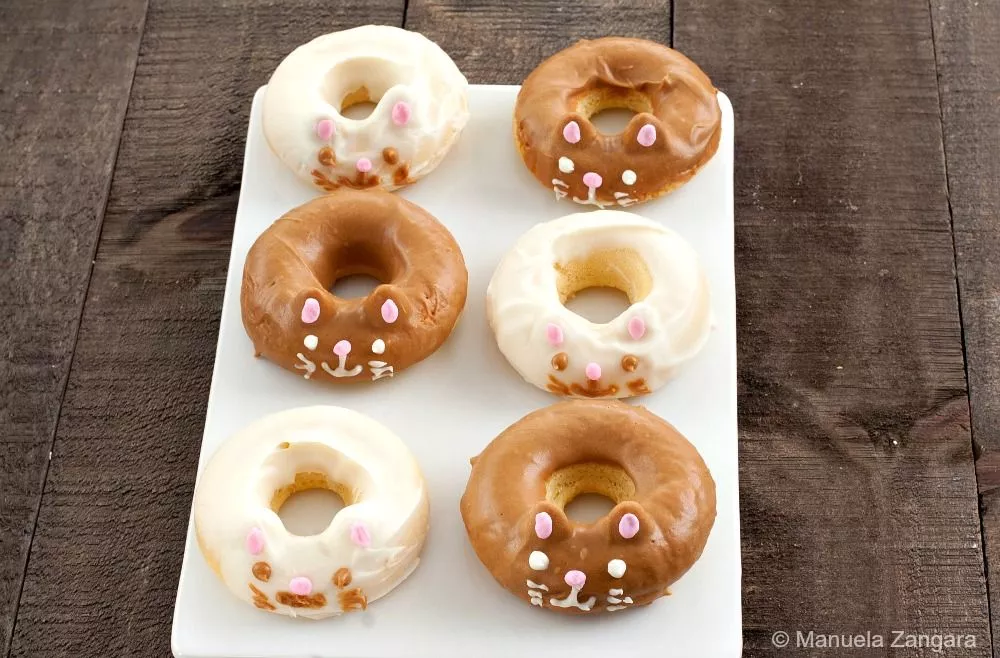
Soft, moist, and dipped in candy melts, these Kitty Cat Doughnuts are decorated with fondant and almonds. A fun bake that will have everyone purring with happiness.
I first came across these Kitty Cat Doughnuts while planning my 5-year-old’s kitten-themed birthday party. They looked so adorable, and I couldn’t resist trying to make them at home.
I must admit, I had never been fond of doughnuts before. The ones I had tried from shops were always far too sweet and a little stale, so baking them myself had never crossed my mind. In fact, I didn’t even own a doughnut pan until I ordered one especially for this recipe.
When it finally arrived, I baked a batch and was thrilled with the result! They turned out soft and moist, and even when frozen ahead of the party, they kept their texture once thawed. Almonds became ears, candy melts made the coating, and fondant gave them their playful faces. My girls were over the moon, and the guests couldn’t resist them either!
Why These Homemade Doughnuts Are Worth Baking
- Baking instead of frying makes them a lighter baked doughnuts recipe, yet still deliciously soft.
- Freezer-friendly recipe saves time, letting you prepare well in advance of celebrations.
- Flexible enough to adapt with seasonal colours, themes, or holiday decorations.
Key Ingredients for Kitty Cat Doughnuts
Caster Sugar
I use caster sugar because it blends easily into the batter, giving just the right level of sweetness without feeling too heavy.
Vanilla Extract
Vanilla brings warmth and a gentle flavour that makes these doughnuts taste homemade and comforting. A little goes a long way here.
Candy Melts
Use vanilla and peanut butter candy melts for dipping. They set well, add flavour, and make decorating fun and colourful.
Find the complete list with measurements in the recipe card below.
How to Make Kitty Cat Doughnuts
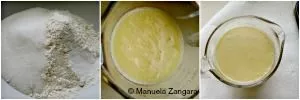
Step 1: Mix together the flour, baking powder, salt, and sugar in a mixing bowl.
Step 2: In a jug, whisk together the eggs, vanilla, oil, and milk until combined.
Step 3: Stir the wet ingredients into the dry mixture.
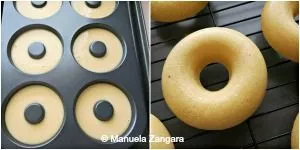
Step 4: If your tin is not non-stick, grease the holes with butter and coat them with a little flour. Spoon or pipe the batter into each hole (a measuring jug works well) until just over 3/4 full.
Step 5: Bake in a pre-heated oven at 160°C – 325°F for 9 minutes.
Step 6: As soon as possible (but without getting burnt!), ease the doughnuts out of the pan with your fingers. Don’t wait too long, because the cooler they get, the more likely they are to stick to the pan.
Step 7: Set the doughnuts aside to cool completely.
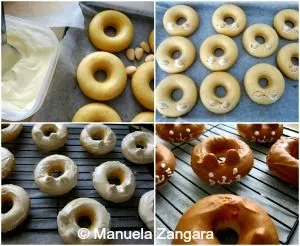
Step 8: Melt your candy melts into 2 deep, small dishes. Follow the instructions on the melts to do so.
Step 9: Dip the almond into the candy melts, and press it into the doughnuts to form the ears. Let the melts harden.
Step 10: Once the almonds are secure, dip the doughnuts into the candy melt, then turn them back over and let them sit on baking paper until the coating is dry. Make sure your bowl is deep enough to dip the doughnuts with the almonds sticking out.
Step 11: Once completely dry, use the other coloured candy melt (with a piping bag) to draw the faces. I also used pink fondant for the ears and noses.
Frequently Asked Questions
Yes, but it needs to be tempered to set firmly. Candy melts are easier since they harden quickly and stay glossy without extra steps.
A doughnut pan gives the best shape and is worth having if you plan to bake these often. Muffin tins can work, but the look will be different.
Yes, use oil-based food colouring for smooth results. Water-based colours can cause the melts to seize, so avoid those.
Extra Help from the Kitchen
Don’t Overmix the Batter – Once the wet and dry ingredients are combined, stir only until smooth. Overmixing can make the doughnuts dense instead of soft.
Tap the Pan Before Baking – After filling the tin, tap it gently on the counter to release air bubbles and help the doughnuts bake more evenly.
Check Bake Time with a Toothpick – Ovens vary, so check at 9 minutes with a toothpick. If it comes out clean, they’re ready; if not, bake for another minute.
Variations and Twists
Make Spooky Halloween Cats – Use black or dark candy melts and pipe little fangs or spooky eyes for a festive twist.
Try Nut-Free Ears – Swap almonds with small fondant triangles or wafer paper for a nut-free version.
Add Chocolate Flavour – Mix a little cocoa powder into the batter for chocolate doughnuts before decorating.
Dress Them for the Season – Add Santa hats for Christmas, pastel colours for Easter, or hearts for Valentine’s Day.
Storage and Shelf Life
Undecorated doughnuts can be stored in an airtight container at room temperature for 3-4 days. Once decorated with candy melts and fondant, they’re best enjoyed within 2 days, as the coating may soften.
For longer storage, freeze plain baked doughnuts for up to 2 weeks. Wrap them individually in cling film, then thaw at room temperature before dipping and decorating.
Serving Suggestions
Kitty Cat Doughnuts are perfect for children’s birthdays, kitten-themed parties, or as a fun activity with the kids during school holidays.
They also make a sweet kitten birthday party dessert, and when decorated with darker candy melts, they become playful Halloween doughnuts too.
More Fun Desserts to Try Next
Kitty Cat Doughnuts
Soft, moist, and dipped in candy melts, these Kitty Cat Doughnuts are decorated with fondant and almonds. A fun bake that will have everyone purring with happiness.
Ingredients
- 150 g – 5 oz. flour
- 110 g – 4 oz. caster sugar
- ½ tsp salt
- 1 tsp baking powder
- 120 ml – ½ cup milk
- 2 eggs
- 1 tsp vanilla extract
- 2 tsp vegetable oil
- 20 almonds
- Candy Melts – Vanilla and Peanut Butter – ½ bag each
- Pink fondant
Instructions
-
Mix together the flour, baking powder, salt, and sugar in a mixing bowl.
-
In a jug, whisk together the eggs, vanilla, oil, and milk until combined.
-
Stir the wet ingredients into the dry mixture.
-
If your tin is not non-stick, grease the holes with butter and coat them with a little flour. Spoon or pipe the batter into each hole (a measuring jug works well) until just over 3/4 full.
-
Bake in a pre-heated oven at 160°C – 325°F for 9 minutes.
-
As soon as possible (but without getting burnt!), ease the doughnuts out of the pan with your fingers. Don’t wait too long, because the cooler they get, the more likely they are to stick to the pan.
-
Set the doughnuts aside to cool completely.
-
Melt your candy melts into 2 deep, small dishes. Follow the instructions on the melts to do so.
-
Dip the almond into the candy melts, and press it into the doughnuts to form the ears. Let the melts harden.
-
Once the almonds are secure, dip the doughnuts into the candy melt, then turn them back over and let them sit on baking paper until the coating is dry. Make sure your bowl is deep enough to dip the doughnuts with the almonds sticking out.
-
Once completely dry, use the other coloured candy melt (with a piping bag) to draw the faces. I also used pink fondant for the ears and noses.


I love cats and cat shaped things. I just bought sunglasses, a ring, and headbands. These doughnuts are beyond cute!
These are SOOO CUTEEE!! Love them!
These are so adorable. 🙂 They make me smile. 🙂