Crisp, golden Dosa and Coconut Chutney come together as a simple, satisfying pairing, with thin, crisp layers and a smooth side for contrast.
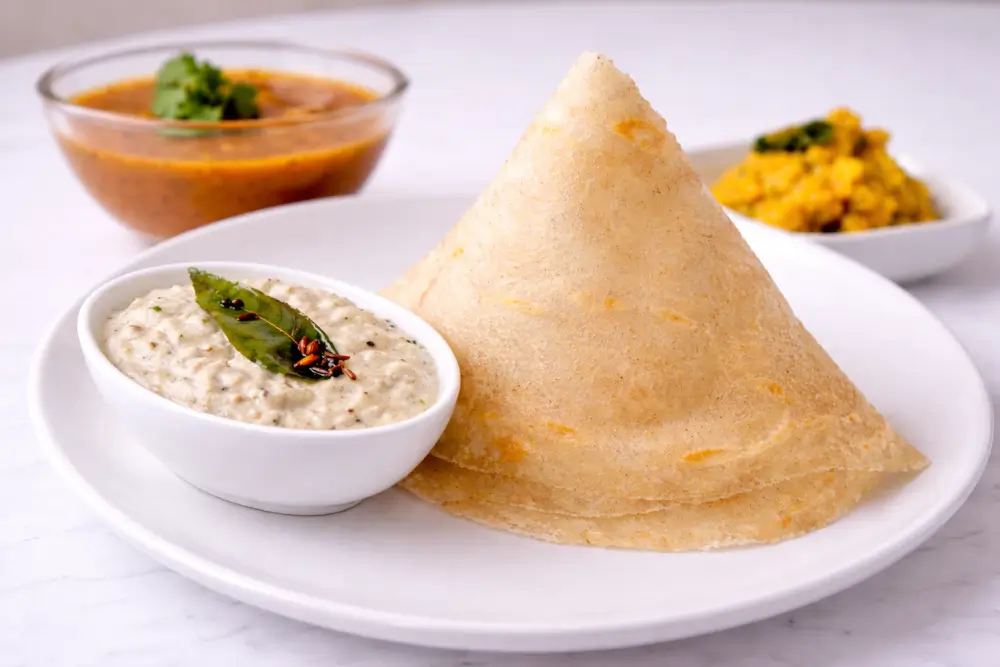
Dosa is a classic dish from South Indian cuisine made from a fermented batter of rice and lentils, cooked into paper-thin, crisp crêpes. Its texture and gentle tang from fermentation are what set it apart.
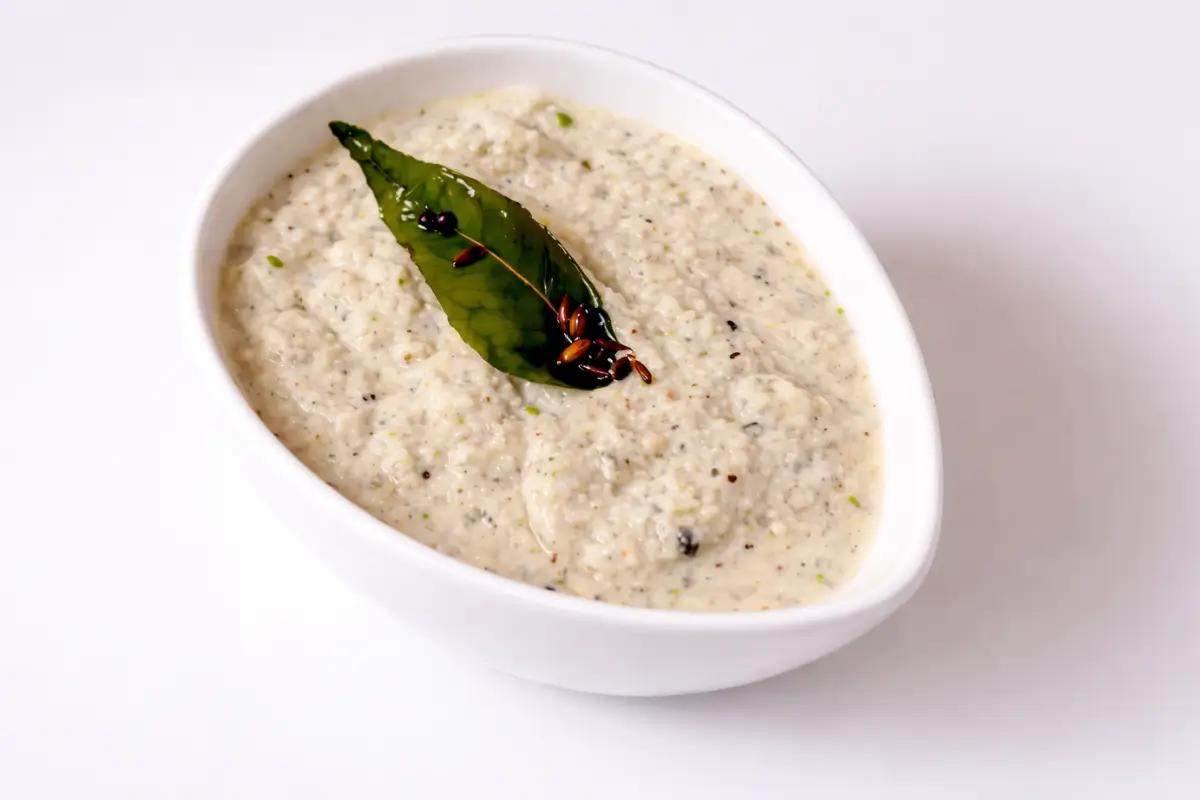
It’s often served with coconut chutney, a traditional South Indian condiment made with coconut, green chillies such as serrano, ginger, and curry leaves. Some versions also use dried red chillies and are finished with a tadka, or tempering, of mustard seeds and spices.

It can be served on its own with sambhar and coconut chutney, or filled with a spiced potato masala to make masala dosas. Most of the ingredients are easy to find at an Indian store, making it accessible even if you’re trying it for the first time.
This recipe focuses on a basic dosa made from scratch, along with a simple coconut chutney to go with it. Fermentation gives the batter its flavour and structure, and it needs time in a warm place to develop properly.
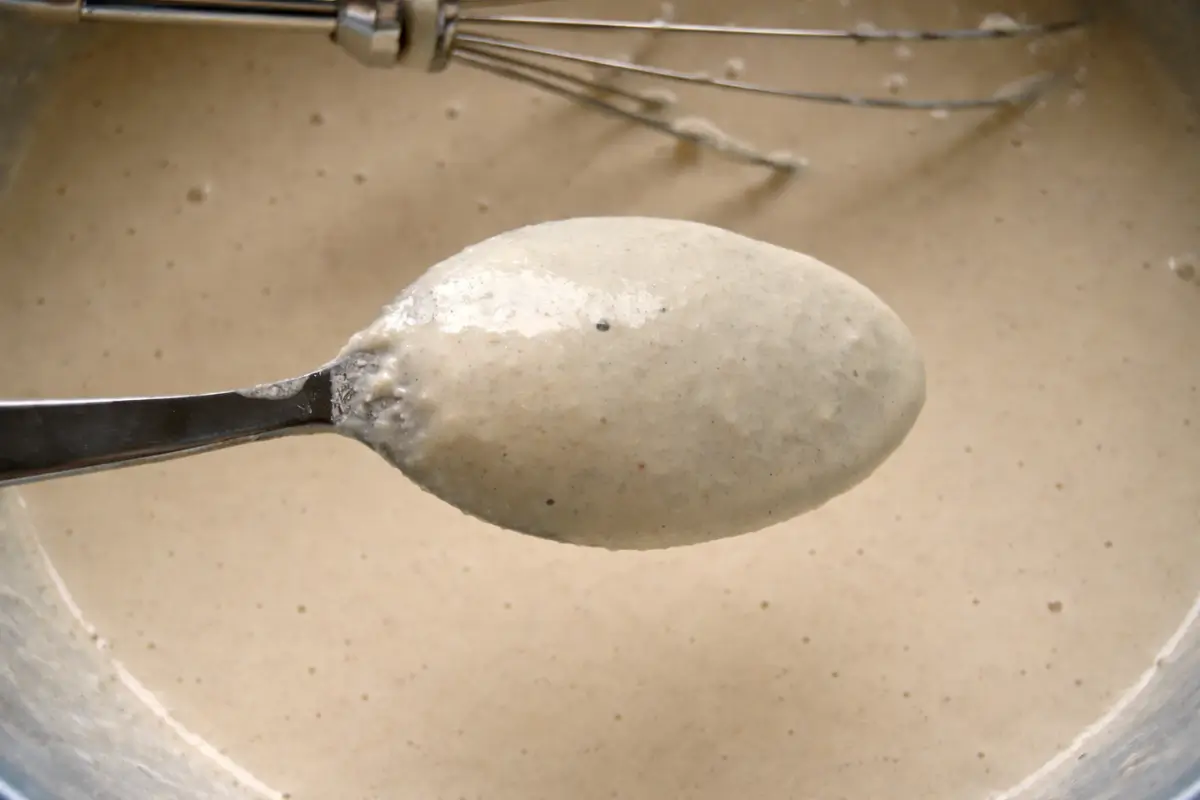
You’ll know it’s ready when the batter smells slightly sour, almost yeast-like, and looks light and foamy.
Enjoy!
Reasons to Make Dosa with Coconut Chutney
- Freezer storage works when you divide the batter into smaller portions ahead of time.
- Leftover chutney pairs with other dishes like idlis or snacks, so nothing goes to waste.
- Uses basic ingredients like rice and lentils, making it practical without needing hard-to-find items.
Key Ingredients for Dosa and Coconut Chutney
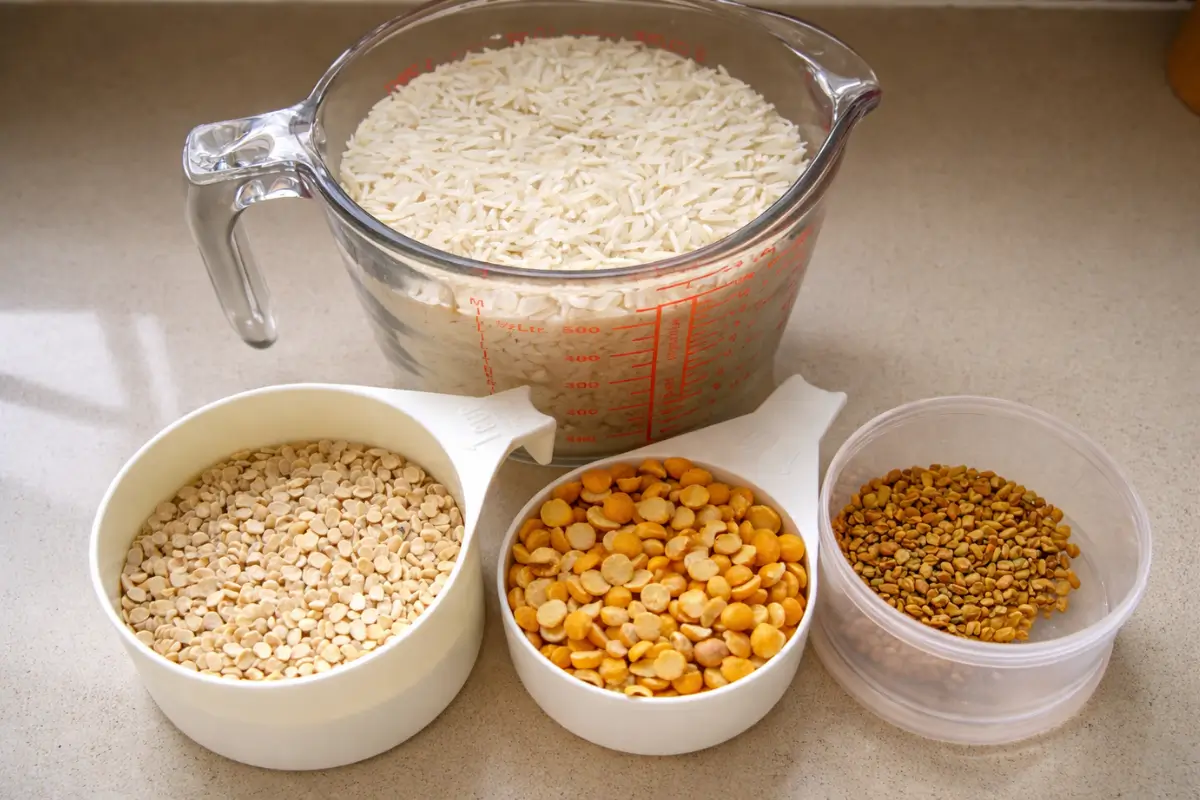
Rice
Gives the dosa its crisp texture when cooked thin on a hot surface. Regular short or medium grain rice works well, though idli or dosa rice can give a slightly better result if available.
Urad Dal and Channa Dal
Urad dal helps the batter ferment and gives a soft, light texture inside, while channa dal adds a mild nutty flavour and helps the dosa stay crisp without breaking.
Fenugreek Seeds
Fenugreek seeds help with fermentation and add a slight bitterness, which balances the overall flavour. They also help the batter spread more evenly.
Coconut Chutney
Brings a smooth, creamy texture from coconut, with mild sweetness balanced by light heat from green chilli and a savoury finish.
Find the complete list with measurements in the recipe card below.
How to Make Dosa and Coconut Chutney
For the Dosa Batter
Step 1: Place the rice in one bowl and cover it with water. In a separate bowl, add the urad dal, channa dal, and fenugreek seeds. Cover with water and leave both to soak for 6 hours.
Step 2: After 6 hours, drain the rice and lentils, making sure to preserve the soaking liquids as you’ll need them later. Blend everything together with some of the reserved liquids into a fine paste.
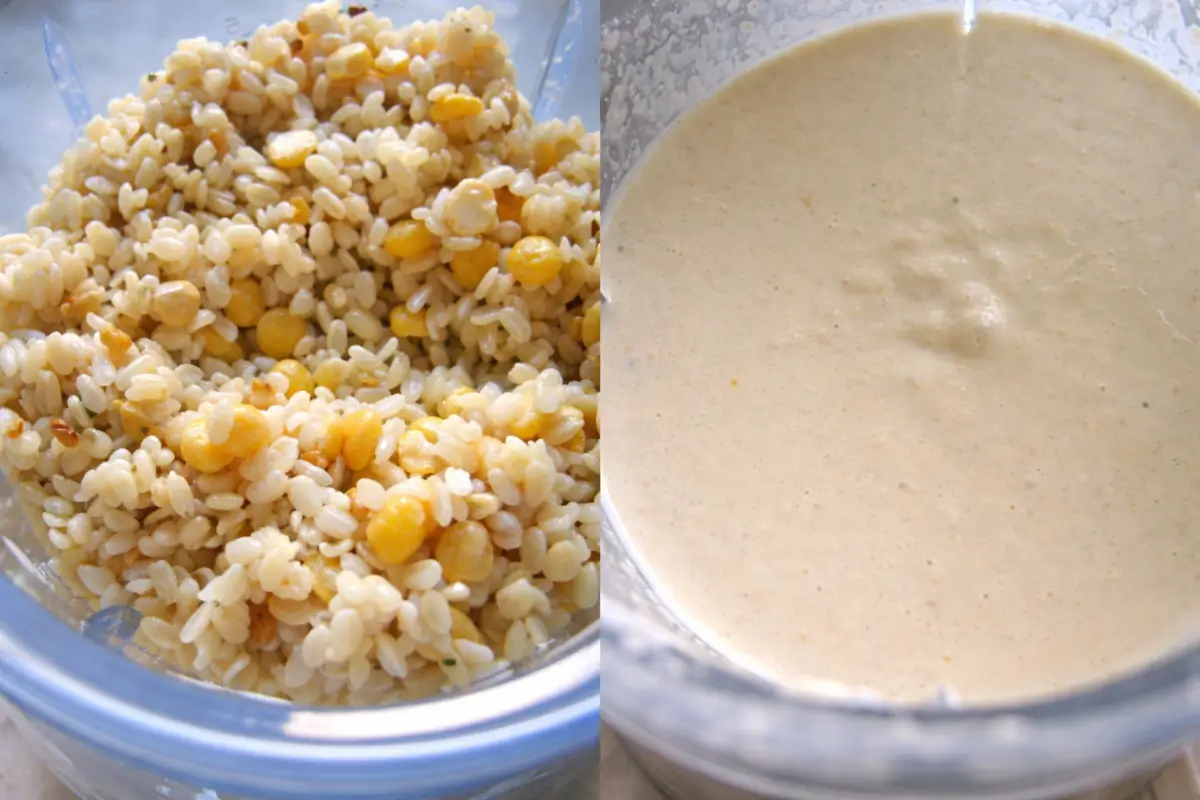
Note: For a crispier dosa, keep the batter slightly grainy instead of blending it completely smooth.

Step 3: Adjust the batter consistency by adding a little of the reserved liquids if needed. Use the soaking water instead of fresh water, as it helps with fermentation and gives better results in both flavour and texture.
Step 4: Leave the batter to ferment overnight in a warm place. Keep it warm by placing it in the oven with the heat turned off and covering it with thick towels.
Step 5: The next day, add salt and adjust the consistency with water or the reserved liquids until the batter is similar to a crêpe batter. Mix well and set aside.
Cooking the Dosas
Step 1: Spread the batter on a cold tawa or non-stick pan. Use a round cup to spread it in a circular motion to create a very thin layer, then turn the heat on. When small bubbles start forming, drizzle a little vegetable oil around the edges to help release the dosa.
Note: A cold tawa helps spread the batter more evenly. A regular-sized tawa works well, even without professional tools. You can refer to the original recipe on Vahrehvah to see how dosas are traditionally made.
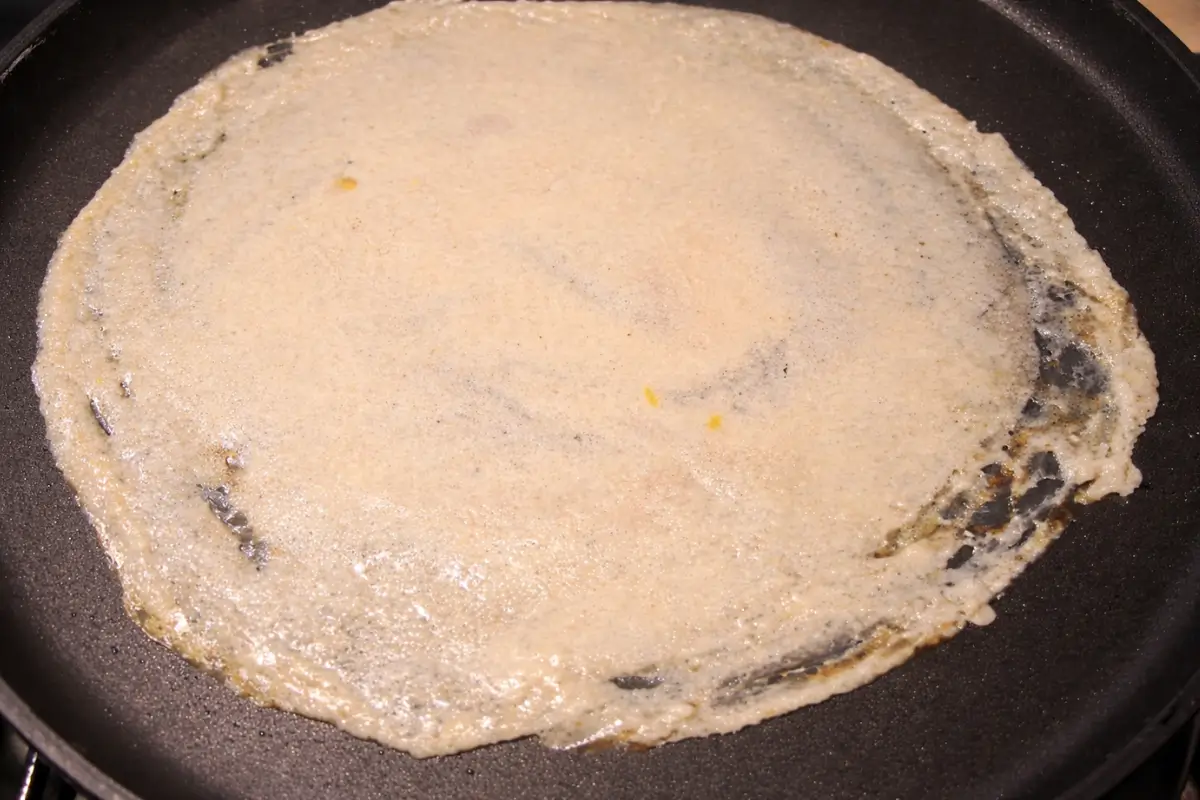
Step 2: Once the edges start to brown, fold the dosa into a half-moon, roll it into a cone, or leave it flat, depending on how you want to serve it.
Step 3: After making the first dosa, turn off the heat and cool the tawa with cold water. When the tawa is cold, make the next dosa.
Note: Dosas don’t need to be flipped and are ready when cooked on one side.
Step 4: Transfer to a plate and serve warm with sambhar or coconut chutney.
Coconut Chutney
Step 1: Grind the coconut, green chilli, ginger, curry leaves, and salt with 1–2 tablespoons of water until slightly chunky or smooth, depending on your preference, then transfer to a bowl.
Step 2: Heat the vegetable oil in a small frying pan. Add the mustard seeds. When they start popping, add the cumin seeds and curry leaves and fry for about 30 seconds over medium heat, making sure they don’t burn.
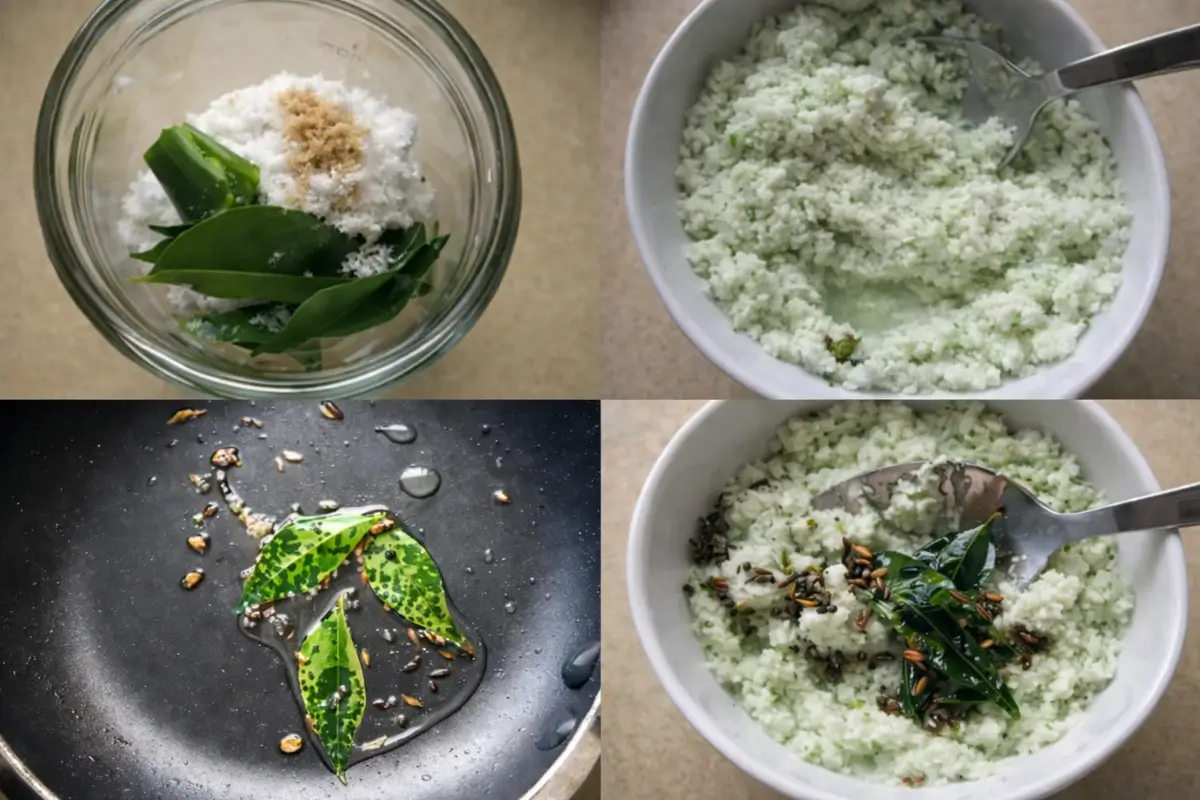
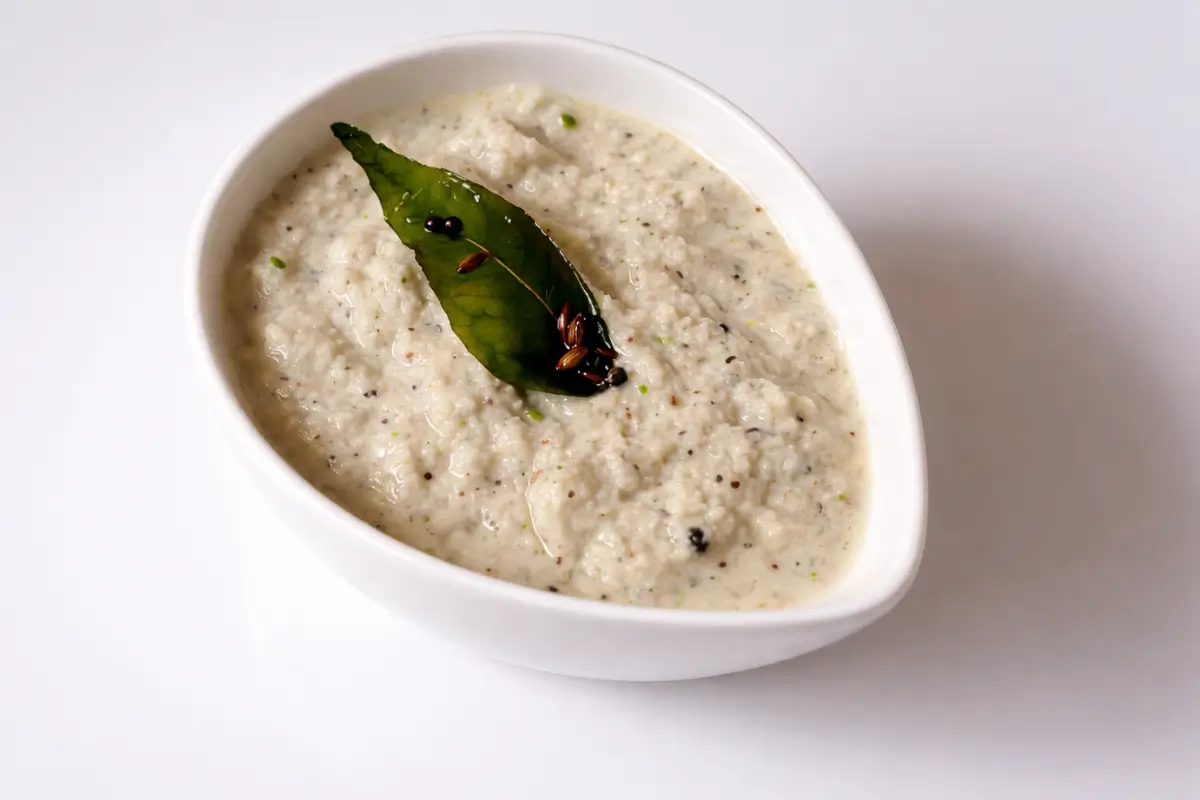
Step 3: Pour the hot tempering over the chutney and mix well.
Step 4: Adjust the consistency with a little water if needed, mixing gently until you reach your preferred thickness.
Step 5: Serve with Dosa, idlis, or other Indian snacks.
Frequently Asked Questions
Yes, both can be used for this coconut chutney recipe. Frozen coconut gives a texture closer to fresh, while desiccated or dried coconut works best when soaked briefly in warm water before blending to soften it and improve consistency.
Fenugreek seeds support fermentation and flavour, but the batter will still work without them. The final taste and texture may be slightly different.
Use a slightly thin batter and spread it evenly on a cold tawa before turning the heat on. Let it cook undisturbed until the edges turn golden, which helps develop a crisp surface.
Short or medium-grain rice works well for this recipe. Idli or dosa rice can give a slightly better texture, but regular rice still produces a good result.
A blender or grinder helps achieve a smooth batter and chutney, especially for proper fermentation and texture. A high-speed blender works well at home, though a traditional wet grinder can give a slightly better consistency.
Extra Help from the Kitchen
Add Water Gradually to the Chutney – Avoid adding too much water at once, as it can make the chutney runny and thin. Add water 1–2 tablespoons at a time while blending until it stays thick and spoonable.
Stir the Batter Gently Before Each Dosa – Stir the batter lightly before each pour to keep the consistency even as it rests. Avoid mixing too aggressively, as this reduces the light texture from fermentation.
Keep the Chutney Covered – Transfer the chutney to a covered bowl once prepared and keep it sealed until serving. This keeps the texture smooth and prevents the surface from drying out.
Use Fresh Curry Leaves for Tempering – Use fresh curry leaves when preparing the tempering, as they release more flavour in hot oil. Add them directly to the oil to bring out their full taste.
Serve Dosa Immediately After Cooking – Remove each dosa from the pan and serve straight away while still hot. This keeps the edges crisp and prevents them from softening as they sit.
Variations and Twists
Masala Dosa – Spread the spiced potato filling over the dosa once the base is cooked, then fold while still hot so it holds its shape.
Ragi Dosa – Replace part of the rice with ragi flour or whole ragi to create a slightly darker dosa with a softer texture and a mild earthy taste. Adjust the batter consistency as needed.
Cucumber Dosa – Mix finely grated cucumber into the batter before cooking to add moisture and create a softer texture. Reduce the added water slightly to maintain the right consistency.
Peanut Coconut Chutney – A handful of roasted peanuts makes the chutney thicker and slightly richer, while keeping its smooth consistency.
Tamarind Coconut Chutney – Stir tamarind into the chutney to give it a sharper, tangy taste that works well with the coconut.
Storage and Shelf Life
Store dosa batter in an airtight container in the refrigerator for up to 3–5 days, as it will continue to ferment slowly over time.
Coconut chutney should be kept in a sealed container in the fridge and used within 1–2 days to maintain its texture.
Freezing works best for the batter. It can be stored in portions and thawed in the refrigerator. Let the frozen batter thaw fully and bring it closer to room temperature, then cook as usual. Reheat dosa on a hot pan to bring back some crispness.
More Delicious Indian Dishes to Try Next
Dosa and Coconut Chutney Recipe
Equipment
Ingredients
Dosas
- 400 g – 2 cups rice
- 50 g – ¼ cup channa dal
- 200 g – 1 cup urad dal
- 10 –12 g – 1 tbsp fenugreek seeds
- vegetable oil – as needed
- salt – as needed
- water – as needed
Coconut Chutney
- 80 –100 g – 1 cup coconut – fresh coconut, frozen coconut, or desiccated coconut
- 1 green chilli
- 10 –12 curry leaves
- 5 g – 1 tsp ginger paste
- salt – to taste
Tempering
- ¼ tsp mustard seeds
- ¼ tsp cumin seeds
- 6 –7 curry leaves
- 15 ml – 1 tbsp vegetable oil
Instructions
For the Dosa Batter
- Place the rice in one bowl and cover it with water. In a separate bowl, add the urad dal, channa dal, and fenugreek seeds, then cover with water and leave both to soak for 6 hours.
- After 6 hours, drain the rice and lentils, making sure to preserve the soaking liquids as you’ll need them later. Blend everything together with some of the reserved liquids into a fine paste.Note: For a crispier dosa, keep the batter slightly grainy instead of blending it completely smooth.
- Adjust the batter consistency by adding a little of the reserved liquids if needed. Use the soaking water instead of fresh water, as it helps with fermentation and gives better results in both flavour and texture.
- Leave the batter to ferment overnight in a warm place. Keep it warm by placing it in the oven with the heat turned off and covering it with thick towels.
- The next day, add salt and adjust the consistency with water or the reserved liquids until the batter is similar to a crêpe batter. Mix well and set aside.
Cooking the Dosas
- Spread the batter on a cold tawa or non-stick pan. Use a round cup to spread it in a circular motion to create a very thin layer, then turn the heat on. When small bubbles start forming, drizzle a little vegetable oil around the edges to help release the dosa.Note: A cold tawa helps spread the batter more evenly. A regular-sized tawa works well, even without professional tools. You can refer to the original recipe on Vahrehvah to see how dosas are traditionally made.
- Once the edges start to brown, fold the dosa into a half-moon, roll it into a cone, or leave it flat, depending on how you want to serve it.
- After making the first dosa, turn off the heat and cool the tawa with cold water. When the tawa is cold, make the next dosa.Note: Dosas don’t need to be flipped and are ready when cooked on one side.
- Transfer to a plate and serve warm with sambhar or coconut chutney.
Coconut Chutney
- Grind the coconut, green chilli, ginger, curry leaves, and salt with 1–2 tablespoons of water until slightly chunky or smooth, depending on your preference, then transfer to a bowl.
- Heat the vegetable oil in a small frying pan. Add the mustard seeds. When they start popping, add the cumin seeds and curry leaves and fry for about 30 seconds over medium heat, making sure they don’t burn.
- Pour the hot tempering over the chutney and mix well.
- Adjust the consistency with a little water if needed, mixing gently until you reach your preferred thickness.
- Serve with Dosa, idlis, or other Indian snacks.
Notes
- This recipe makes a large batch of batter, and half the quantity is enough for 4 people.
- About 6 hours are needed for soaking, followed by 8–12 hours for fermentation.
This post may contain affiliate links. If you make a purchase through these links, I may earn a small commission at no extra cost to you.


Coconut chutney is really awesome!
Oh wow. This is impressive!
I love crepes, knowing that a recipe can create even thinner and crisper crepes is a delight. The chutney is something I look forward to making as well.
Myfudo here…Normally we’d never put a shameless plug back to us, but we just launched our new site and we would love for you to be a part of it. I’d love to share our newest launch with you, I hope you don’t mind? Now that we are getting a new look…Myfudo is moving to a new domain http://www.yumgoggle.com This has been a project we have been working on for almost a year now. We just launched our new gallery submission site, and we are just thrilled. We’d be proud to have your work as part of our growing collection to continue to have a larger reach and further inspire all fellow food lovers out there! Please sign up and check us out (it’s free) http://www.yumgoggle.com/gallery
We look forward to seeing your wonderful pictures, as always.
p.s. We are hosting a Kitchen Aid Mixer Giveaway to celebrate our new Yumgoggle site, we hope you’ll participate =)
http://www.yumgoggle.com/japanese-cuisine-japanese-spinach-side-dish-horenso-no-ohitashi-kitchenaid-mixer-giveaway/
Now: the coconut chutney I shall make without fail! Absolutely love dosas, but need a quiet [!!!!!] wet weekend with no distractions to dare try to make them myself! Not that they sound difficult, just different – but, am game methinks? Then a last minute invite to neighbours: ‘I’ve got homemade dosas, you bring the wine’ 🙂 !
I agree that the dosas look great wrapped into a cone. We are so used to making crepes with flour that it doesn’t occur to us that other cultures create the same effect with completely different ingredients.
Aww! This pretty post I love! Yes, this is the coconut dip I mentioned that time. I shall make my own dosas, masala dosas with the yummy dipping sauce! Tks Manu, for sharing this post! Looking forward to your next post! 😉
*Is the fermented smell very strong? I hope not, or rather, I hope the smell is pleasantly fermented. Hee…. 😛
Hahahaha the smell is not that bad (not very strong either)! Let me know when you make them! 🙂
Ok I’ll let you know how my turns out when I make them. Tks so Manu! 🙂